LucrativeIt Digital Download and Licensing
Installation, configuration, and user guide for store owners
Introduction
LucrativeIt Digital Download and Licensing is a standalone WordPress plugin for selling digital products such as eBooks, templates, themes, and plugins. It supports lifetime, monthly, and yearly licenses, and takes payment through Stripe or Paddle.
After a successful payment, the plugin issues a license key, emails the customer a secure download link that expires, and blocks downloads once a subscription lapses. Card details are entered on Stripe or Paddle's hosted checkout, so they never touch your WordPress server. WooCommerce is not required.
Quick start: Install and activate the plugin, choose Stripe or Paddle under Digital Licensing → Settings → Payments, paste your API keys and add the webhook, configure SMTP, then create your first product with Add Product. The shop, cart, checkout, and account pages are created for you automatically.
Key features
- Lifetime (one-time), yearly, and monthly billing plans on the same product
- Automatic license key generation and expiry tracking
- Private file vault: product files are never stored in the public Media Library
- Signed, time-limited download links
- Stripe Checkout or Paddle Billing, with webhook-verified fulfilment
- Coupons with percentage or fixed discounts, usage limits, and minimum order amounts
- Product categories, tags, and Featured / Popular / Trendy showcases
- Full block editor (Gutenberg) or Elementor for product descriptions
- Customer account area with orders, downloads, and profile
- Optional emails to existing buyers when you release a new product version
- Built-in SMTP and an editable license delivery email
System Requirements
| Requirement | Details |
|---|---|
| WordPress | 6.0 or higher (tested up to 7.1) |
| PHP | 7.4 or higher |
| HTTPS | Required in production so Stripe and Paddle can deliver webhooks |
| Payment account | A Stripe or Paddle account (test/sandbox mode works for setup) |
| Permalinks | Any setting other than "Plain" so the REST webhook URLs resolve |
| Upload size | Product files up to 64 MB through the uploader (limited by your PHP upload_max_filesize and post_max_size) |
| An SMTP provider is recommended so license emails reach customers reliably |
Installation
Installation takes a few minutes and does not need SSH access.
-
Upload the plugin
In WordPress, go to Plugins → Add New → Upload Plugin, choose the plugin ZIP file, and click Install Now.
You can also extract the ZIP and upload the
lucrativeit-digital-download-and-licensingfolder to/wp-content/plugins/over FTP. -
Activate
Click Activate Plugin. A new Digital Licensing menu appears in the admin sidebar.
On activation the plugin creates four storefront pages: Digital Shop, My Cart, Digital Checkout, and My Digital Account. It also adds sample products so you can see how the store looks. Delete or replace them when you start selling.
-
Connect a payment gateway
Open Digital Licensing → Settings → Payments, choose Stripe or Paddle, enter your keys, and create the webhook endpoint as described in Payments & Webhooks.
-
Create your first product
Click + Add Product and follow the four-step wizard: Details, Pricing, Product details, and File & Publish.
Post-Installation Checklist
- Choose the active payment gateway and currency under Settings → Payments
- Add the Stripe or Paddle webhook and paste its signing secret
- Configure and test SMTP under Settings → SMTP
- Review the license delivery email under Settings → Email template
- Confirm the storefront pages under Settings → Storefront
- Pick a storefront theme and accent colour under Settings → Design
- Remove the sample products and add your own
- Place a test order in Stripe test mode or Paddle sandbox before going live
- Update your store's terms and privacy policy to mention Stripe or Paddle
Settings
All configuration lives under Digital Licensing → Settings, split into five tabs: Payments, SMTP, Email template, Storefront, and Design.
Payments & Webhooks
The General panel controls store-wide payment behaviour:
| Setting | Description |
|---|---|
| Active payment gateway | Stripe or Paddle. Only one gateway is active at a time. |
| Currency | Three-letter currency code, for example USD. |
| Download link lifetime (hours) | How long a signed download link stays valid. The default is 24 hours. Customers can always get a fresh link from their account. |
| Download tracking | Off by default. When enabled, records the license ID, product ID, and download time for dashboard statistics. IP addresses are not collected. |
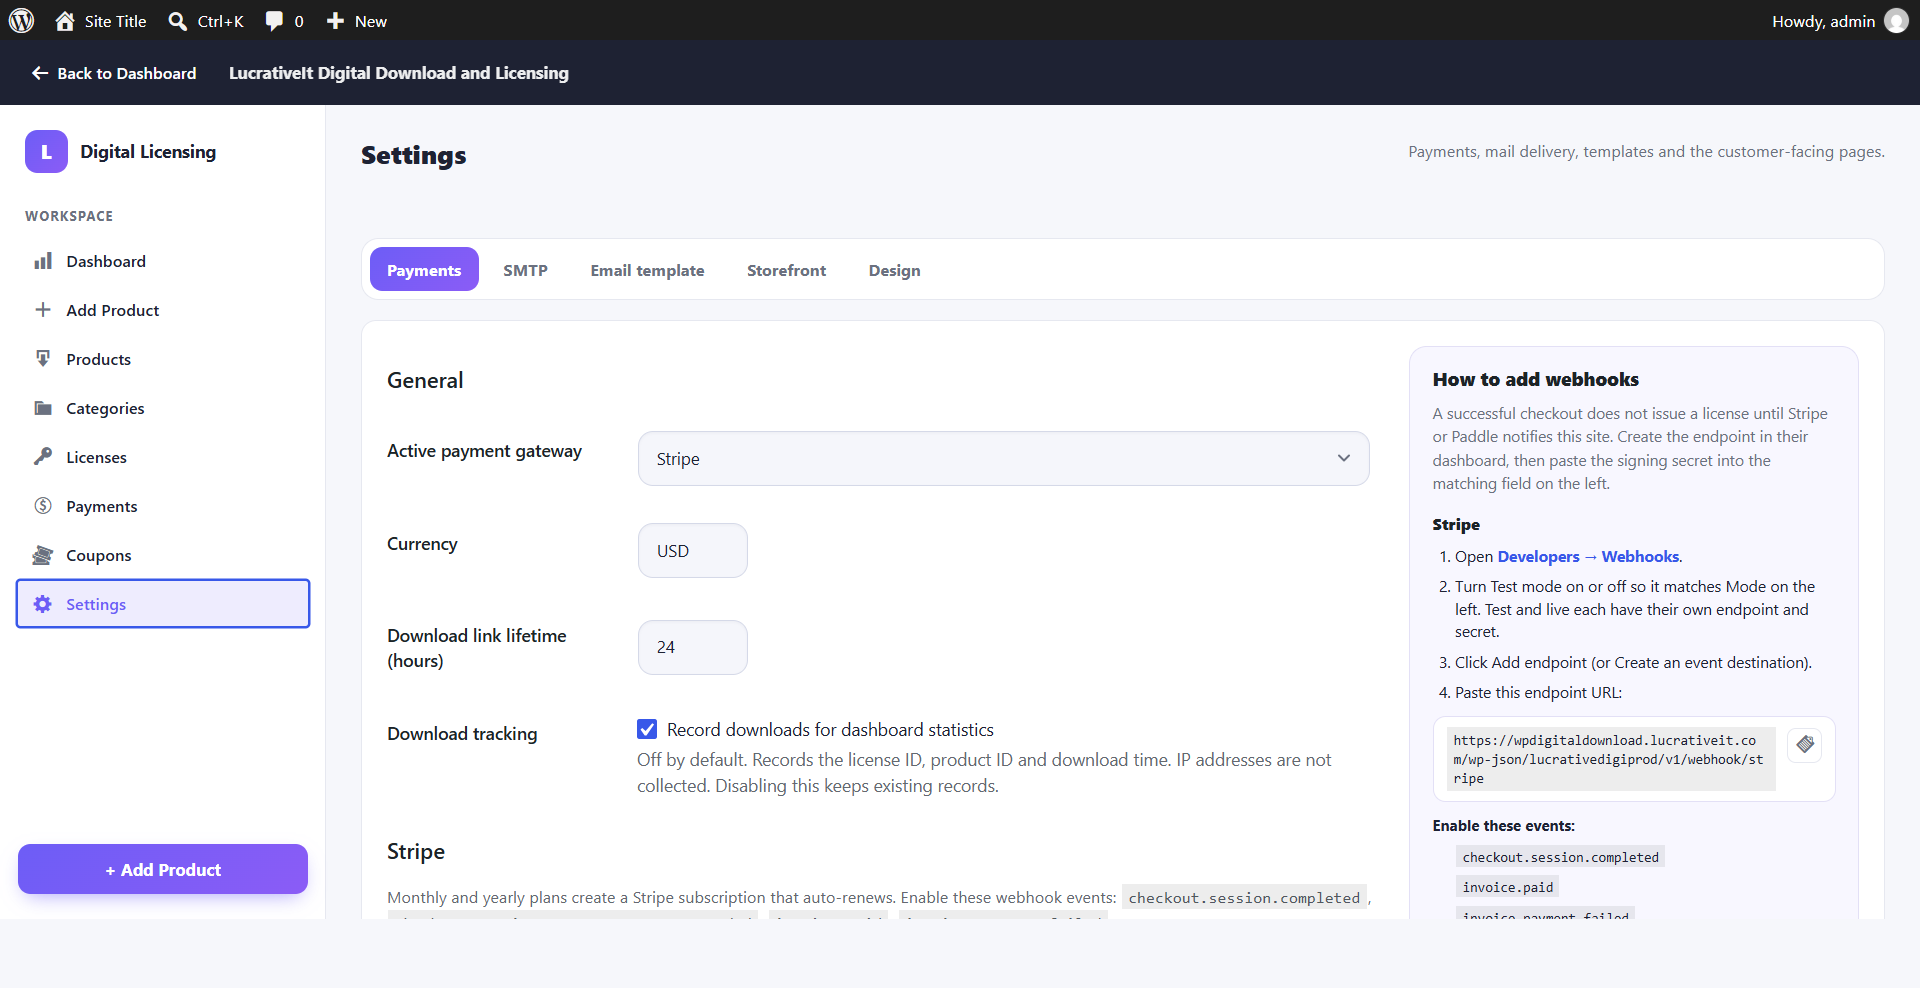
Stripe: Select Test or Live mode, then paste the matching secret key and the webhook signing secret (whsec_…). Monthly and yearly plans create a Stripe subscription that renews automatically.
Paddle: Select Sandbox or Live, then paste your API key, client-side token, and webhook secret. Paddle acts as the merchant of record and handles tax.
Create the webhook in your gateway dashboard using the URL shown on the settings screen, and enable these events:
| Gateway | Endpoint URL | Events to enable |
|---|---|---|
| Stripe Developers → Webhooks |
https://yoursite.com/wp-json/lucrativedigiprod/v1/webhook/stripe |
checkout.session.completedcheckout.session.async_payment_succeededinvoice.paidinvoice.payment_failedcustomer.subscription.deleted |
| Paddle Developer Tools → Notifications |
https://yoursite.com/wp-json/lucrativedigiprod/v1/webhook/paddle |
transaction.completedsubscription.canceledsubscription.past_due |
Test and live modes each have their own endpoint and signing secret in Stripe. Make sure the mode in your Stripe dashboard matches the mode selected in the plugin.
SMTP
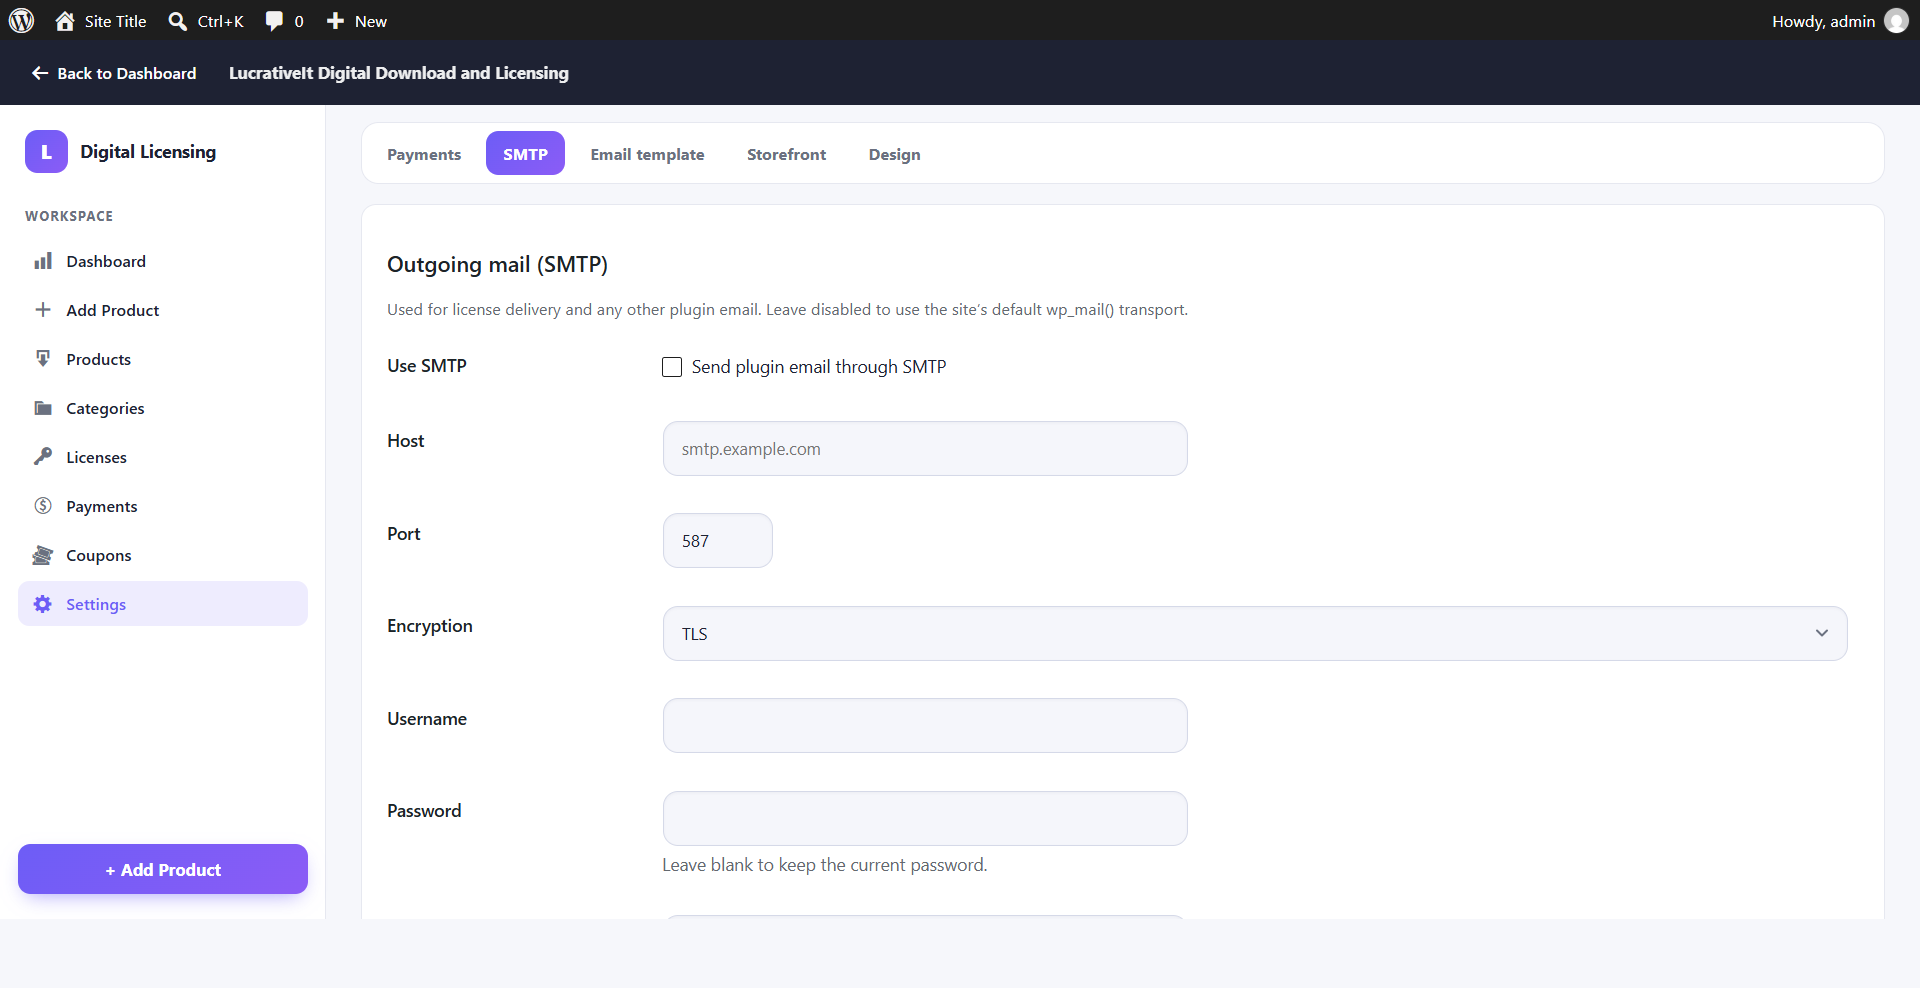
By default, plugin emails go through WordPress's wp_mail(), which many hosts deliver poorly. Enable Send plugin email through SMTP and enter your provider's host, port, encryption (TLS or SSL), username, and password. Gmail (with an App Password), Amazon SES, SendGrid, Mailgun, and any standard SMTP server all work.
Leave the password field blank when saving to keep the stored password. Use the test email button to confirm delivery before you start selling.
Email Template
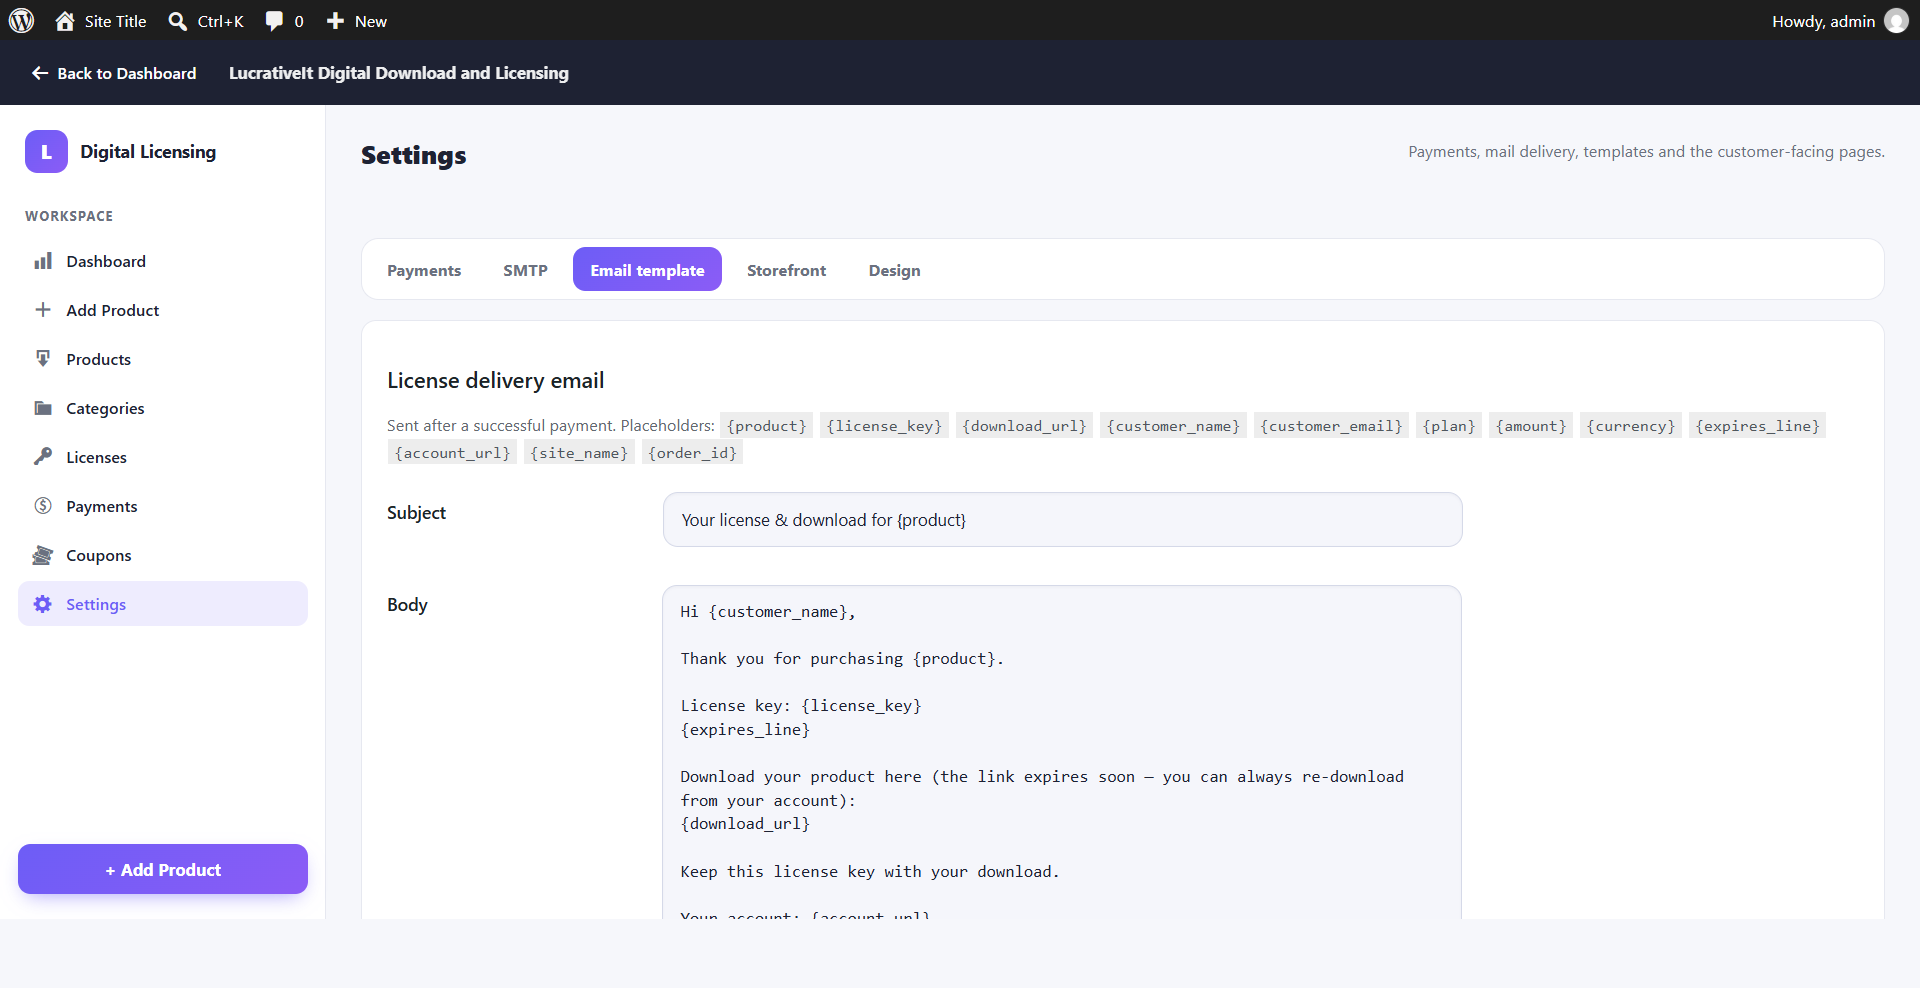
The License delivery email is sent after every successful payment. You can edit its subject and body, using these placeholders:
| Placeholder | Replaced with |
|---|---|
{product} | Product title |
{license_key} | The customer's license key |
{download_url} | Signed, expiring download link |
{customer_name} / {customer_email} | Buyer's name and email |
{plan} | Lifetime, yearly, or monthly |
{amount} / {currency} | Amount paid and currency |
{expires_line} | Expiry date line for subscriptions (empty for lifetime) |
{account_url} | Link to the My Digital Account page |
{site_name} / {order_id} | Your site name and the order number |
Storefront Pages
The plugin creates its storefront pages on activation. On this tab you can assign a different page to each role or recreate a page if it was deleted. Each page must contain its matching shortcode:
| Page | Default URL | Shortcode |
|---|---|---|
| Digital Shop | /digital-shop/ | [lucrativedigiprod_products] |
| My Cart | /my-cart/ | [lucrativedigiprod_cart] |
| Digital Checkout | /digital-checkout/ | [lucrativedigiprod_checkout] |
| My Digital Account | /my-digital-account/ | [lucrativedigiprod_account] |
[lucrativedigiprod_checkout].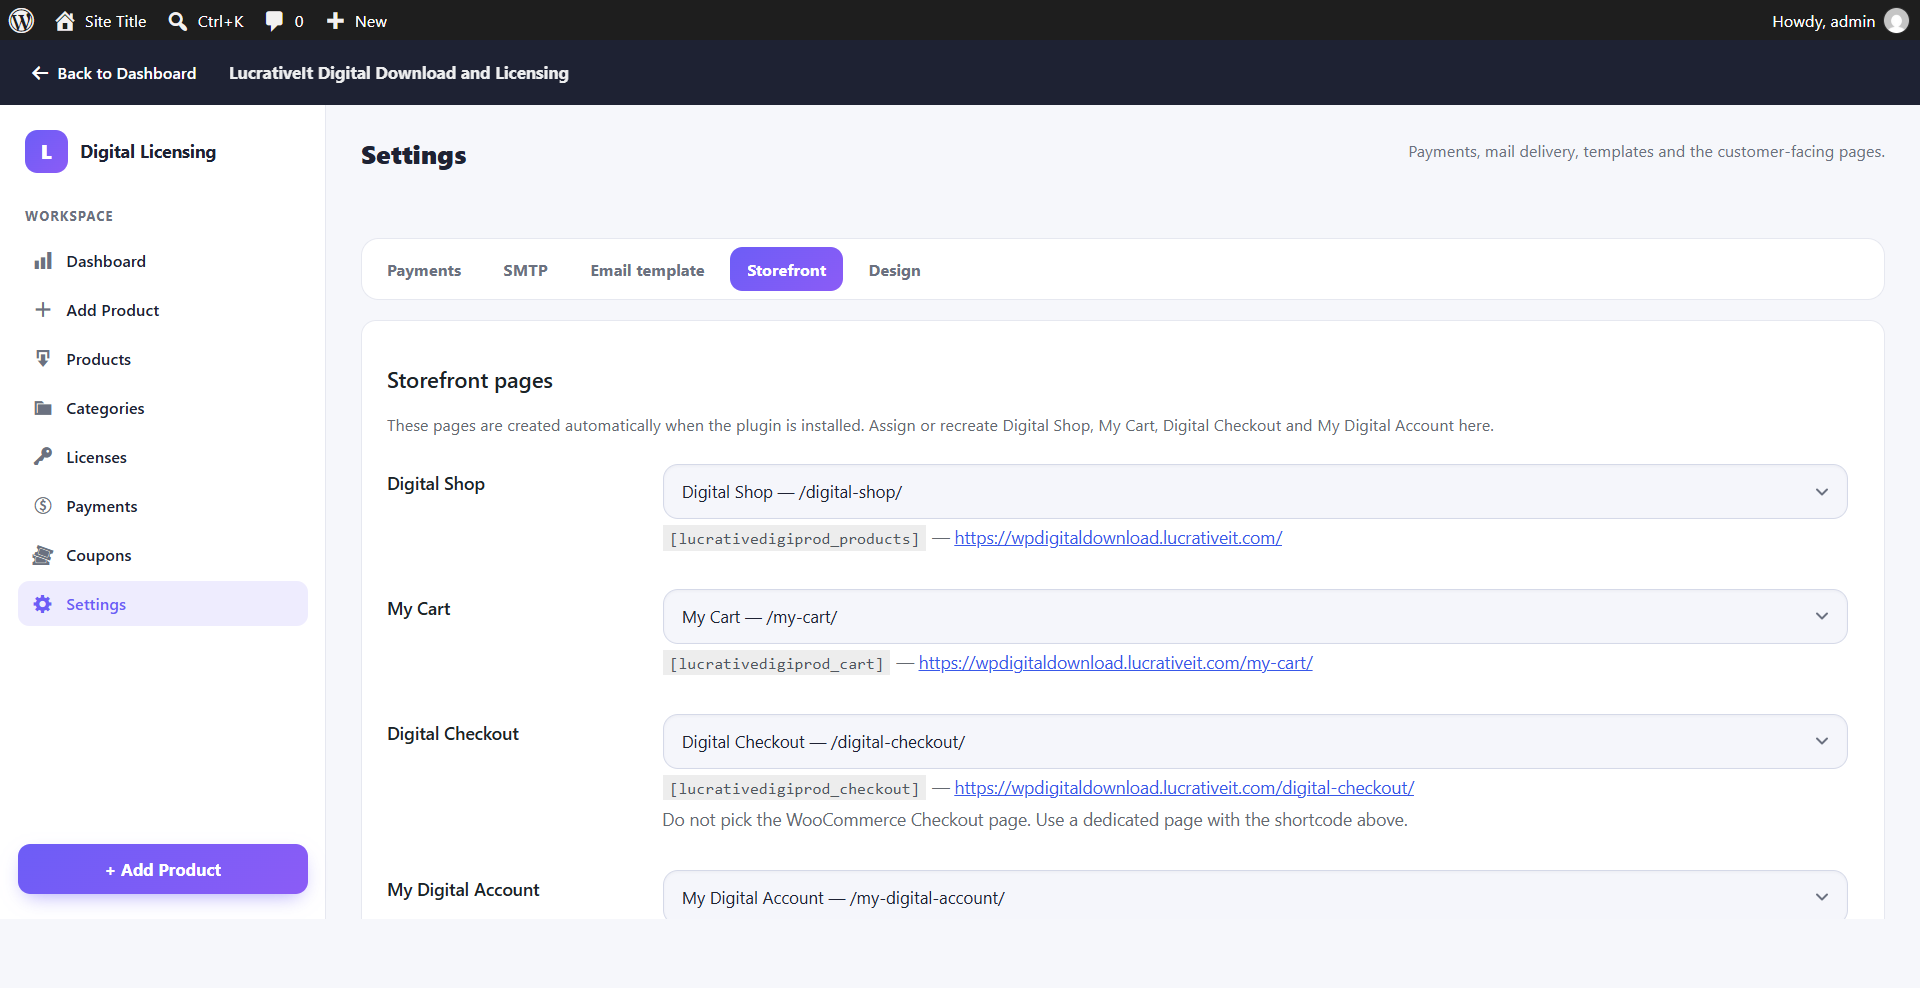
Design
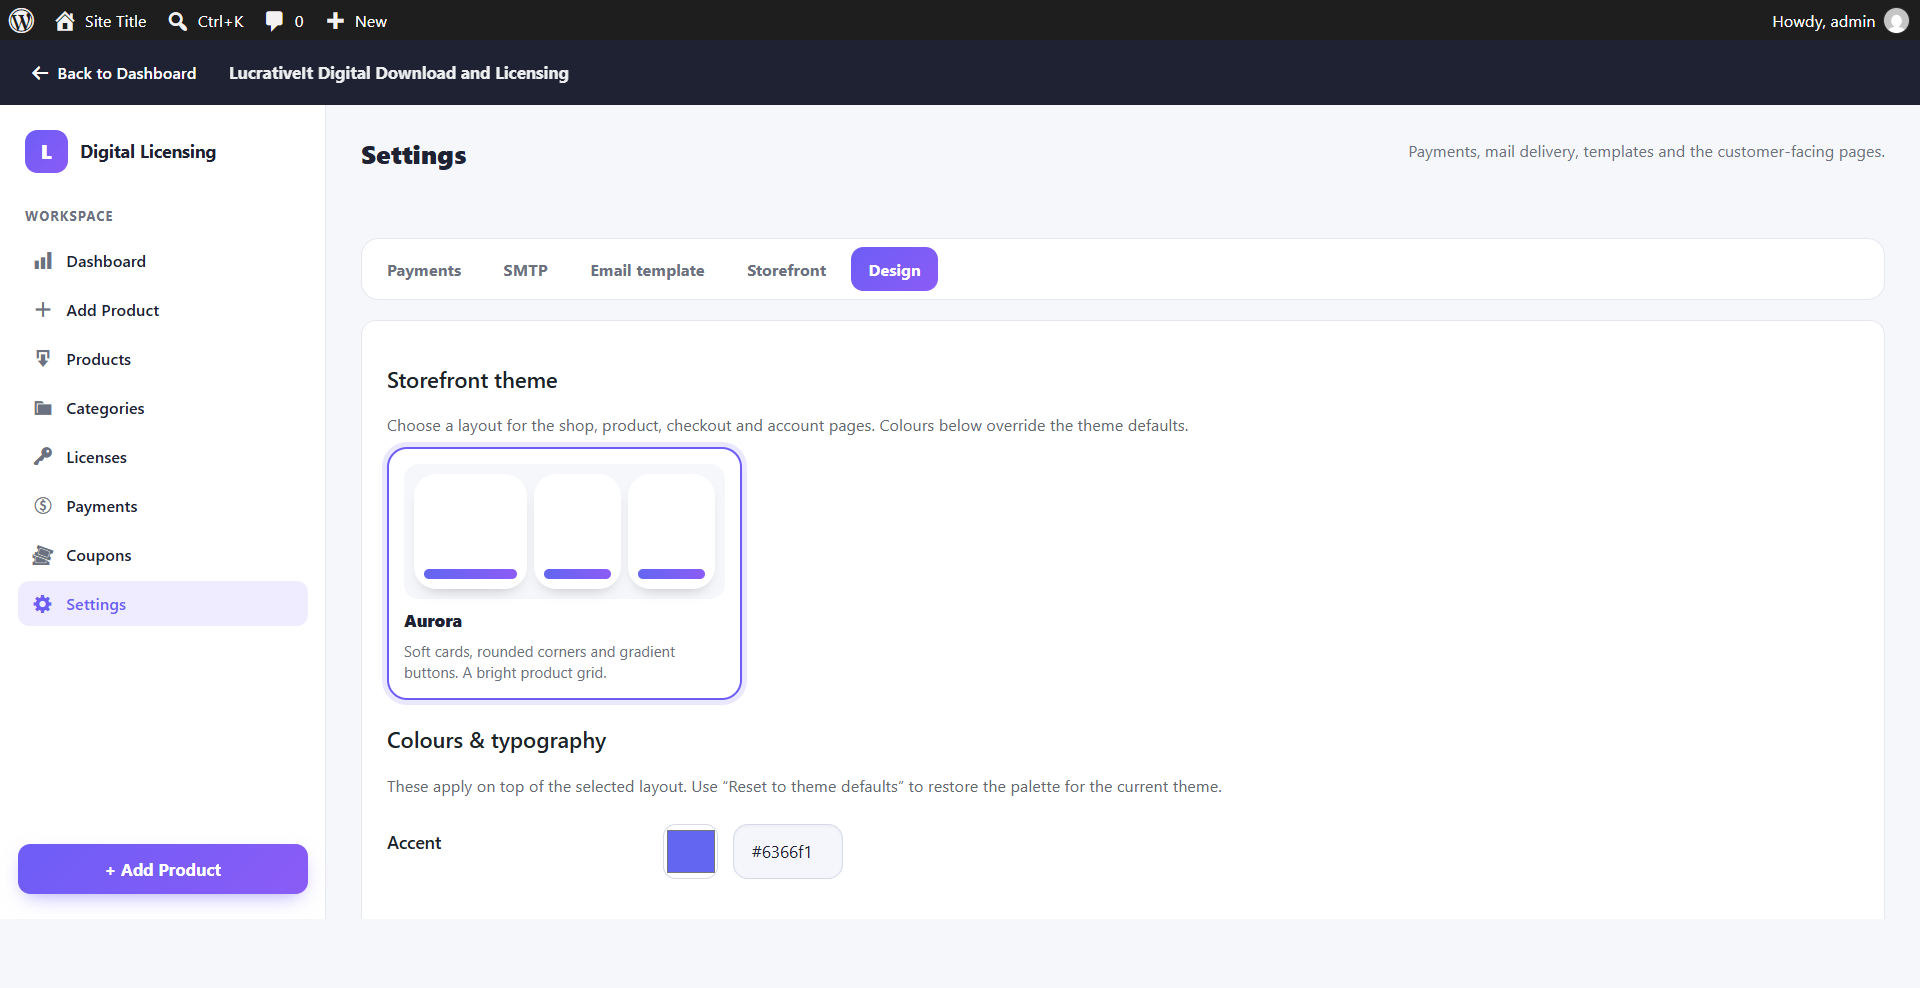
Choose a storefront theme that controls the layout of the shop, product, checkout, and account pages. The default theme, Aurora, uses soft cards, rounded corners, and gradient buttons.
Under Colours & typography you can override the accent colour and other palette values on top of the selected theme. Click Reset to theme defaults to restore the theme's original palette.
Admin Guide
Everything you need to run the store is in the Digital Licensing workspace: Dashboard, Add Product, Products, Categories, Licenses, Payments, Coupons, and Settings.
Dashboard
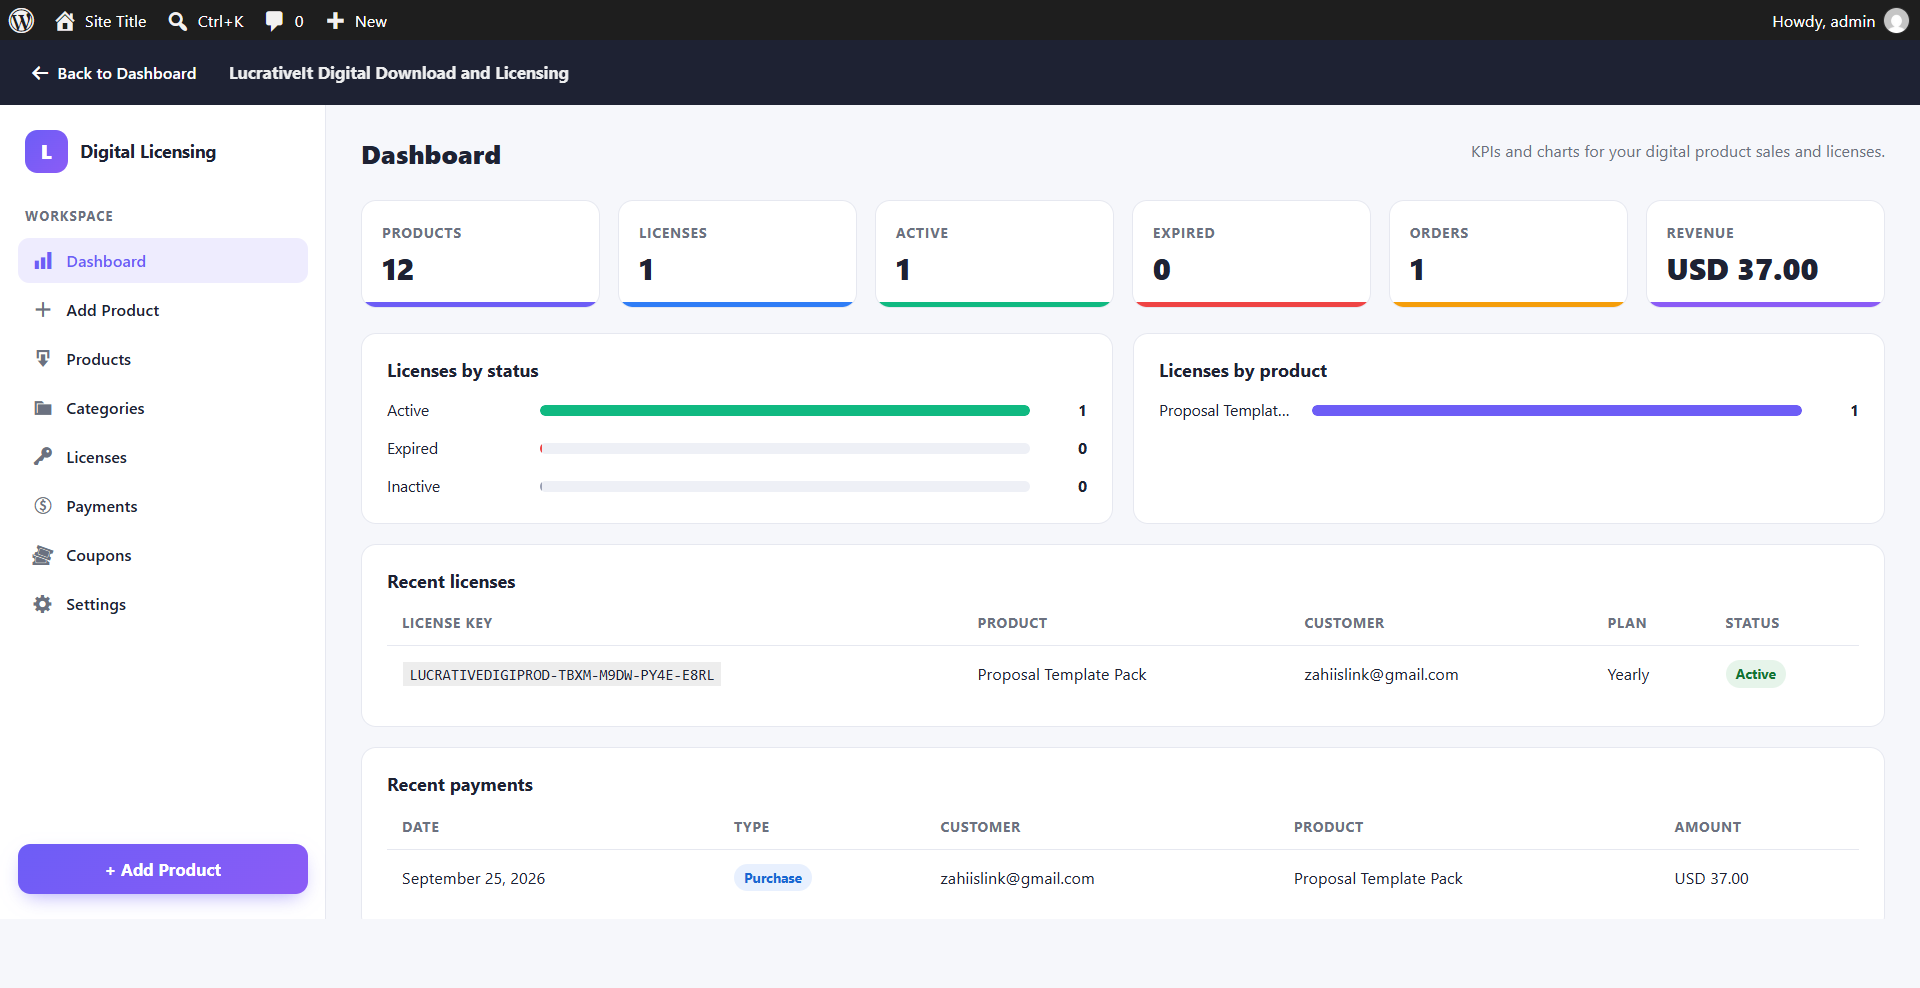
The dashboard summarises your store at a glance: total products, licenses issued, active and expired licenses, orders, and revenue. Below the totals are charts of licenses by status and by product, followed by the most recent licenses and payments.
Products
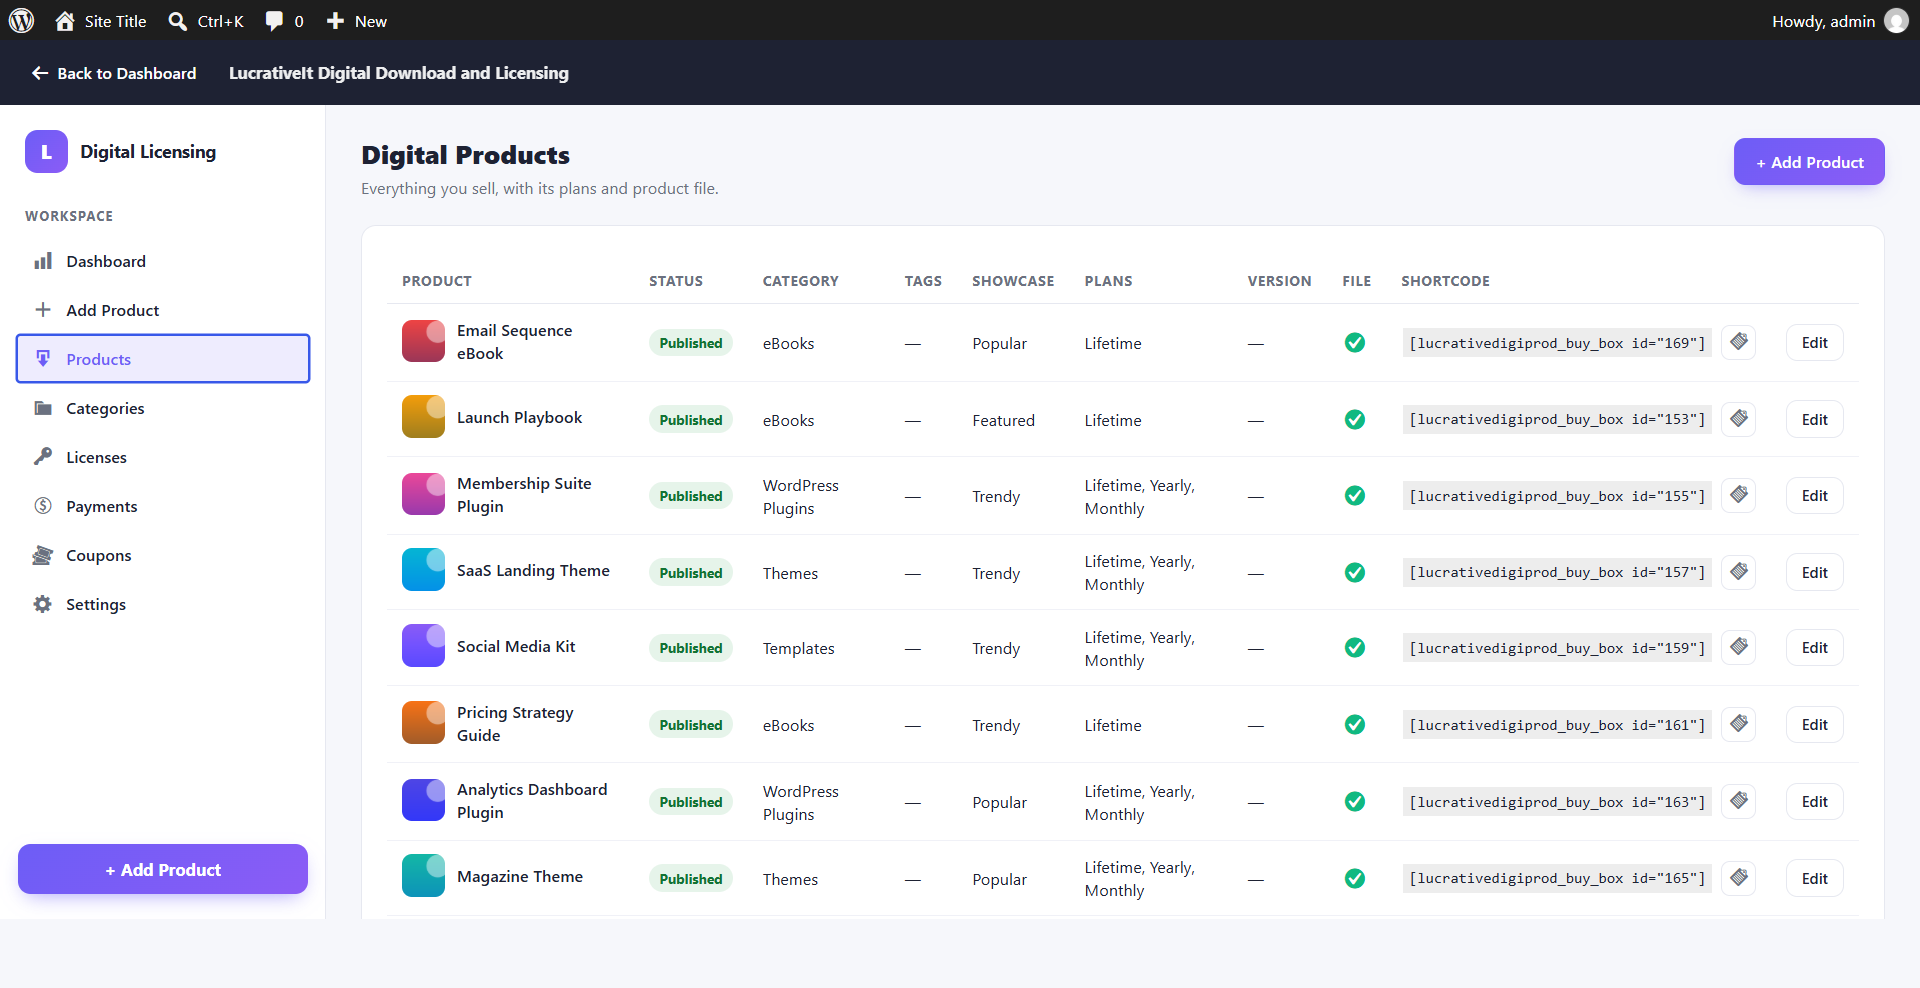
The Products screen lists everything you sell, with each product's status, category, tags, showcase label, billing plans, version, and whether a file is attached. Every row includes a ready-made [lucrativedigiprod_buy_box id="…"] shortcode with a copy button, so you can place that product's pricing on any page. Click Edit to reopen the product wizard.
Add / Edit Product
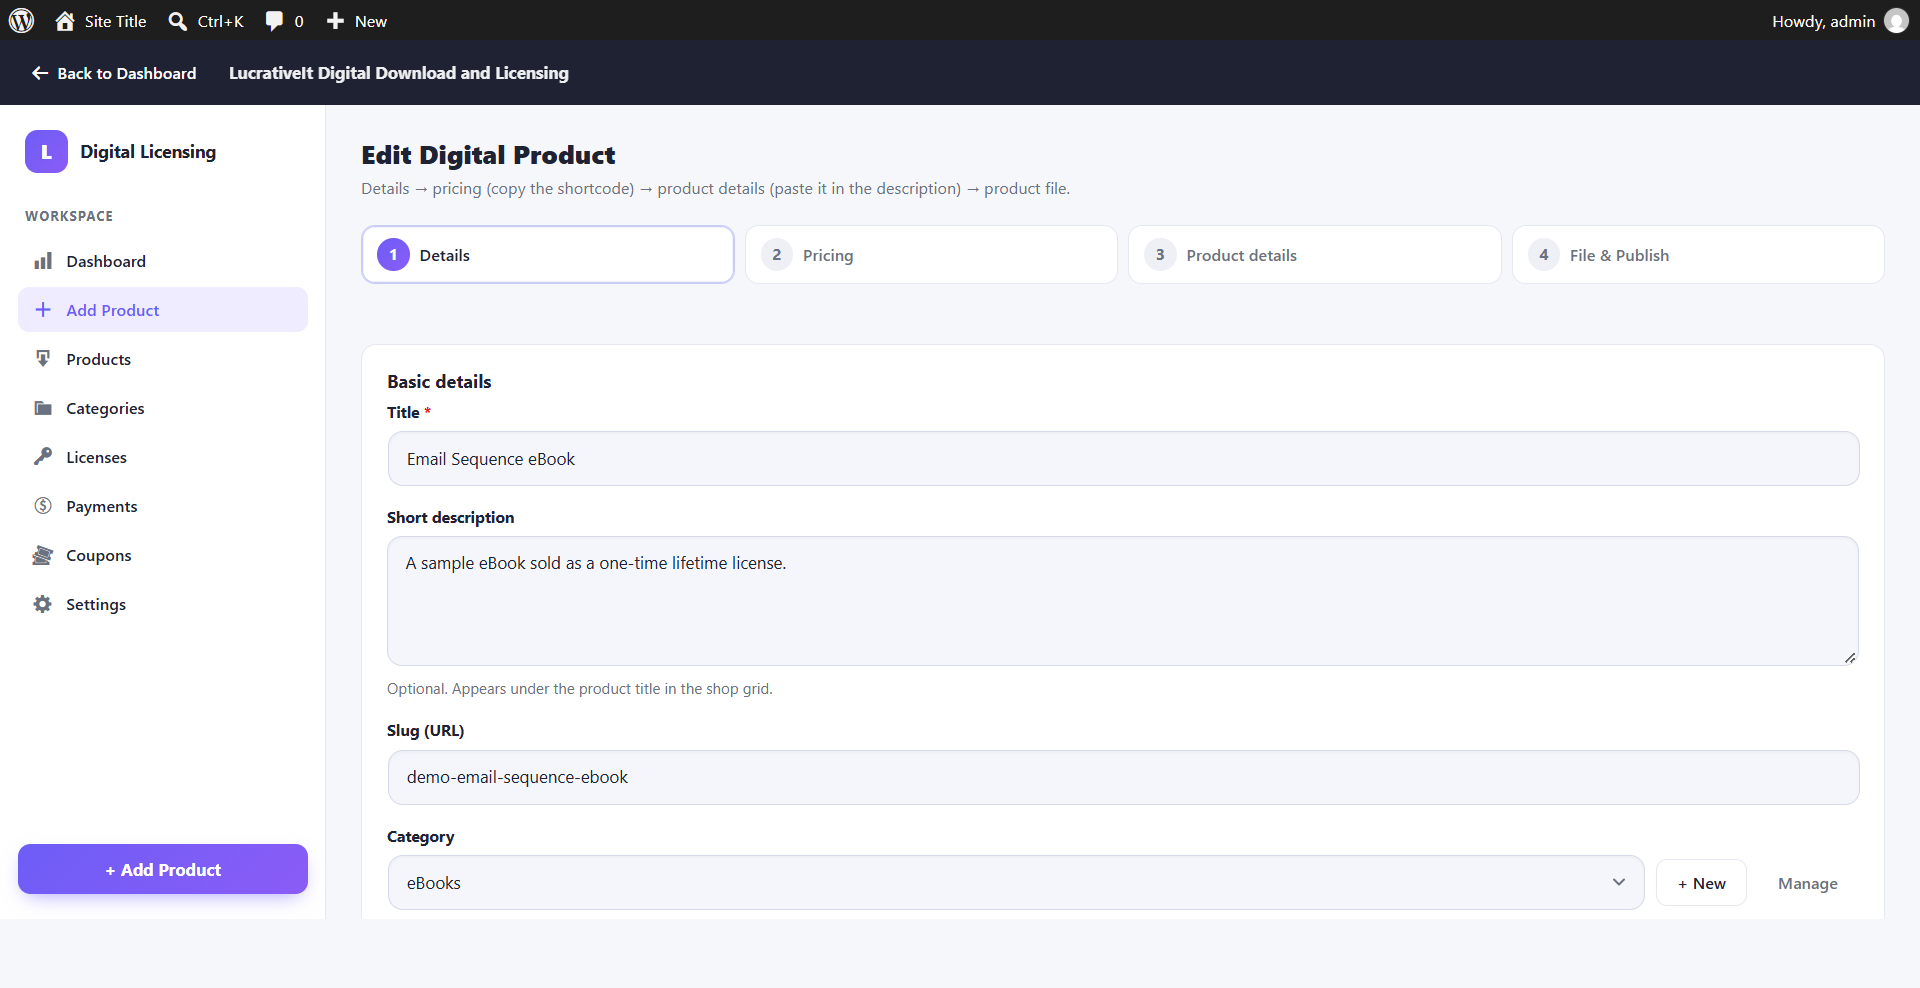
Products are created with a four-step wizard. Your progress is shown across the top, and you can jump back to any step.
-
Details
Enter the product title, an optional short description (shown under the title in the shop grid), the URL slug, and the category. Use + New to create a category without leaving the wizard. You can also add tags and a showcase label (Featured, Popular, or Trendy) here.
-
Pricing
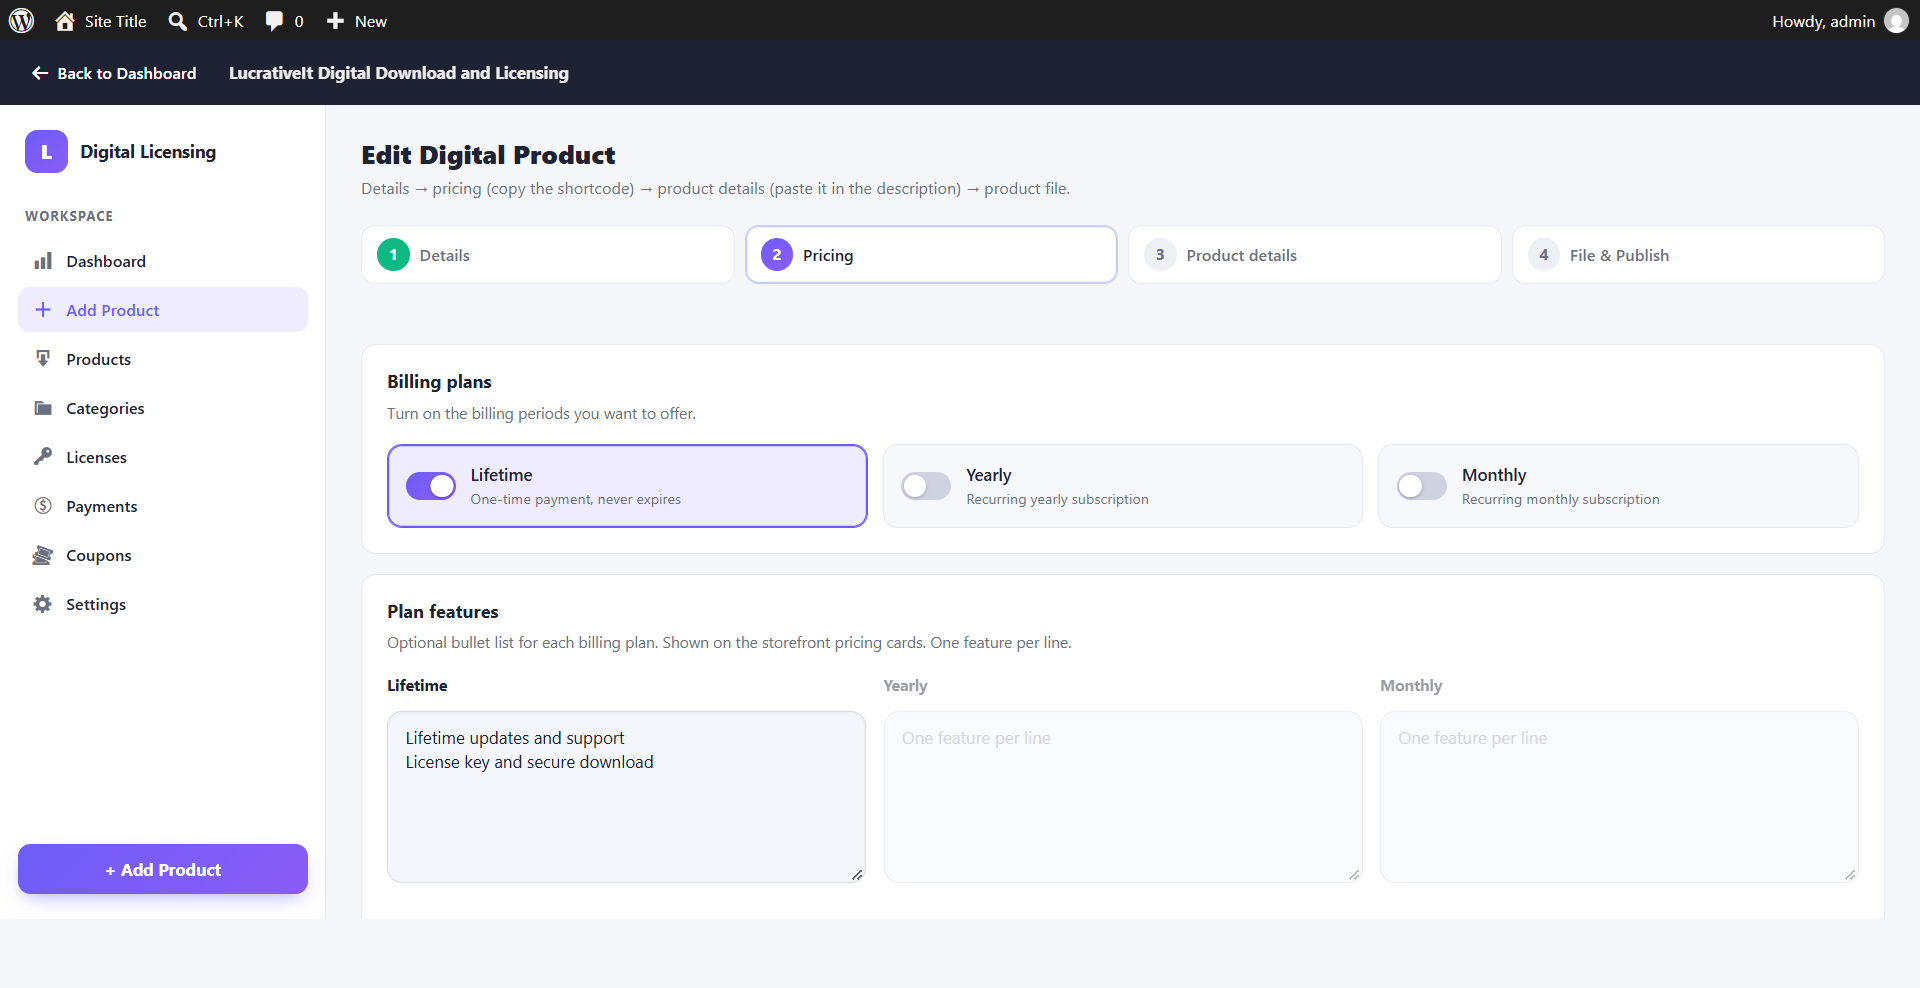
Turn on the billing plans you want to offer: Lifetime (one-time payment that never expires), Yearly, and/or Monthly (recurring subscriptions). Set a price for each enabled plan. Under Plan features, list one feature per line for each plan; these appear as bullet points on the storefront pricing cards. Copy the price plan shortcode shown on this step, because you will paste it into the description next.
-
Product details
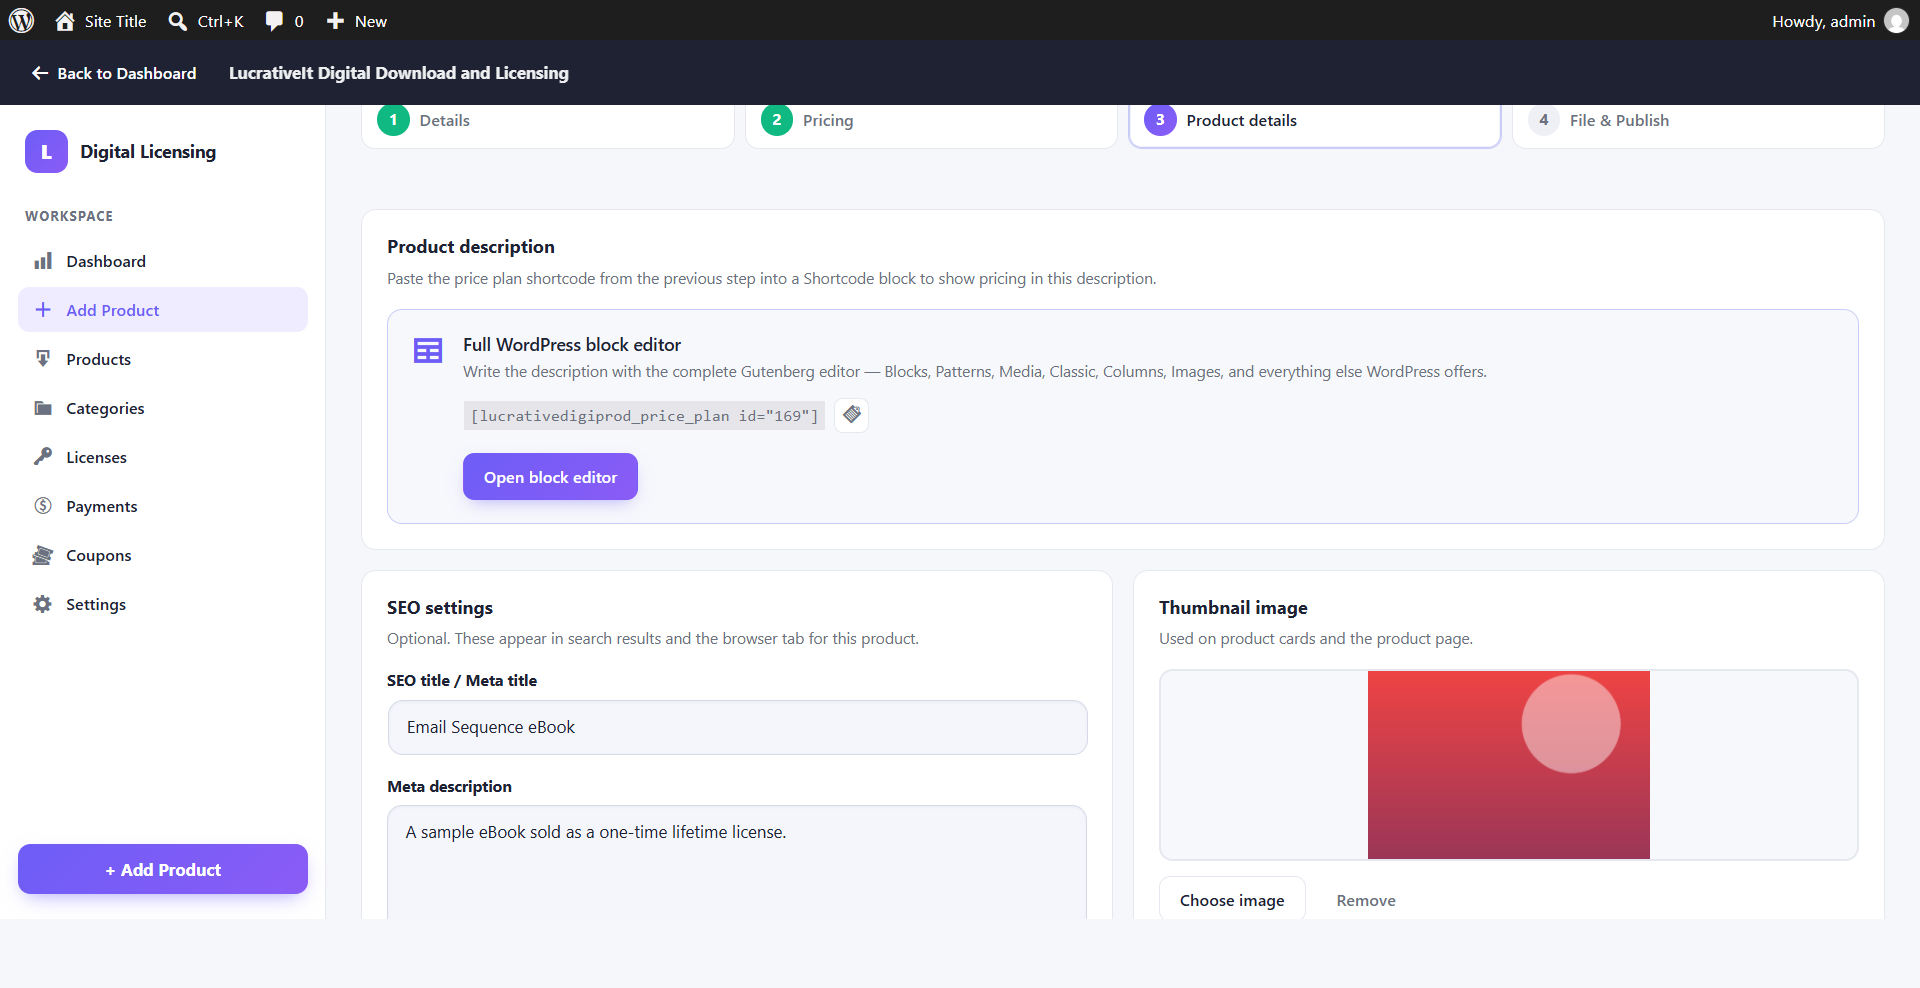
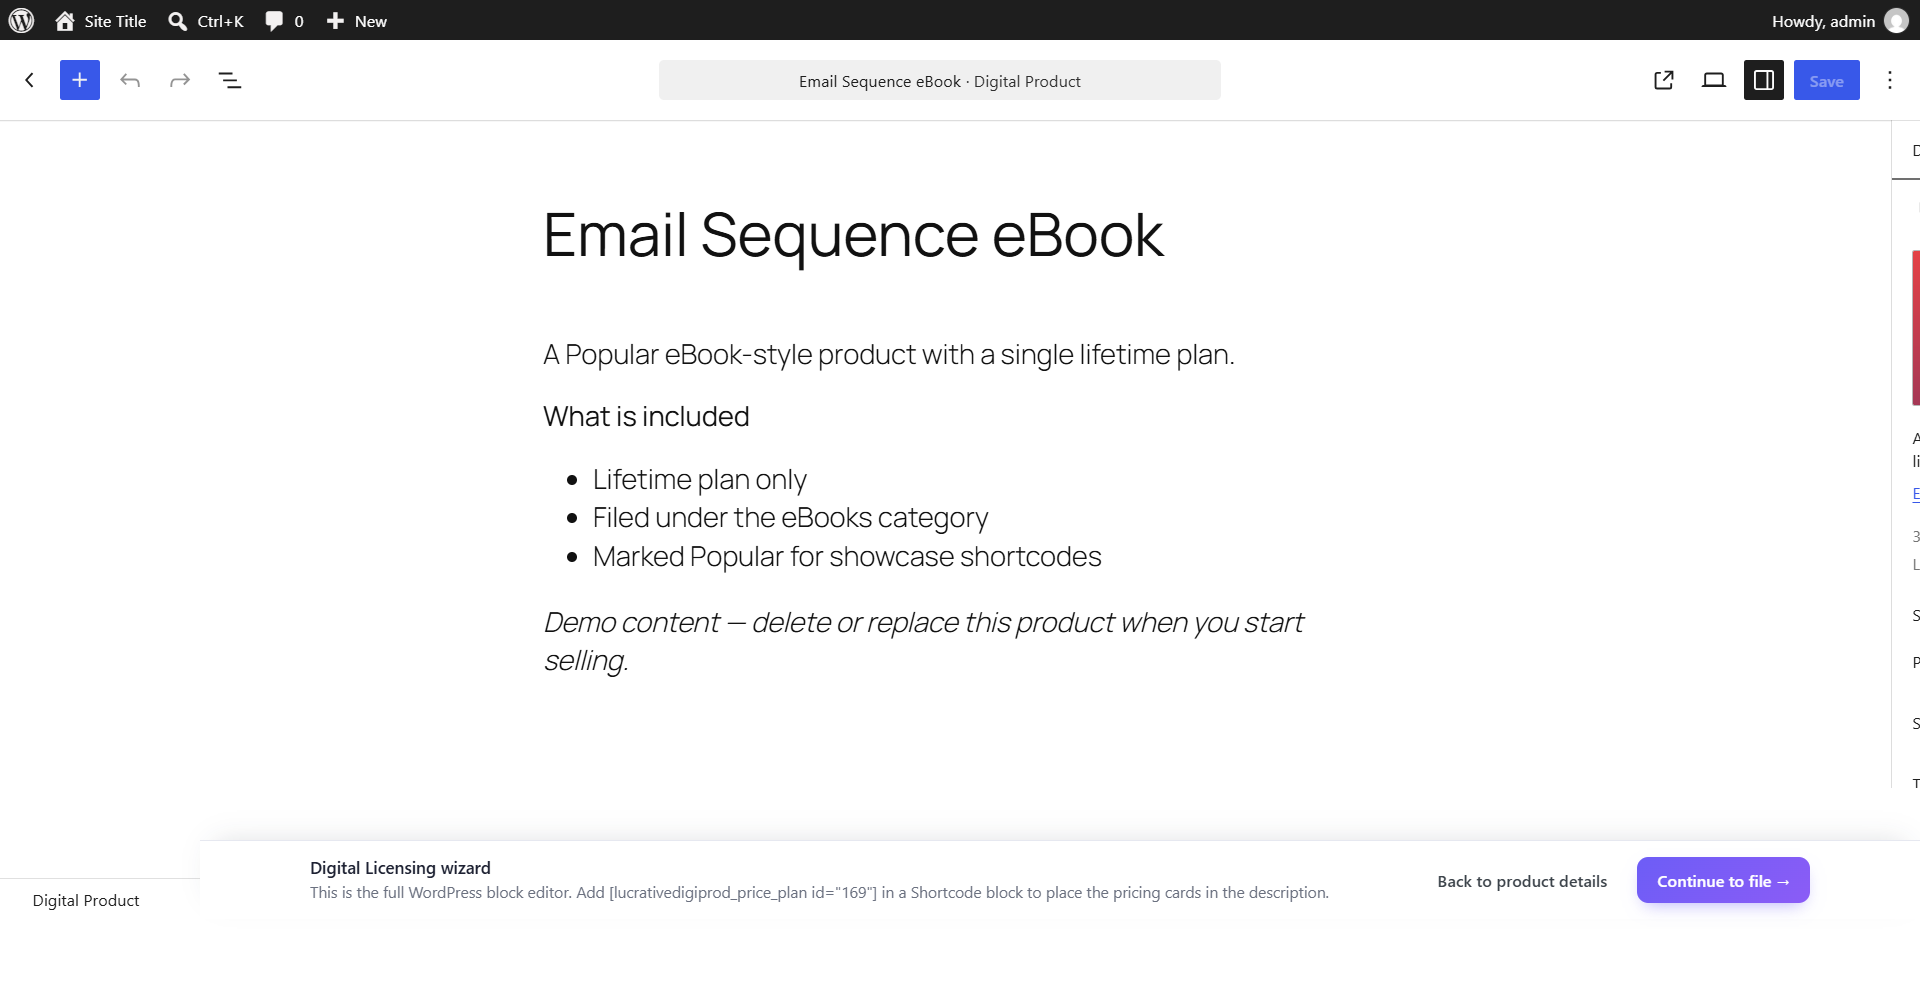
Click Open block editor to write the full description with the WordPress block editor (or Elementor, if you use it). Paste the
[lucrativedigiprod_price_plan id="…"]shortcode into a Shortcode block where you want the pricing cards to appear. On the same step, fill in the optional SEO title and meta description, and choose a thumbnail image for product cards and the product page. -
File & Publish
Drag and drop the product file onto the upload area, or click Browse files. Files up to 64 MB are uploaded into a private, protected vault, never the public Media Library. Set the current version and publish the product.
version.png)
Releasing a New Version
When you improve a product, you can notify everyone who bought it:
- Open the product and go to File & Publish.
- Upload the new file and raise the Current version number.
- Optionally write a changelog, plus a subject and message for the customer update email.
- Check Email purchasers when I click Update product, then click Update product.
Only customers with an active, unexpired license are emailed, and each customer receives one email per version. The update email supports these placeholders: {product}, {version}, {customer_email}, {license_key}, {download_url}, {account_url}, and {changelog}.
This works for any kind of product, including HTML templates, PDFs, eBooks, and PHP scripts. It sends an email with a download link; it does not register native WordPress plugin updates.
Categories
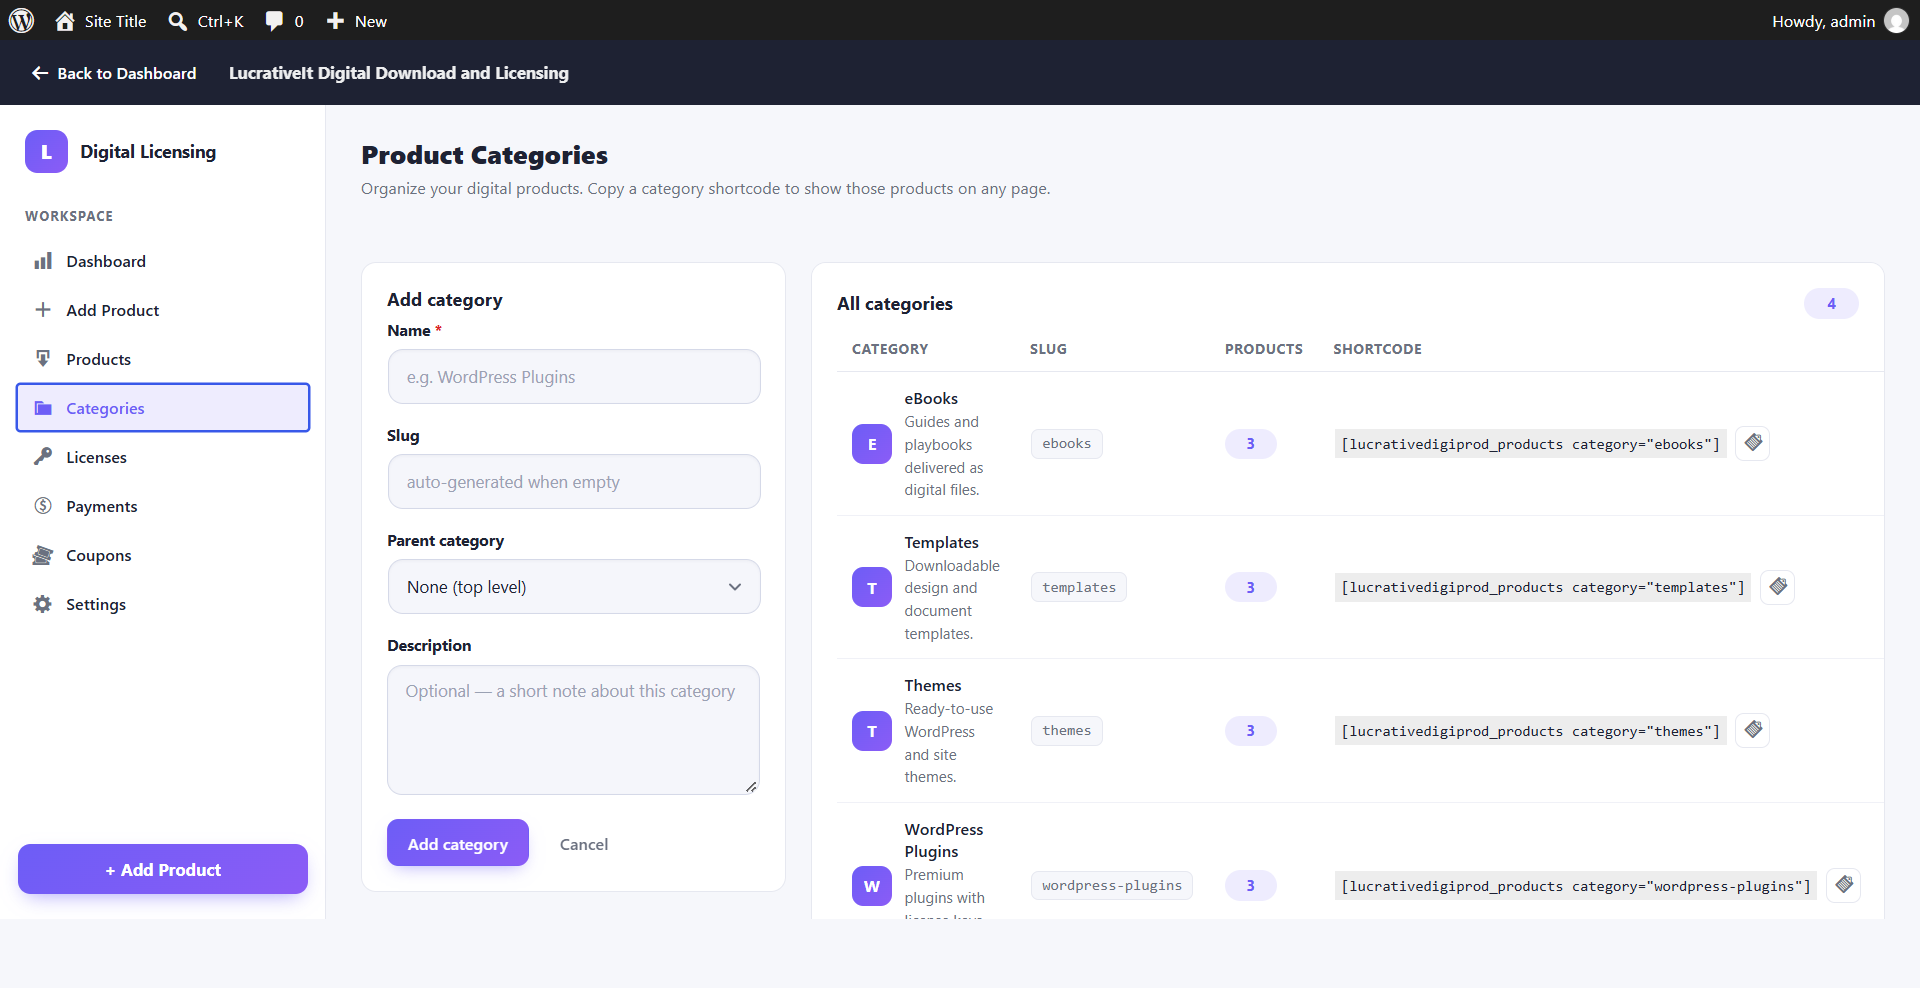
Organise products into categories under Categories. Enter a name, an optional slug (generated automatically if left empty), an optional parent category, and a description. The list on the right shows each category's product count and a copyable shortcode, such as [lucrativedigiprod_products category="ebooks"], that displays only that category's products on any page.
Licenses
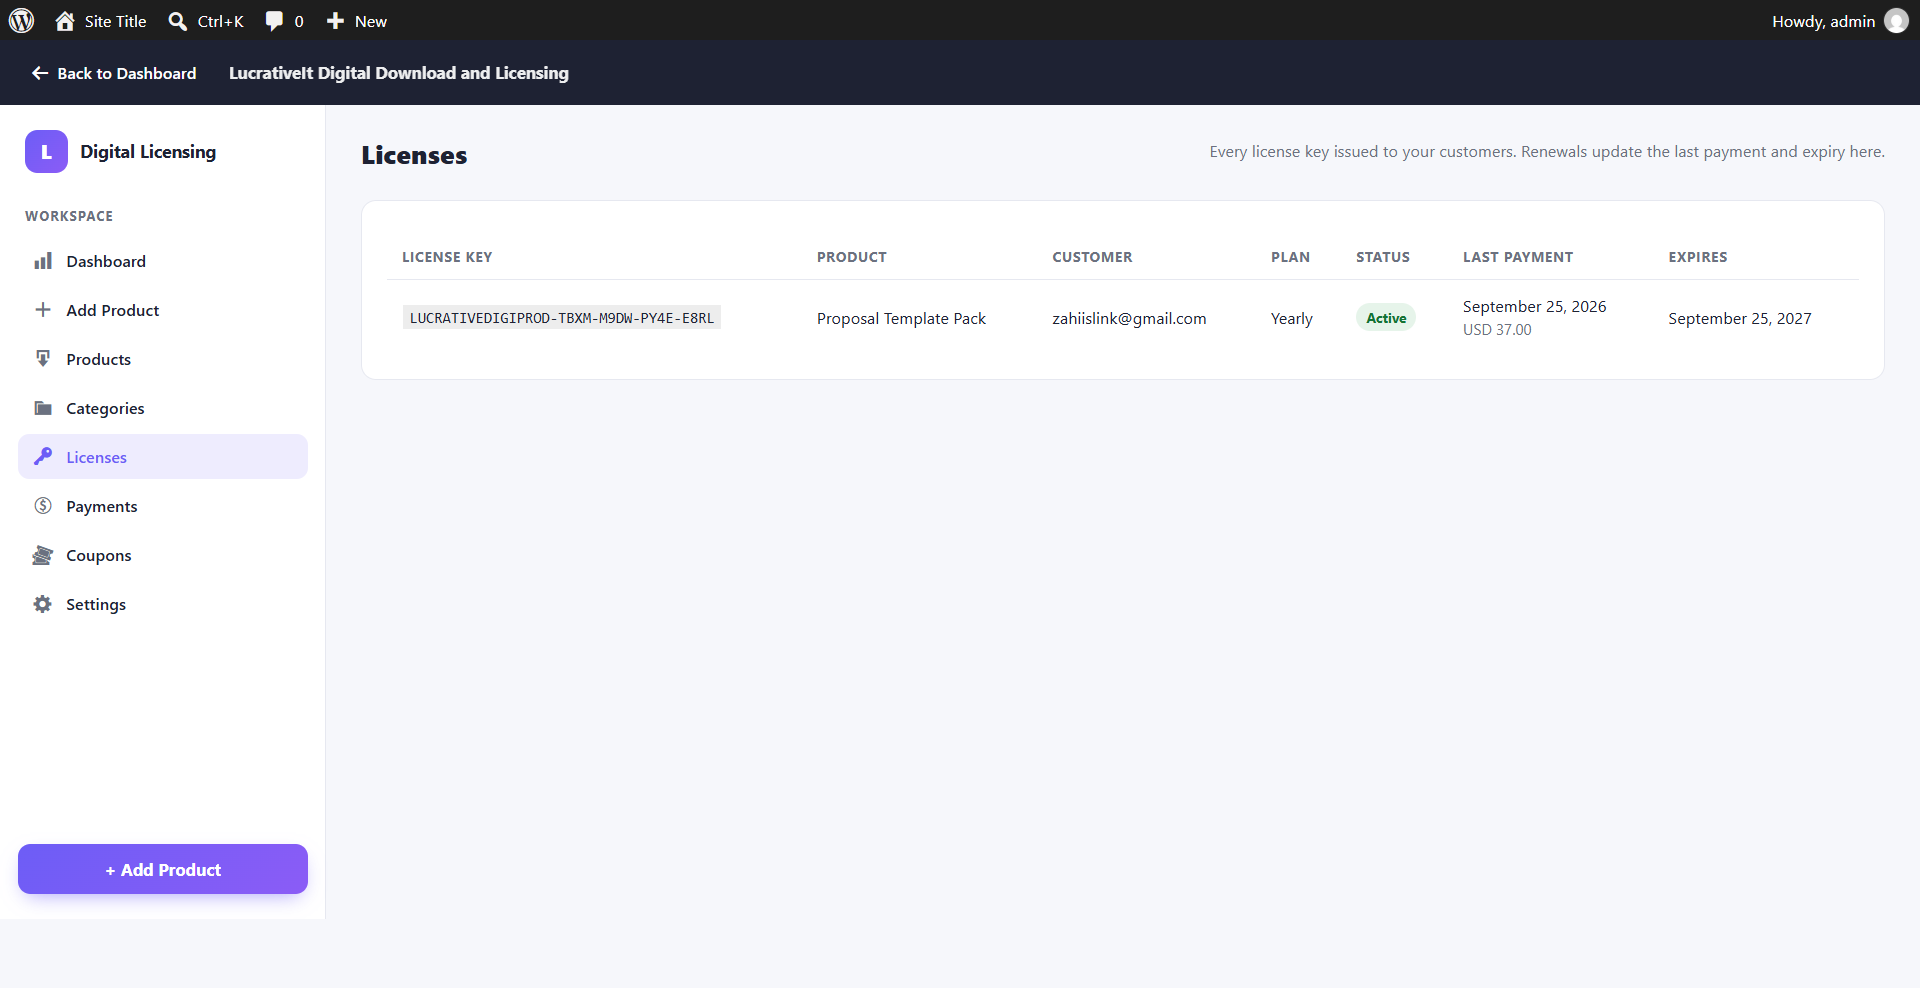
The Licenses screen lists every license key issued, along with the product, customer email, plan, status (Active, Expired, or Inactive), last payment, and expiry date. When a subscription renews, its last payment and expiry date update automatically. When a subscription is cancelled or a renewal fails, the license stops allowing downloads.
Payments
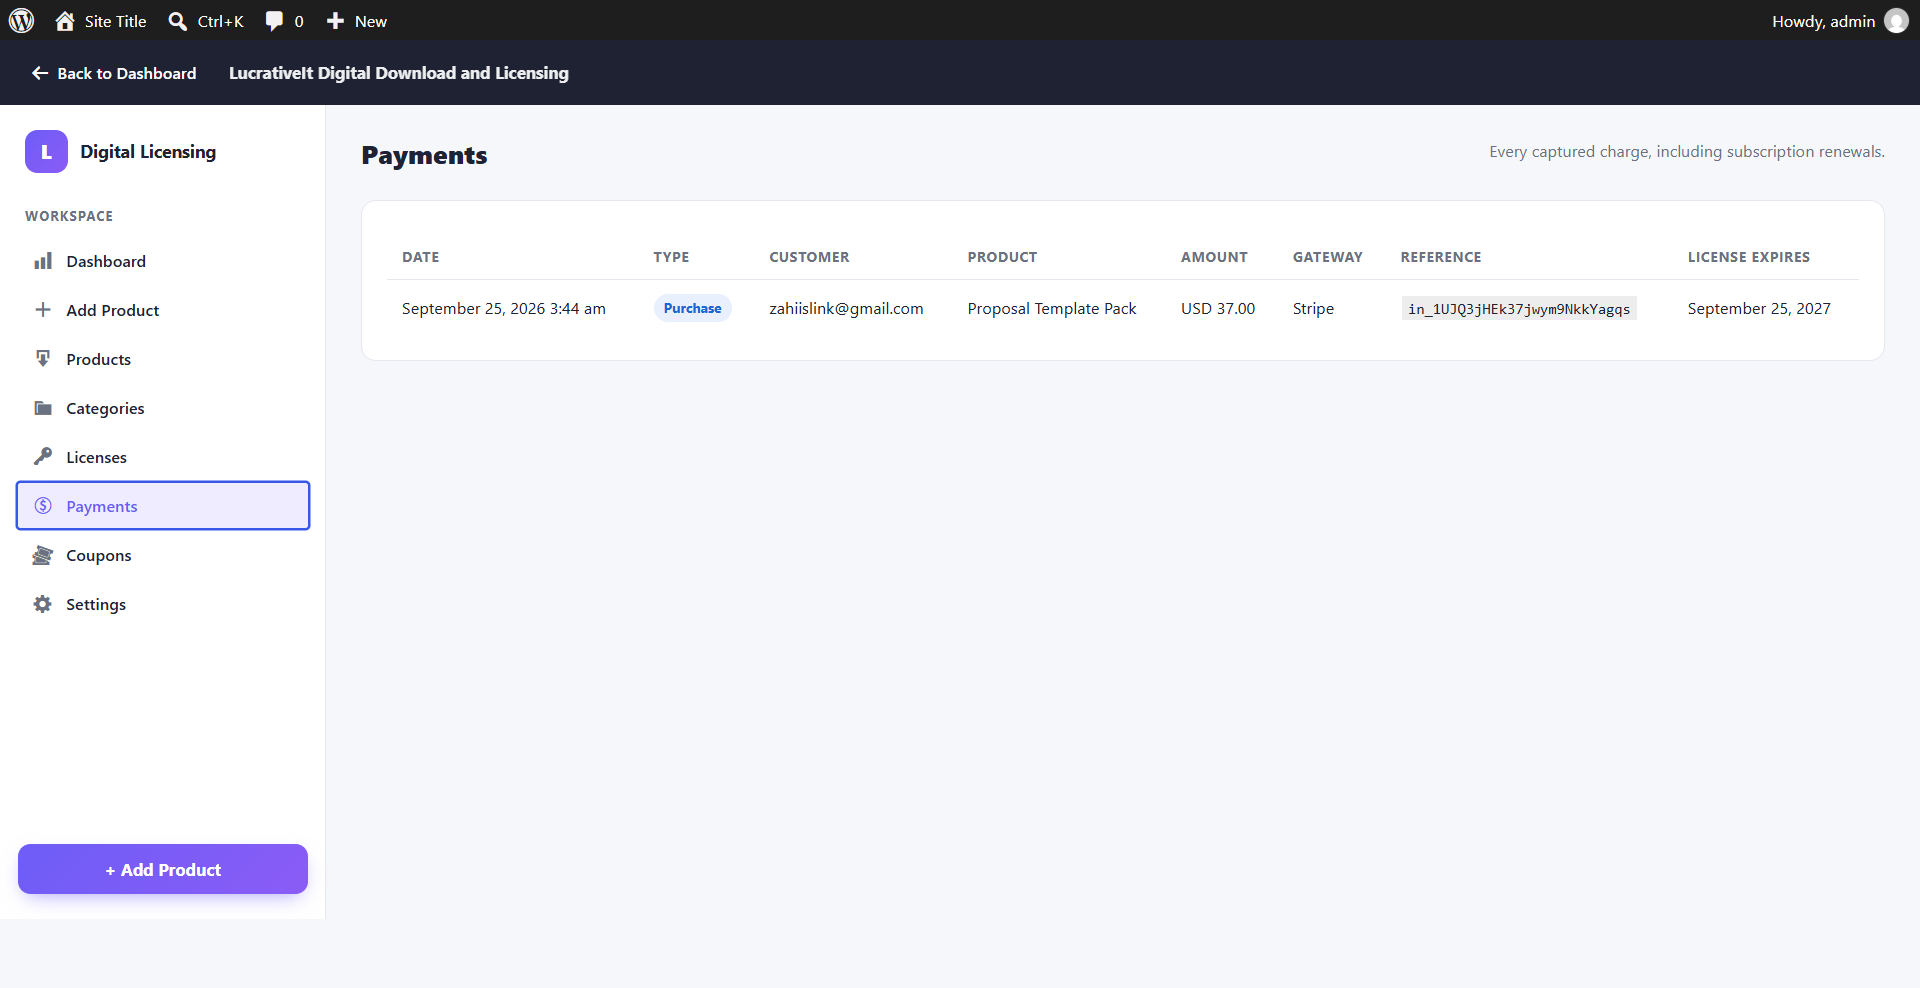
The Payments screen records every captured charge, including subscription renewals. Each row shows the date, type (purchase or renewal), customer, product, amount, gateway, the gateway's reference ID, and the resulting license expiry.
Coupons
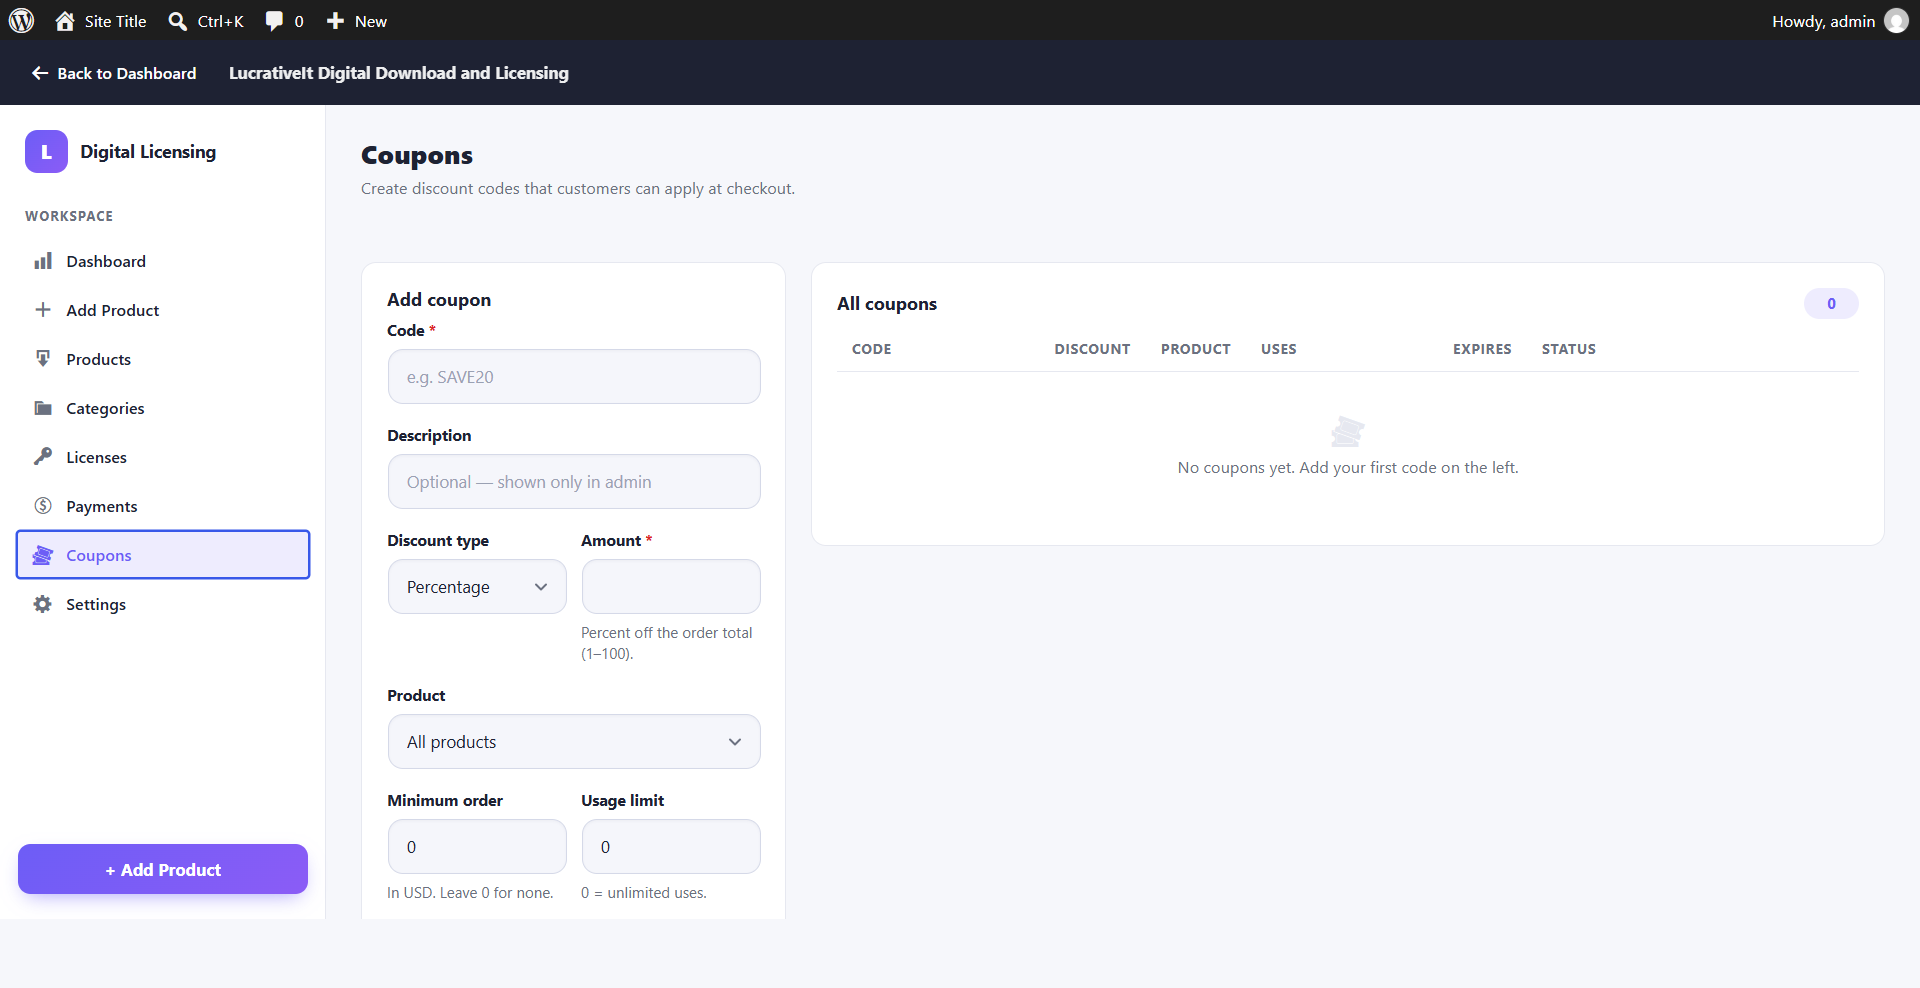
Create discount codes that customers enter at checkout. Each coupon has:
- Code — what the customer types, for example
SAVE20 - Description — an optional note, visible only to admins
- Discount type and amount — a percentage (1–100) or a fixed amount off the order total
- Product — apply to all products or to one specific product
- Minimum order — the lowest order total the coupon works on (0 for no minimum)
- Usage limit — the maximum number of uses (0 for unlimited)
- Expiry date — optional
Customer Experience
This is what your buyers see on the front end, from browsing the shop to downloading their files.
Digital Shop
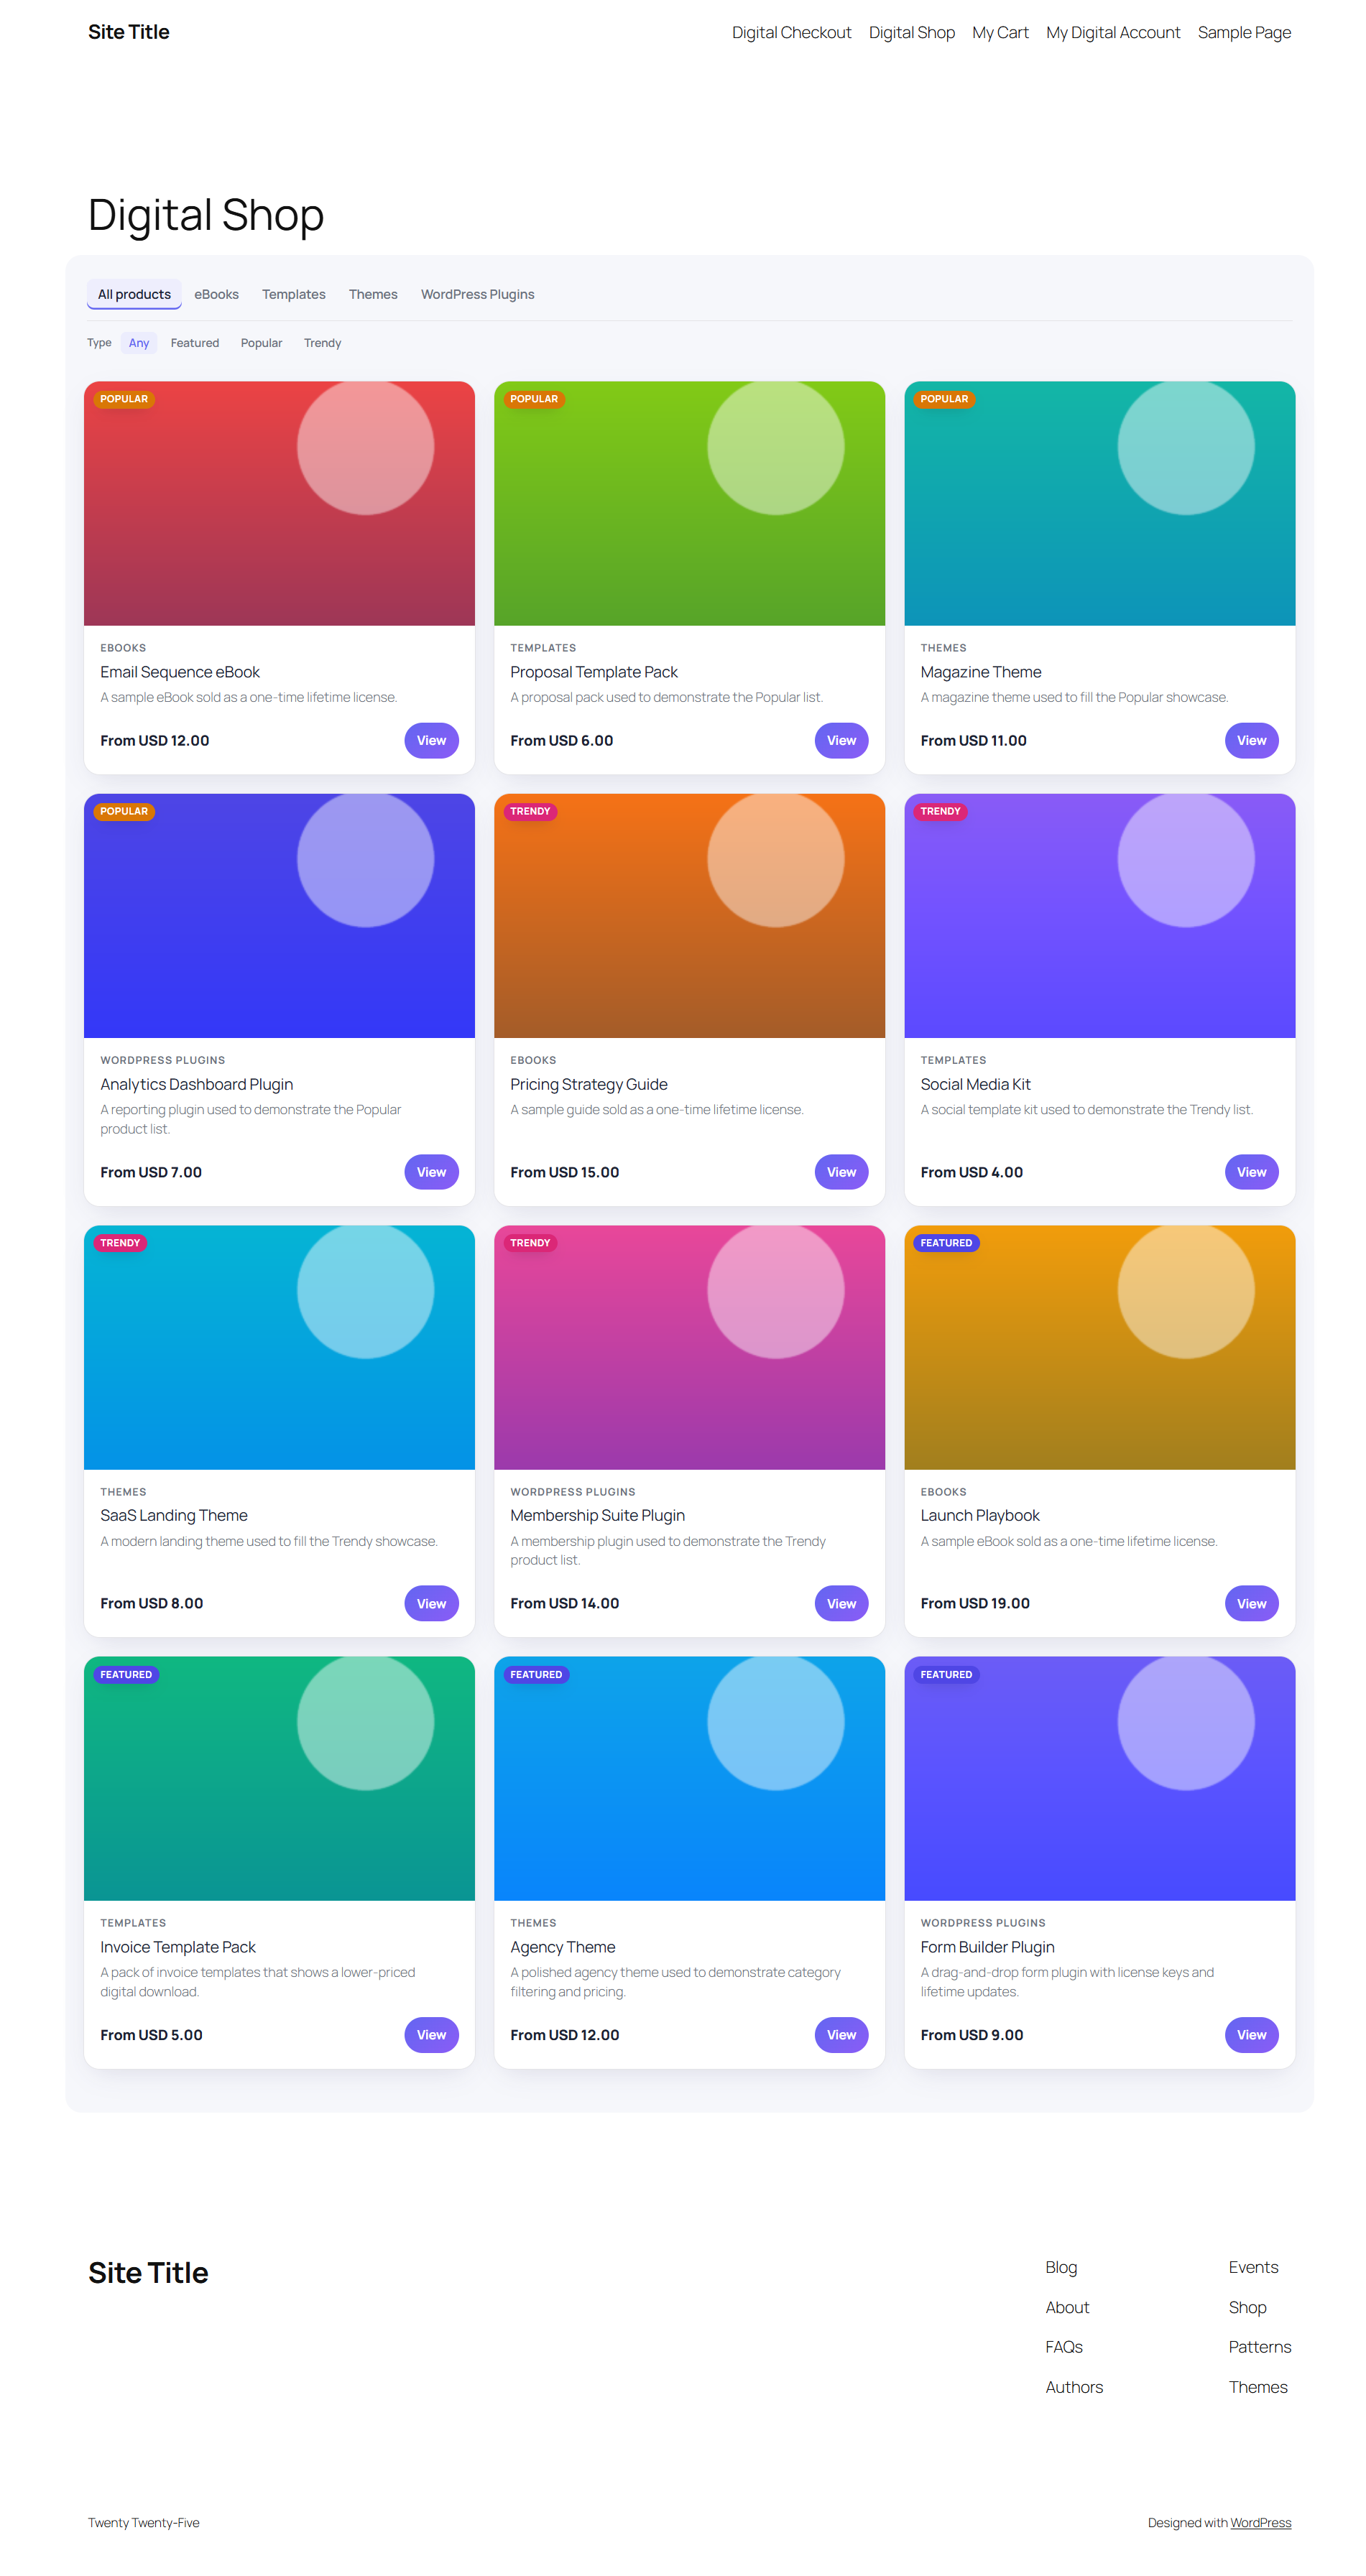
The Digital Shop page shows your products in a responsive grid. Customers can filter by category tab and by showcase type (Featured, Popular, or Trendy). Each card shows the thumbnail, category, short description, and starting price.
Product Page
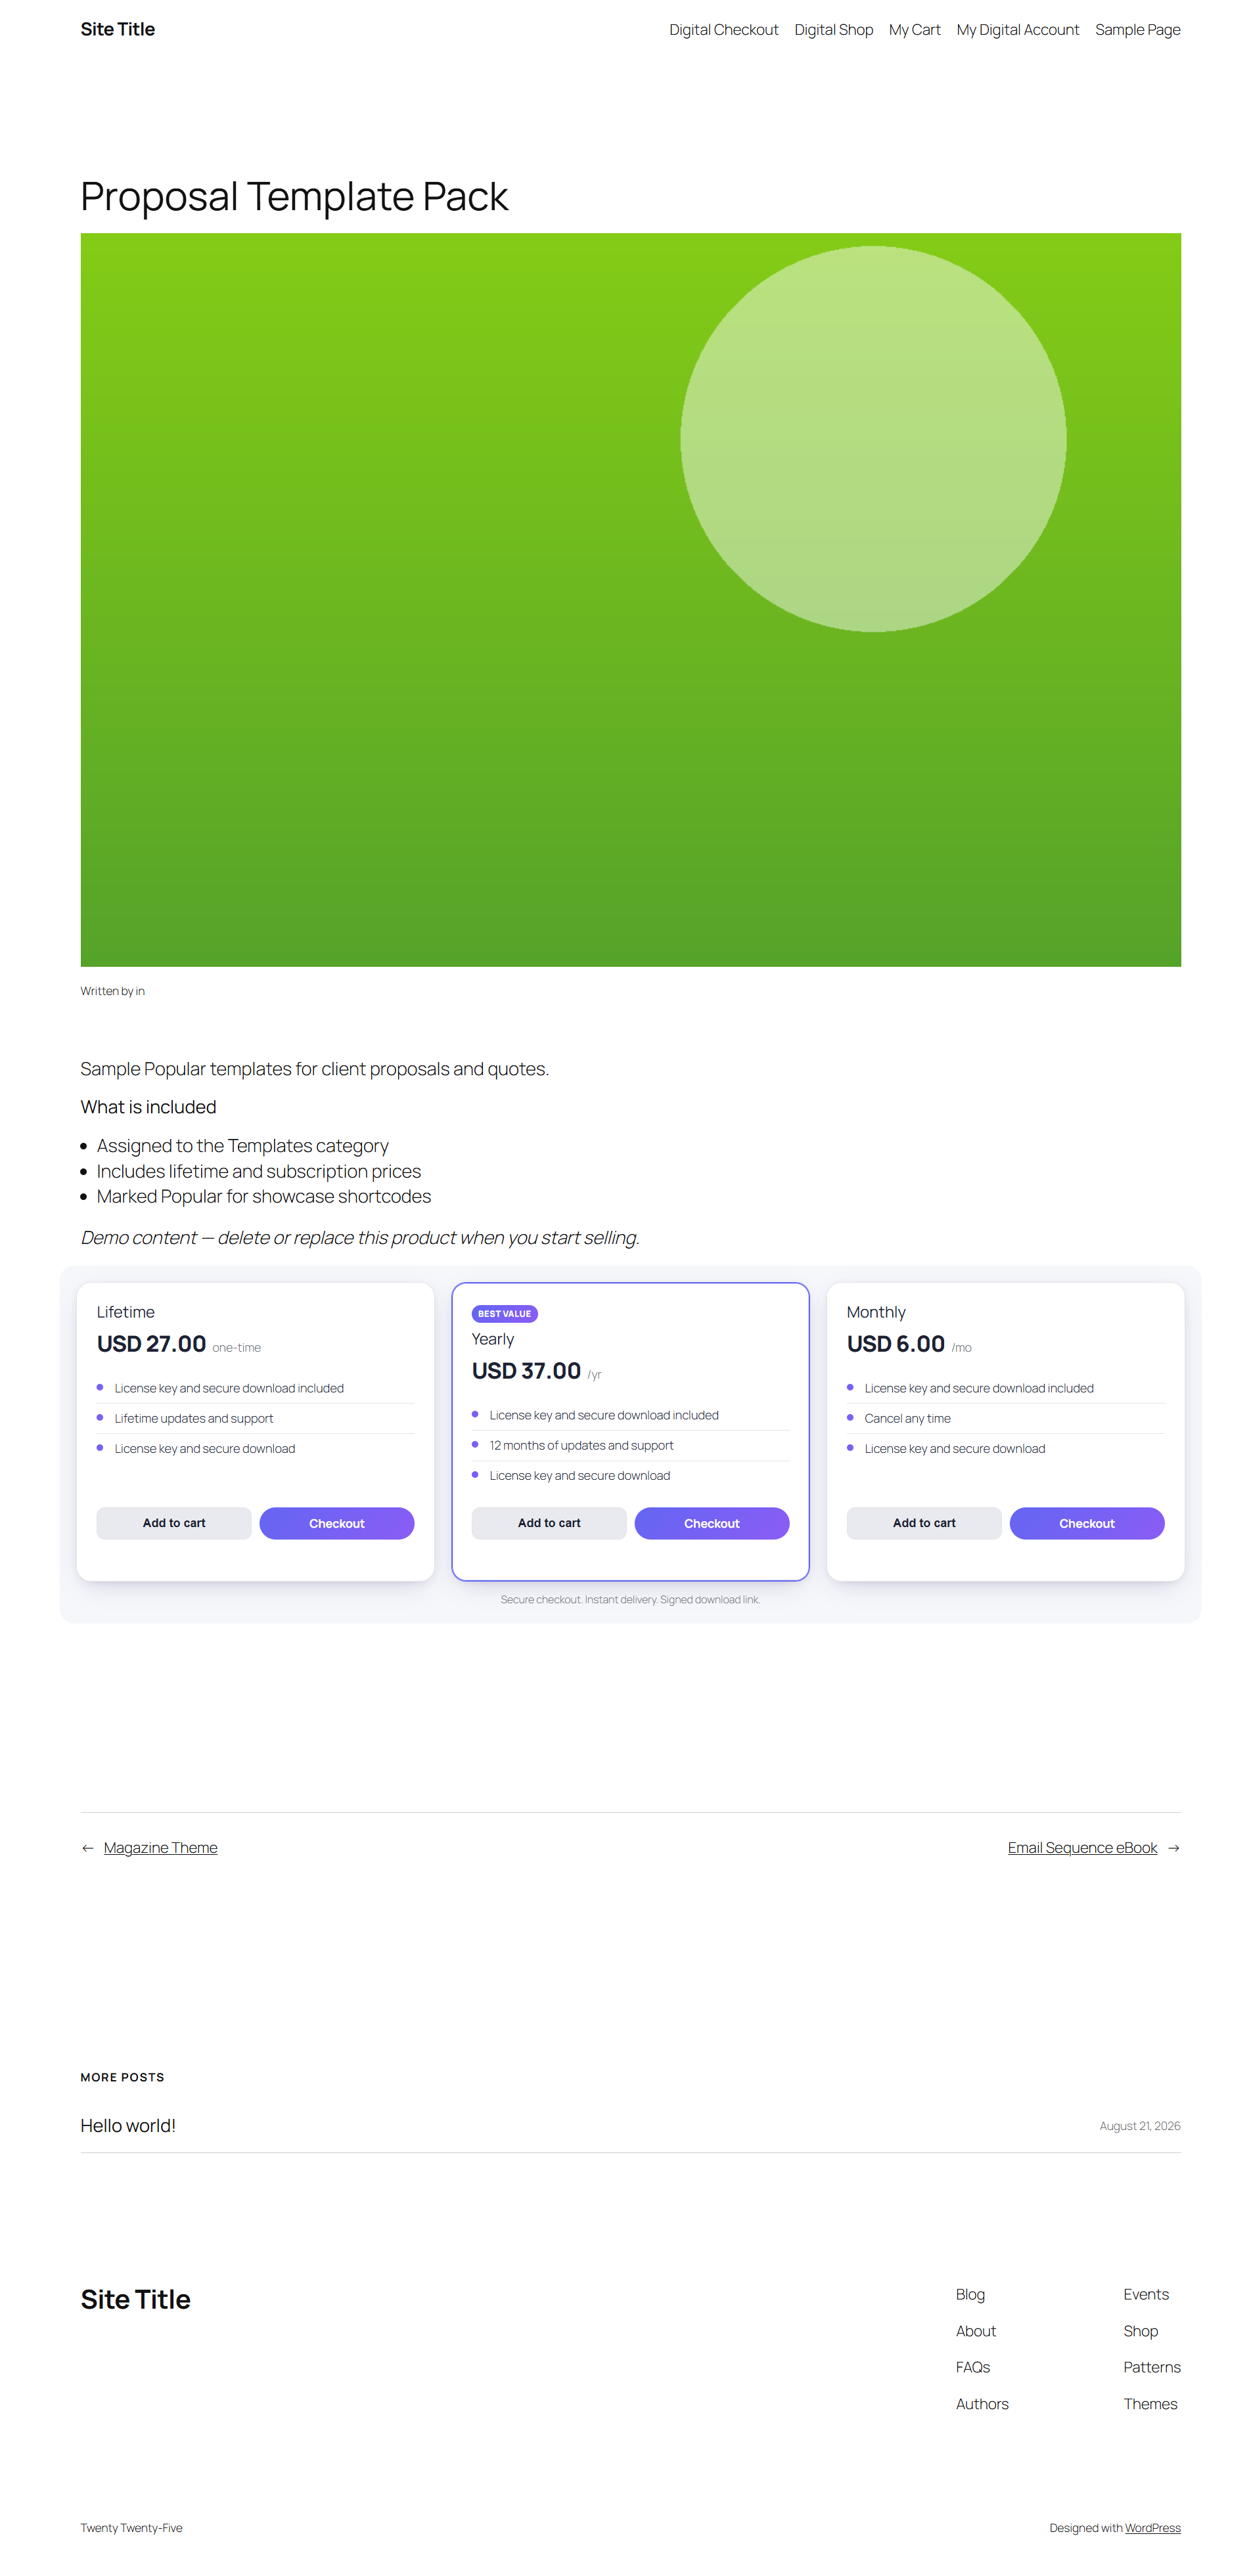
Each product page shows the thumbnail, your block-editor description, and pricing cards for every enabled plan, with their features. Customers can click Add to cart or go straight to Checkout.
Checkout
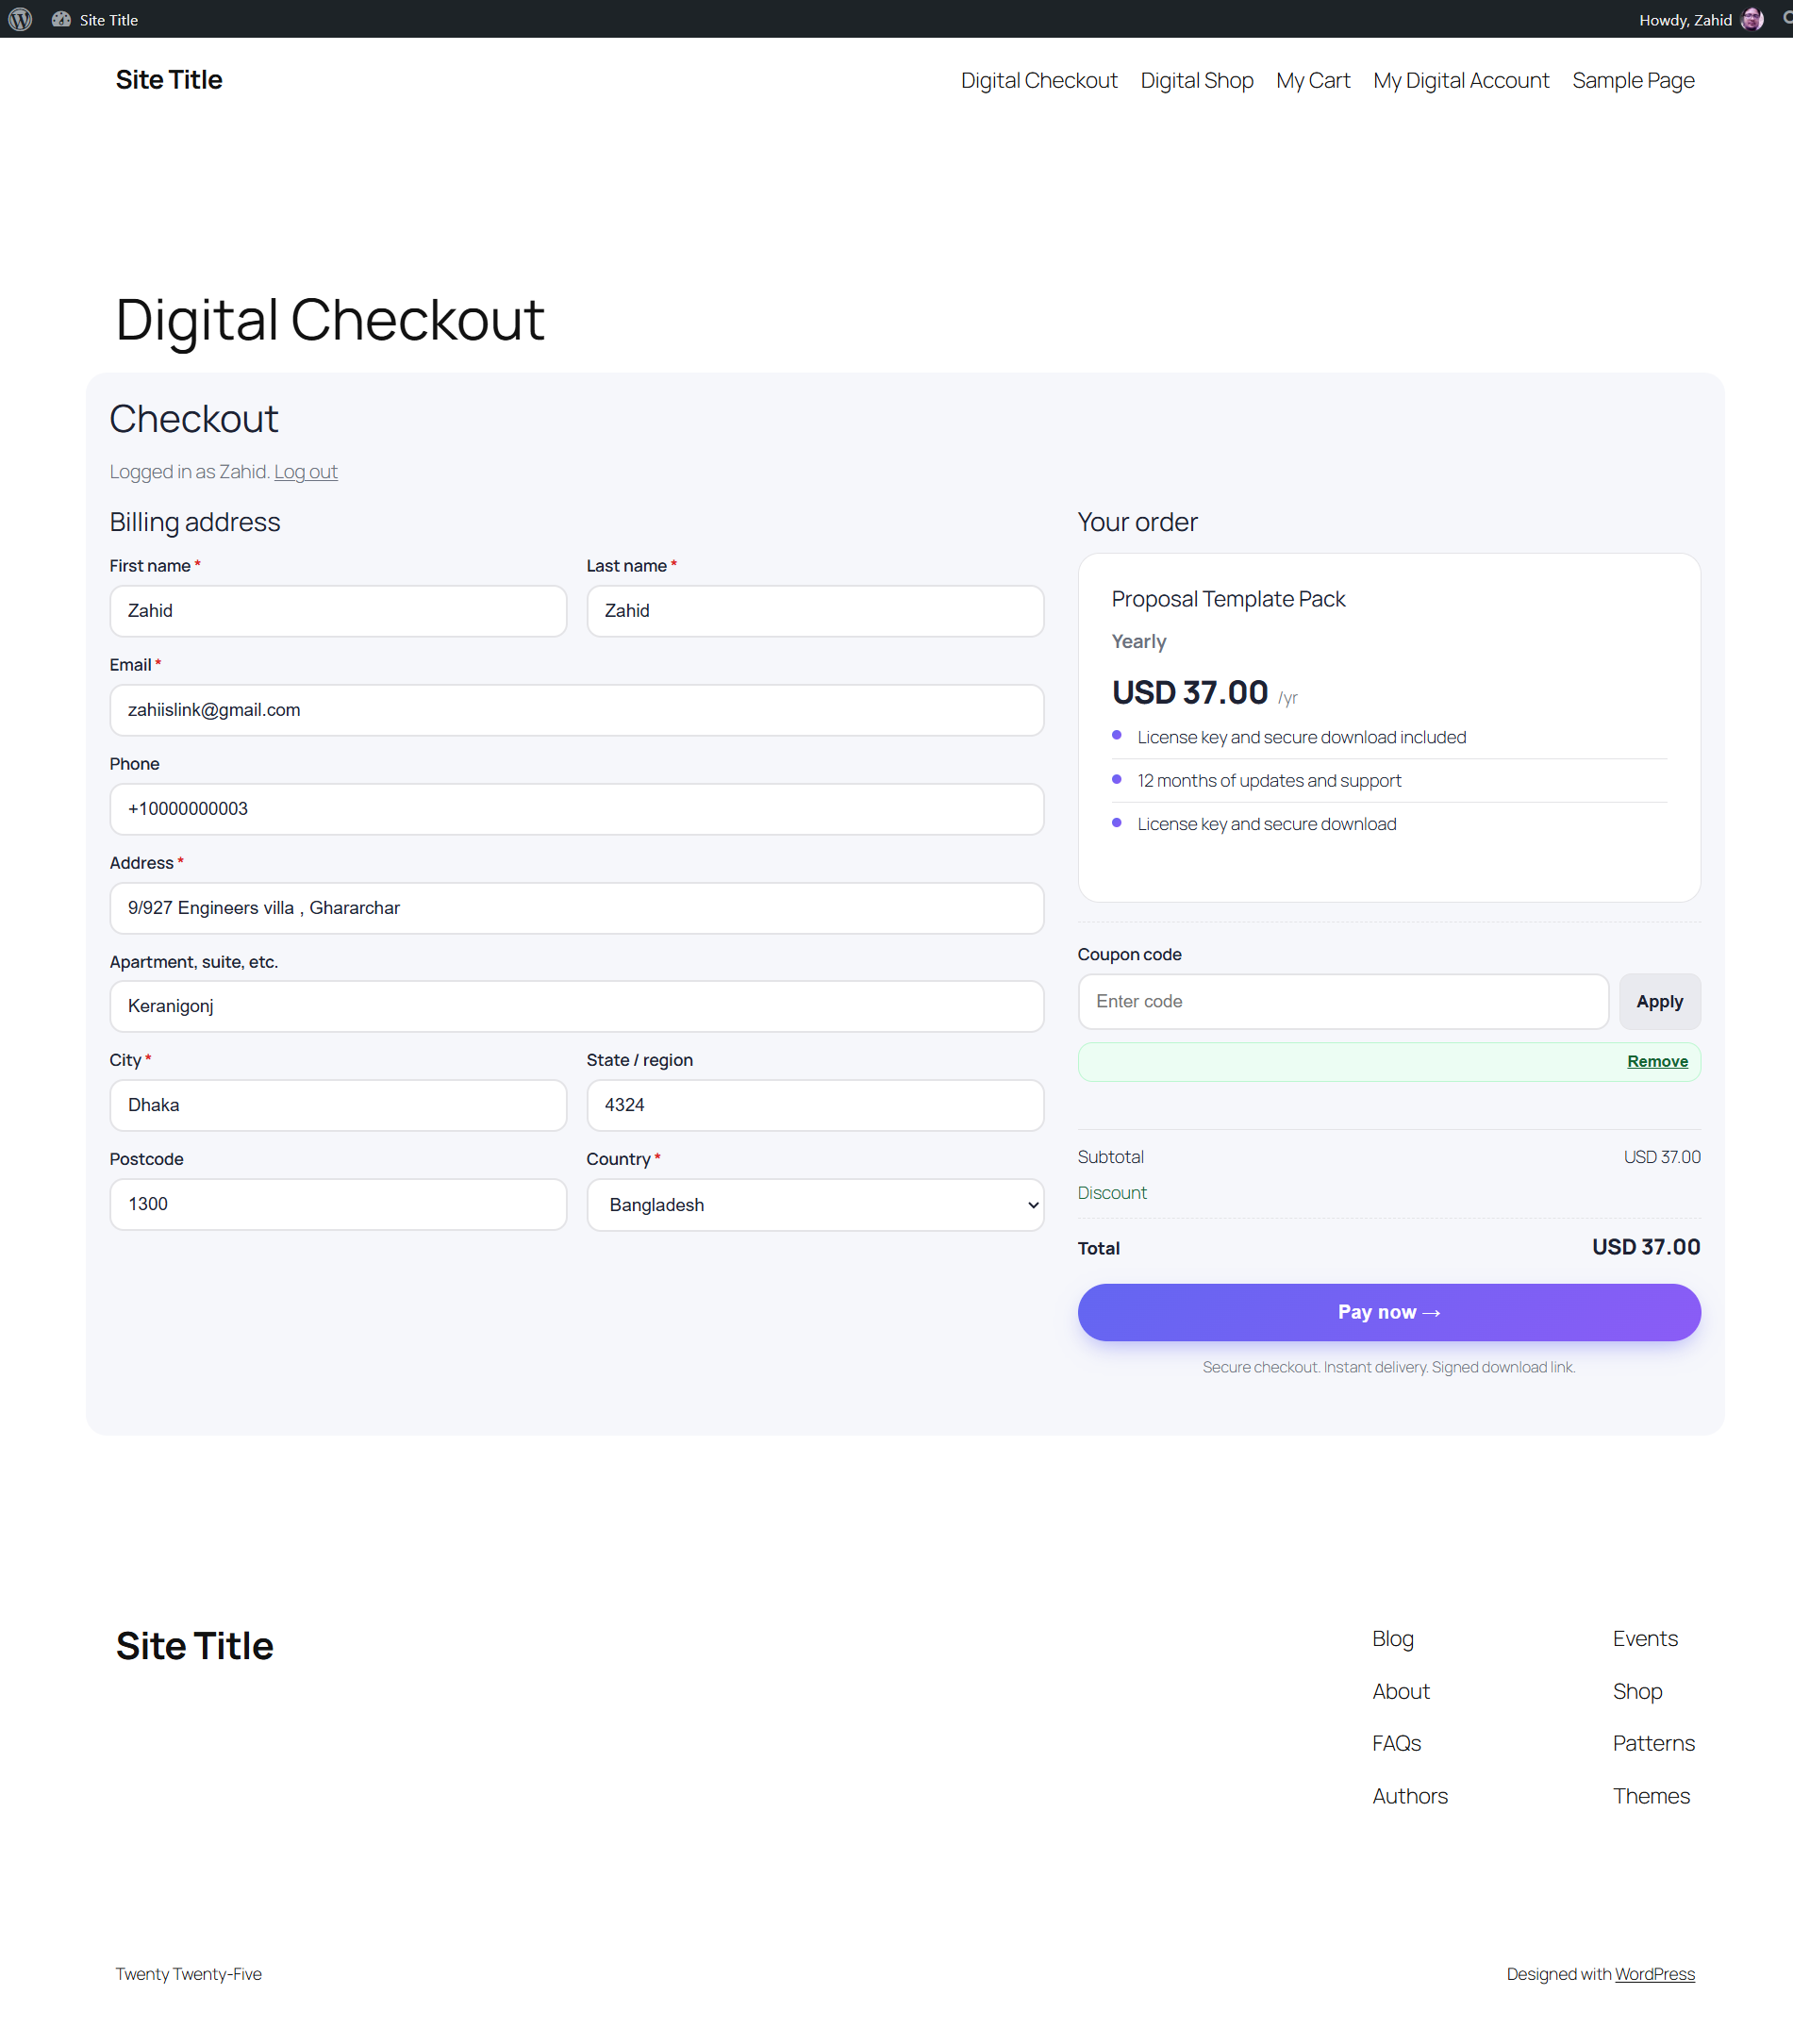
On the Digital Checkout page, customers enter a billing address, optionally apply a coupon code, review the order summary, and click Pay now. Returning customers who are logged in have their details filled in. New customers can create an account during checkout, and guest checkout also works.
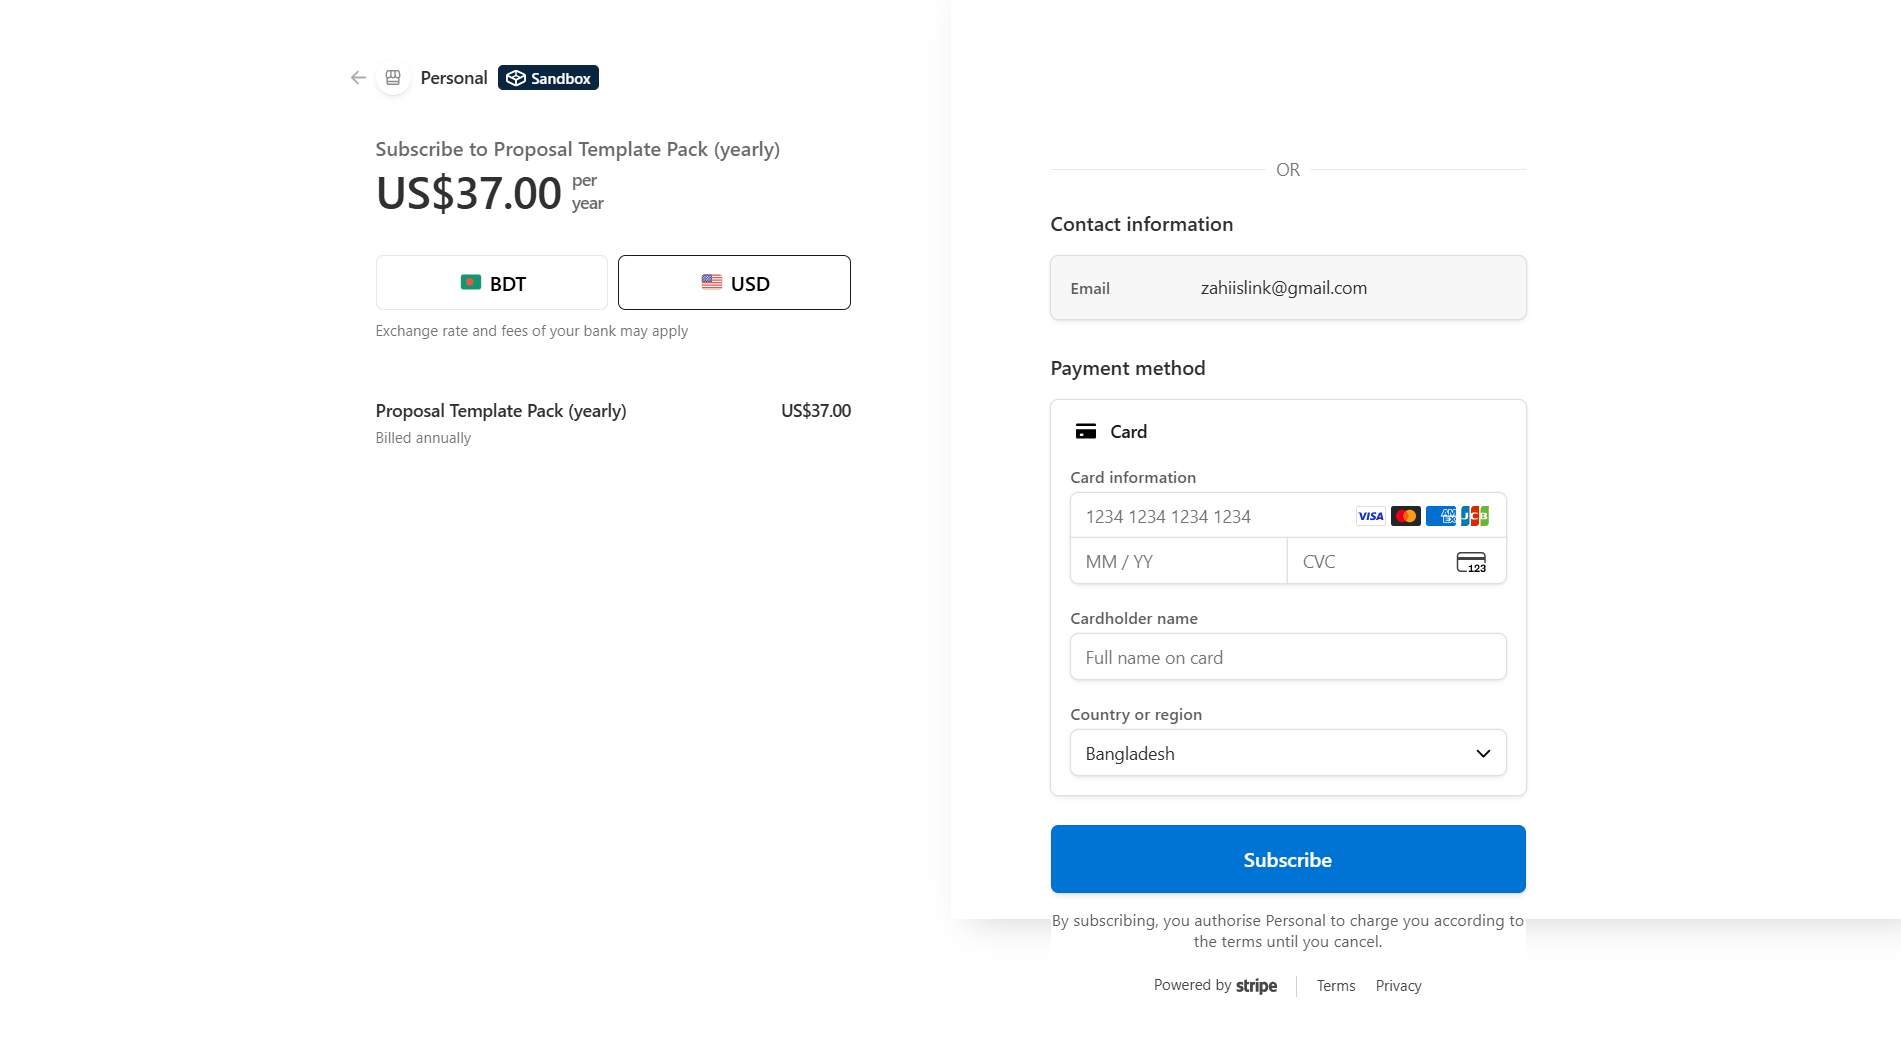
The customer is then sent to Stripe Checkout, or shown the Paddle overlay, to enter card details. Monthly and yearly plans are set up as subscriptions.
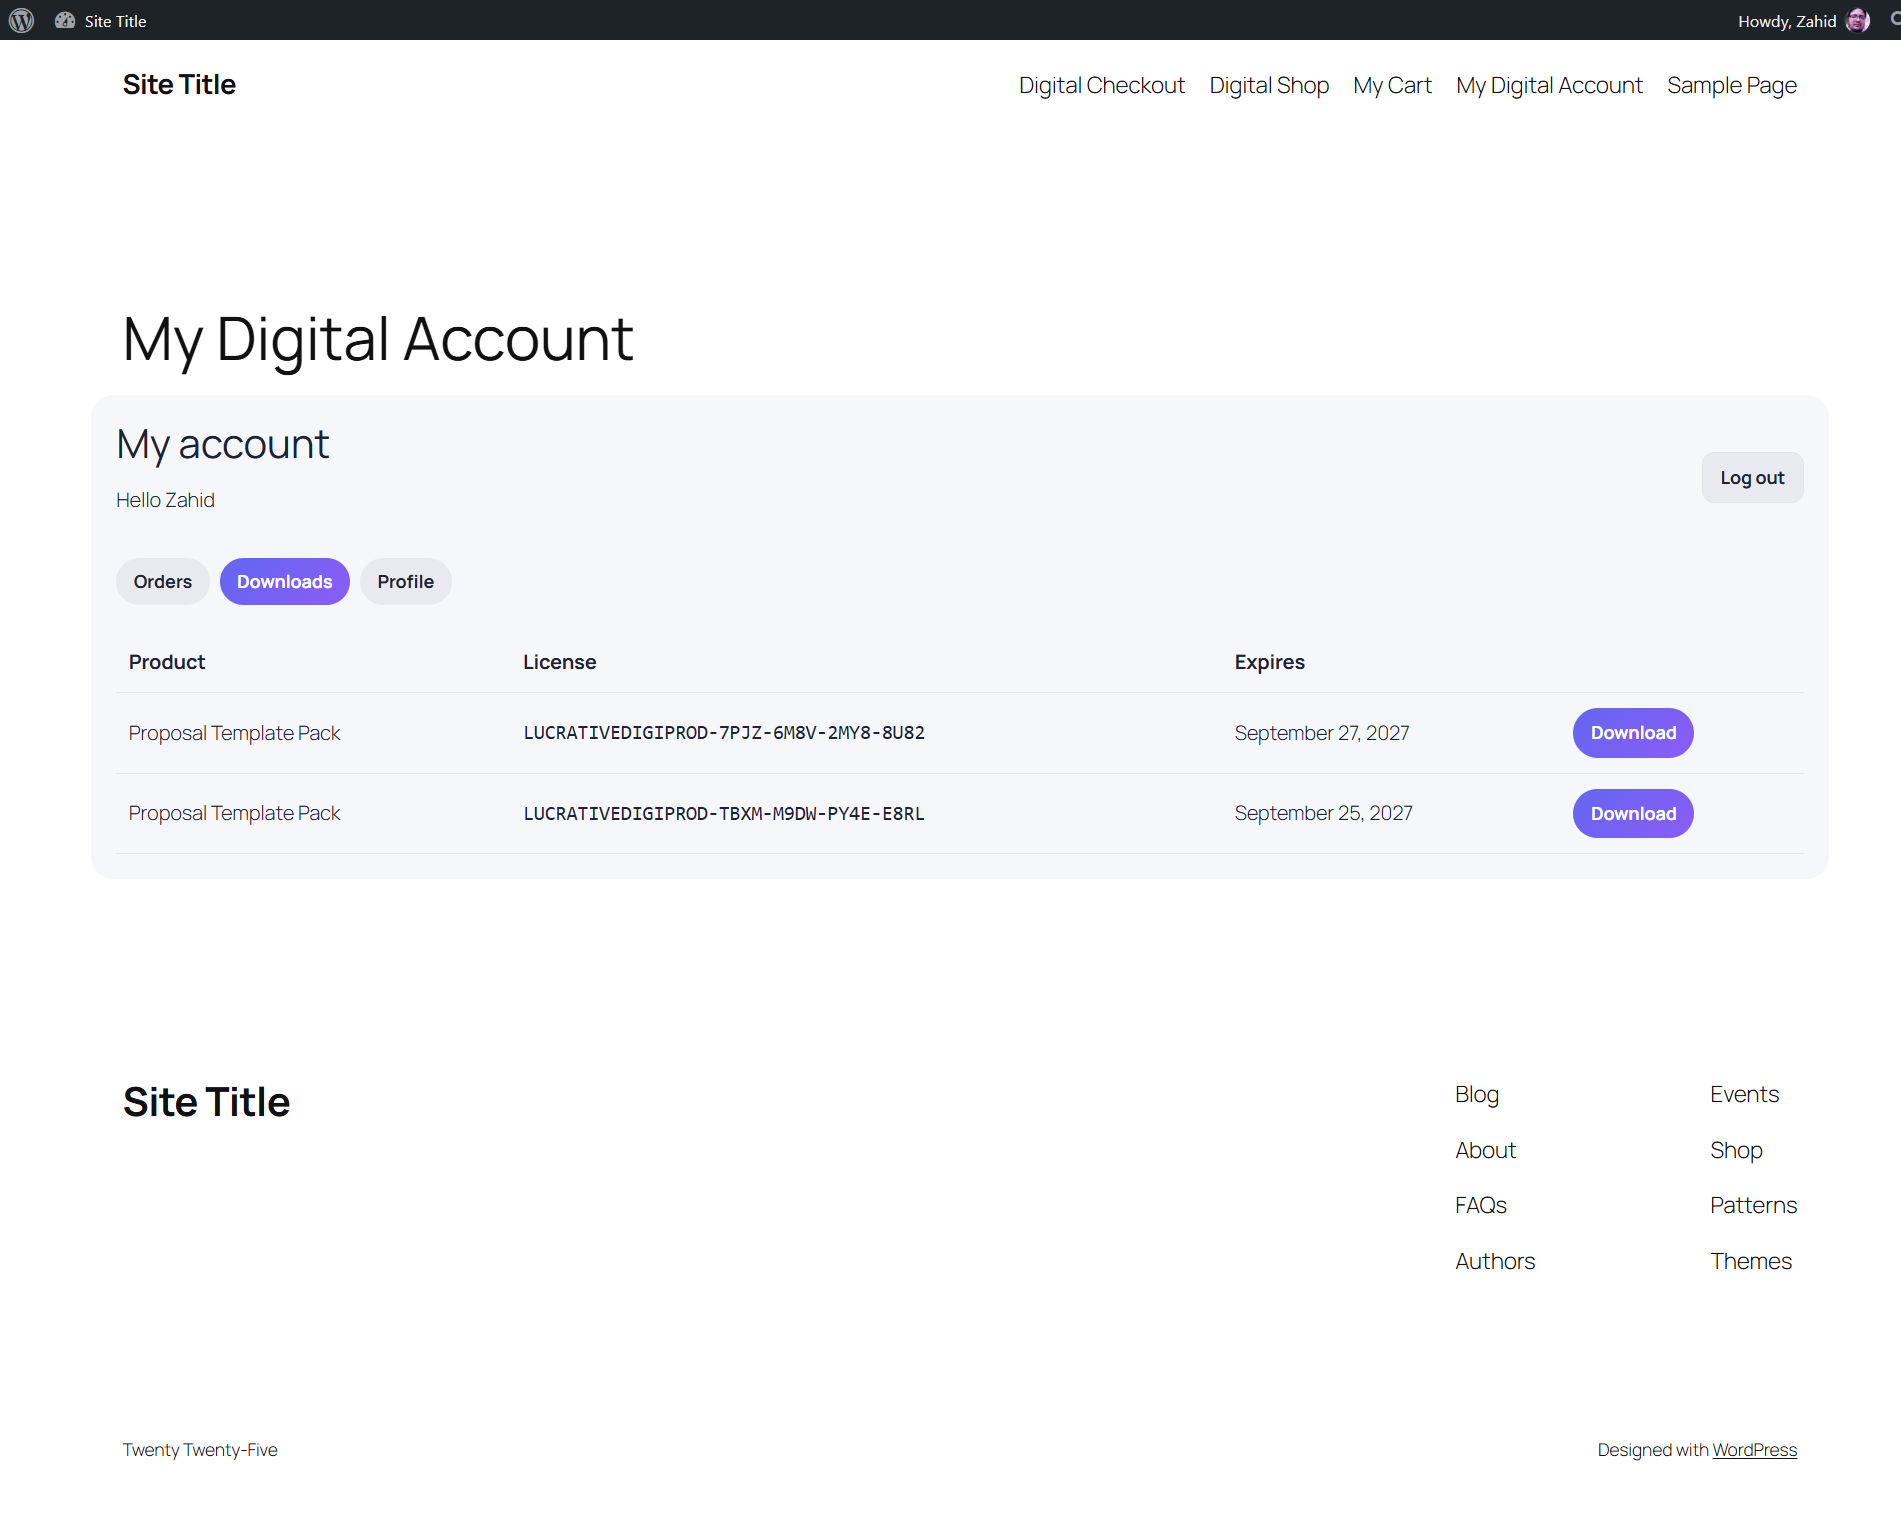
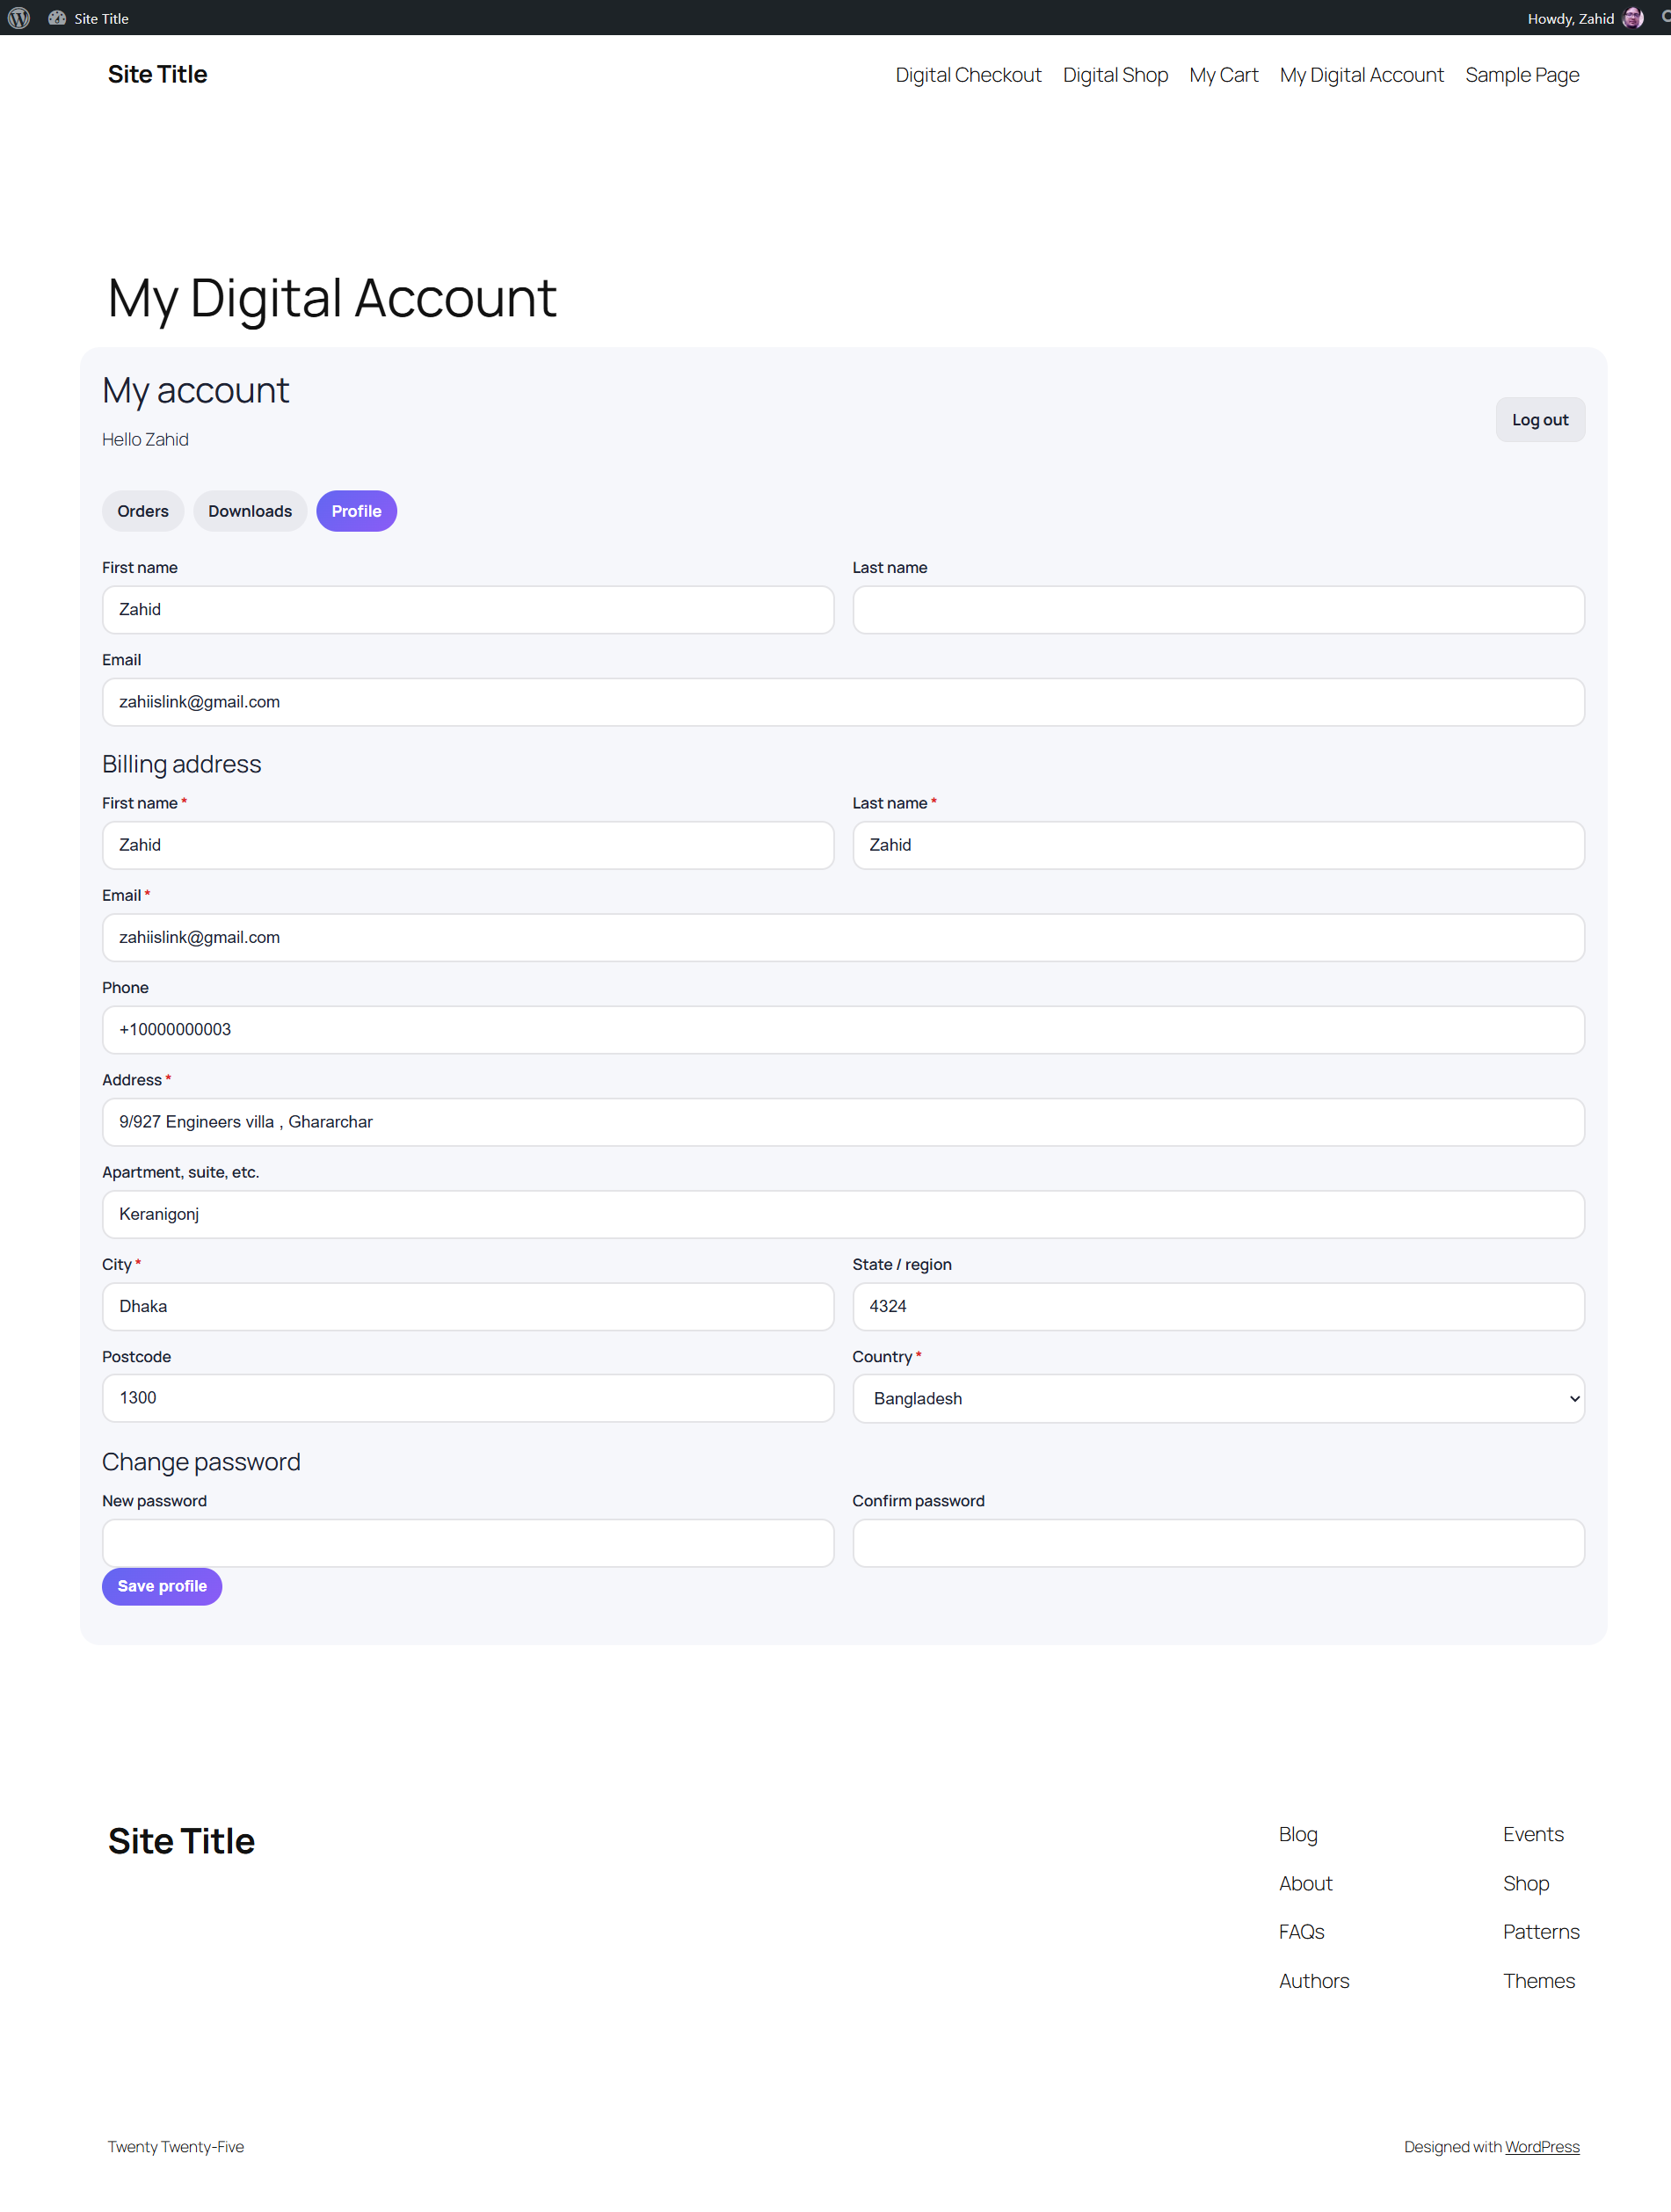
My Digital Account
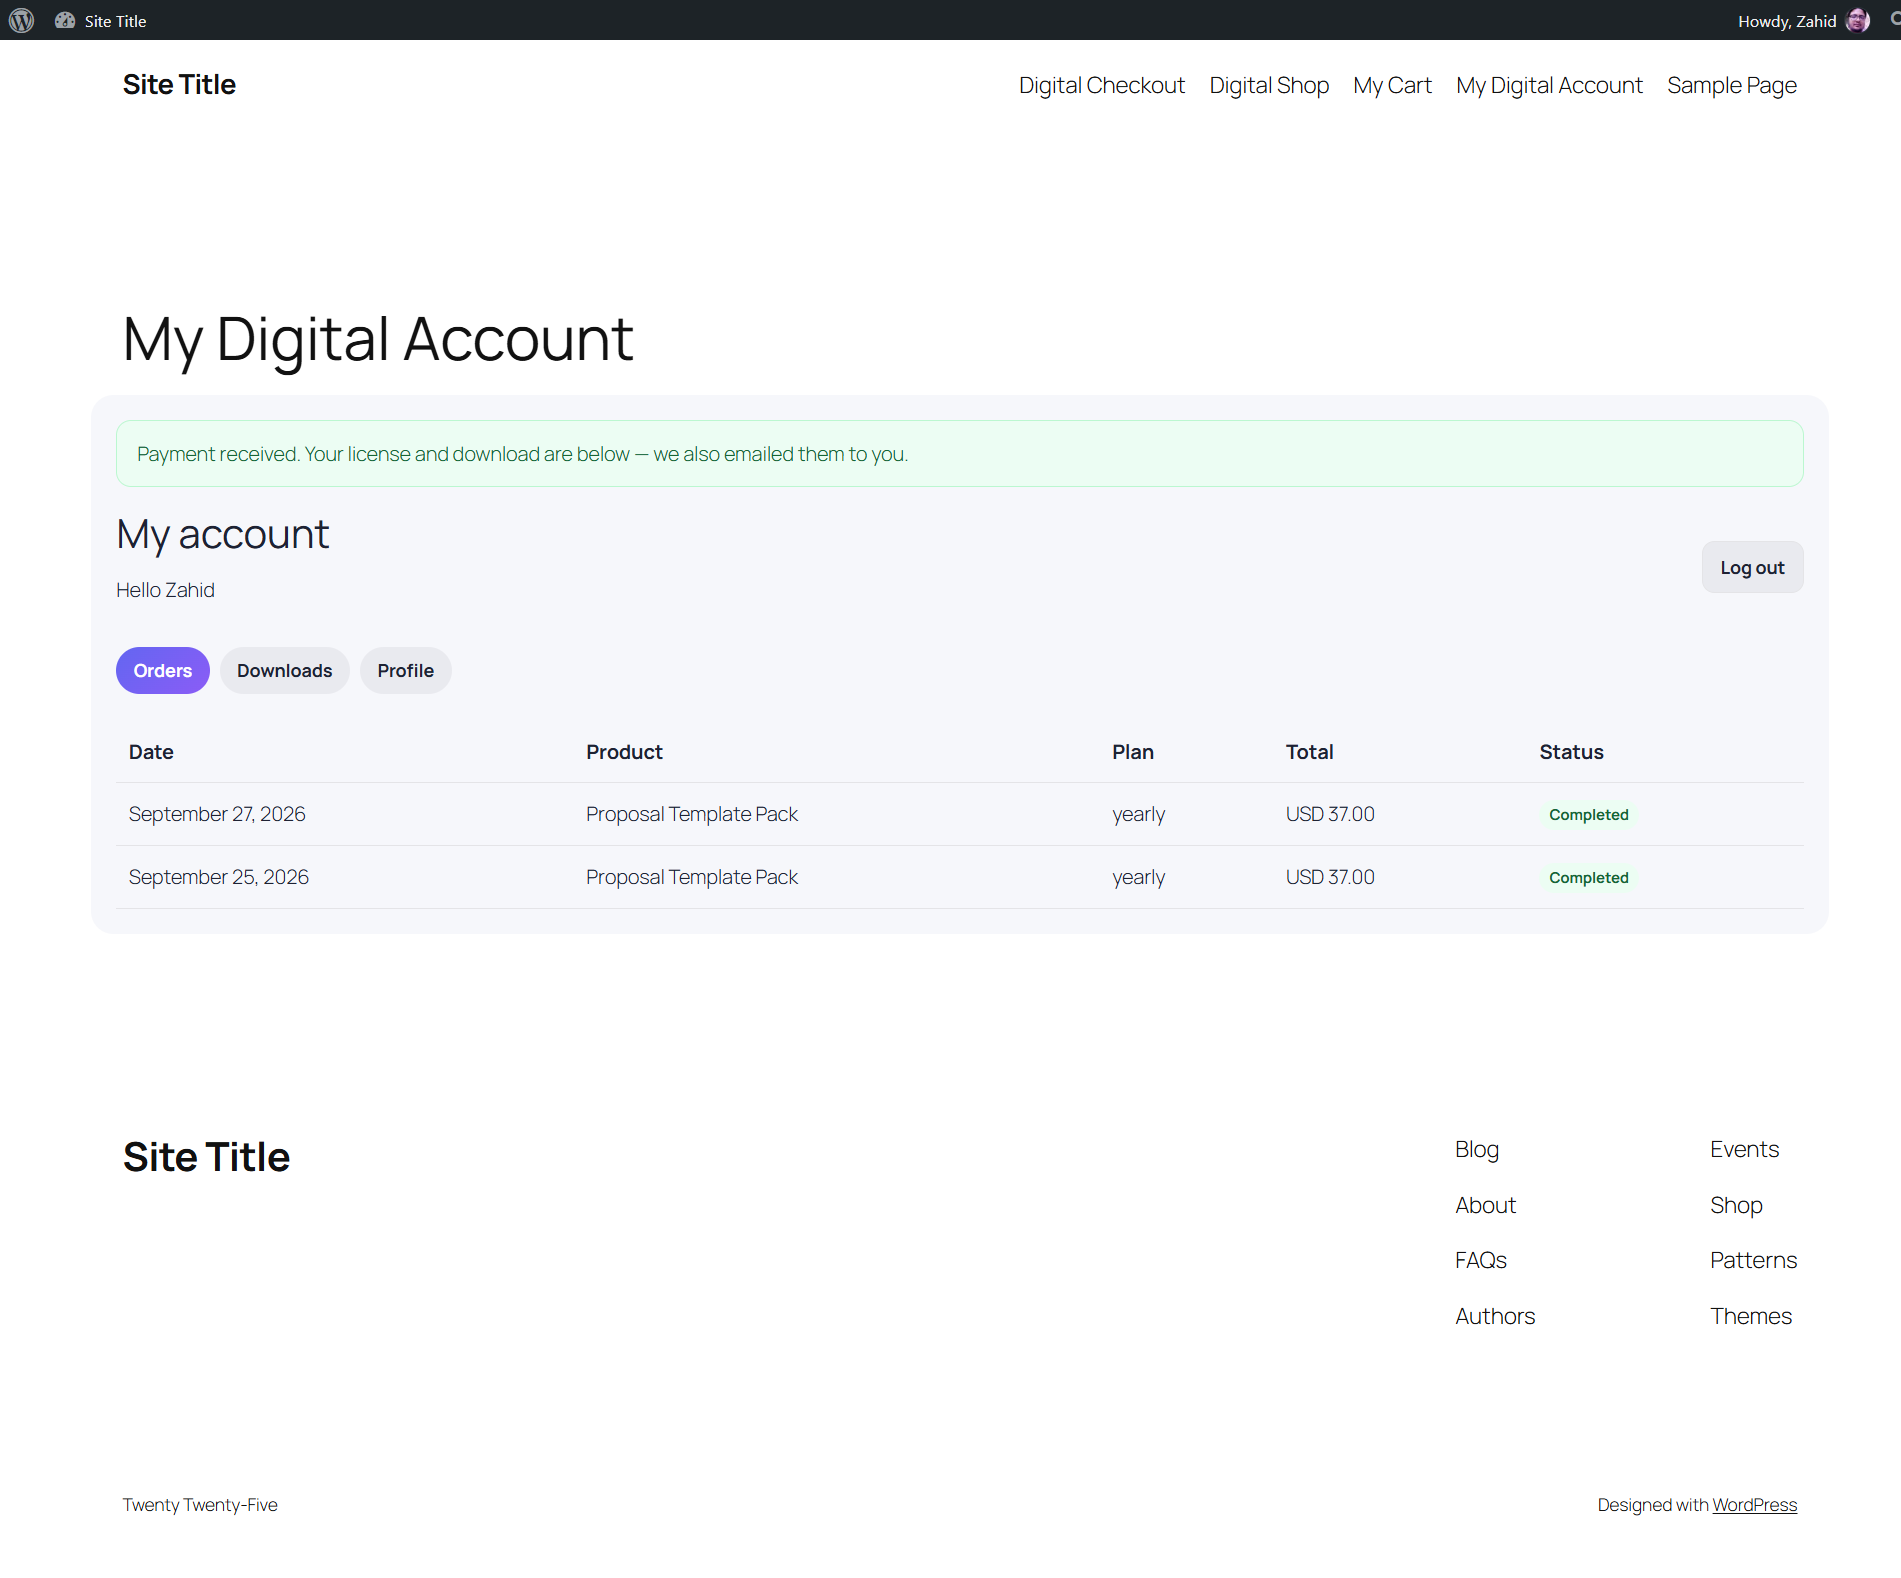
After paying, customers return to My Digital Account with a confirmation message, and receive their license key and download link by email. The account area has three tabs:
- Orders — every purchase with its date, product, plan, total, and status
- Downloads — each license key, its expiry date, and a Download button that generates a fresh signed link
- Profile — name, email, billing address, and password change
Shortcodes
Use these shortcodes on any page, post, or Shortcode block. The block editor also includes a Digital store pattern category with ready-made catalogue, cart, checkout, and account layouts.
| Shortcode | Description |
|---|---|
[lucrativedigiprod_products] | Product grid with filters. Attributes: category (slug), tag, type (featured, popular, or trendy), per_page (1–48), columns (1–4), and title. |
[lucrativedigiprod_buy_box id="123"] | Pricing cards for a single product. Optional plan attribute to show one plan only. |
[lucrativedigiprod_price_plan id="123"] | Same as the buy box. Use it inside a product description. |
[lucrativedigiprod_product id="123"] | A full single product display. |
[lucrativedigiprod_cart] | Shopping cart. |
[lucrativedigiprod_checkout] | Checkout form. |
[lucrativedigiprod_account] | Customer account with Orders, Downloads, and Profile tabs. |
Examples:
[lucrativedigiprod_products category="ebooks" columns="3"]
[lucrativedigiprod_products type="featured" per_page="6" title="Featured Products"]
[lucrativedigiprod_buy_box id="169"]
Troubleshooting
| Problem | Solution |
|---|---|
| Customer paid but received no license | Check that the webhook exists in Stripe or Paddle, points to the correct URL, has the required events enabled, and that its signing secret is pasted in Settings → Payments. Stripe's webhook log shows delivery errors. |
| Webhook returns 404 | Set Settings → Permalinks to any option other than "Plain", then save. |
| Webhook returns 400 or 401 | The signing secret does not match. Test and live modes use different secrets. |
| License emails not arriving | Enable SMTP under Settings → SMTP and send a test email. Check the customer's spam folder. |
| Download link says it has expired | Links expire after the lifetime set in Settings → Payments. The customer can generate a new link from My Digital Account → Downloads. |
| Download blocked for a subscriber | The subscription was cancelled or a renewal payment failed. Check the license status under Licenses. |
| File upload fails | Increase PHP upload_max_filesize and post_max_size, or ask your host to raise them. |
| Storefront page is blank or missing | Go to Settings → Storefront and reassign or recreate the page. |
| Pricing cards not showing in the description | Make sure the [lucrativedigiprod_price_plan id="…"] shortcode is in a Shortcode block and at least one plan is enabled with a price. |
Frequently Asked Questions
Does this require WooCommerce?
No. The plugin is a standalone digital store with its own checkout, licenses, and downloads.
Do I need to enable user registration in WordPress?
No. The checkout creates subscriber accounts regardless of WordPress's general Membership setting. Guest checkout also works; guest orders are accessed through the signed links in the email.
Can I use Stripe and Paddle at the same time?
No. Choose one active gateway in Settings → Payments.
Is download tracking enabled automatically?
No. Enable it under Settings → Payments. New records do not include IP addresses.
Do I need to update my terms and privacy policy?
Yes. Tell customers that payments are processed by Stripe or Paddle and link to that provider's terms and privacy policy.
What happens when I delete the plugin?
Deactivating keeps all store data. Deleting the plugin removes its custom tables, settings, product posts, and private product files, so back up your site first.
Support
If you need help, contact us through lucrativeit.com or the plugin site at wpdigitaldownload.lucrativeit.com. Please include:
- Your WordPress and PHP versions
- Which gateway you use (Stripe or Paddle) and whether it is in test or live mode
- Steps to reproduce the issue
- Any errors from your gateway's webhook log (remove secret keys)
- Screenshots if applicable
This plugin is licensed under the GPLv2 or later. Payment card numbers are never stored in WordPress.
Changelog
Version 1.6.3
- Clarified that customer version emails use signed download links and do not register WordPress plugin updates.
Version 1.6.2
- Added developer metadata, a Settings action link, and storefront block patterns.
- Made download tracking opt-in and stopped collecting IP addresses in new records.
- Hardened account ownership, REST registration, input validation, and storage paths.
- Prevented license fulfilment for unpaid Stripe Checkout sessions.
- Rebuilt the translation template.
Version 1.6.1
- Customer update emails when the product version changes.
- Initial release.