Lucrativeit Subscription and Recurring Billing (WpBillify)
Product Documentation
Enterprise subscription management for WordPress. Manage customers, branches, plans, subscriptions, and recurring billing from one admin portal — with public pricing pages and on-page checkout for your site visitors.
1. Product Overview
Lucrativeit Subscription and Recurring Billing (WpBillify) gives you a full billing workspace inside WordPress. After activation it appears under Subscriptions+ in the admin menu.
Built-in billing engine
Subscriptions, invoices, and recurring cycles with Stripe automatic charges or Manual invoice-based billing.
Public storefront
Responsive pricing tables, interval tabs, hero, locations, FAQ, and checkout via shortcodes.
Multi-location ready
Branches with images, amenities, and hours — assign customers and show locations on the frontend.
Industry demo packs
Import Gym, ISP, Coaching, SaaS, or Software License sample data to explore the product instantly.
2. Admin Modules
The Enterprise Portal sidebar includes these modules:
Dashboard
MRR, ARR, active subscriptions, churn, revenue trend, recent activity.
Customers
Subscriber directory with search, status/branch filters, and revenue totals.
Branches
Regional offices with contact details, hours, amenities, and images.
Plan Categories
Group plans by business type and create public pages.
Plans
Pricing tiers across day, week, month, year, and lifetime intervals.
Subscriptions
Lifecycle tracking: trialing, active, past due, canceled.
Billing
Invoice list, mark paid, payment links, and invoice detail editing.
Reports
Last 30 days revenue, invoice counts, charts, and breakdowns.
Settings
General, gateways, email, notifications, templates, and frontend appearance.
+ New Subscription
Always available shortcut to the 3-step subscription wizard.
3. Getting Started — Setup Wizard & Demo Data
After activation, the setup wizard helps you populate the workspace quickly. You can import industry sample packs or start with an empty database.
3.1 Choose categories to import
Open the setup screen and select one or more categories. Use Select all to import every pack, or pick a single industry (for example Gym Membership).
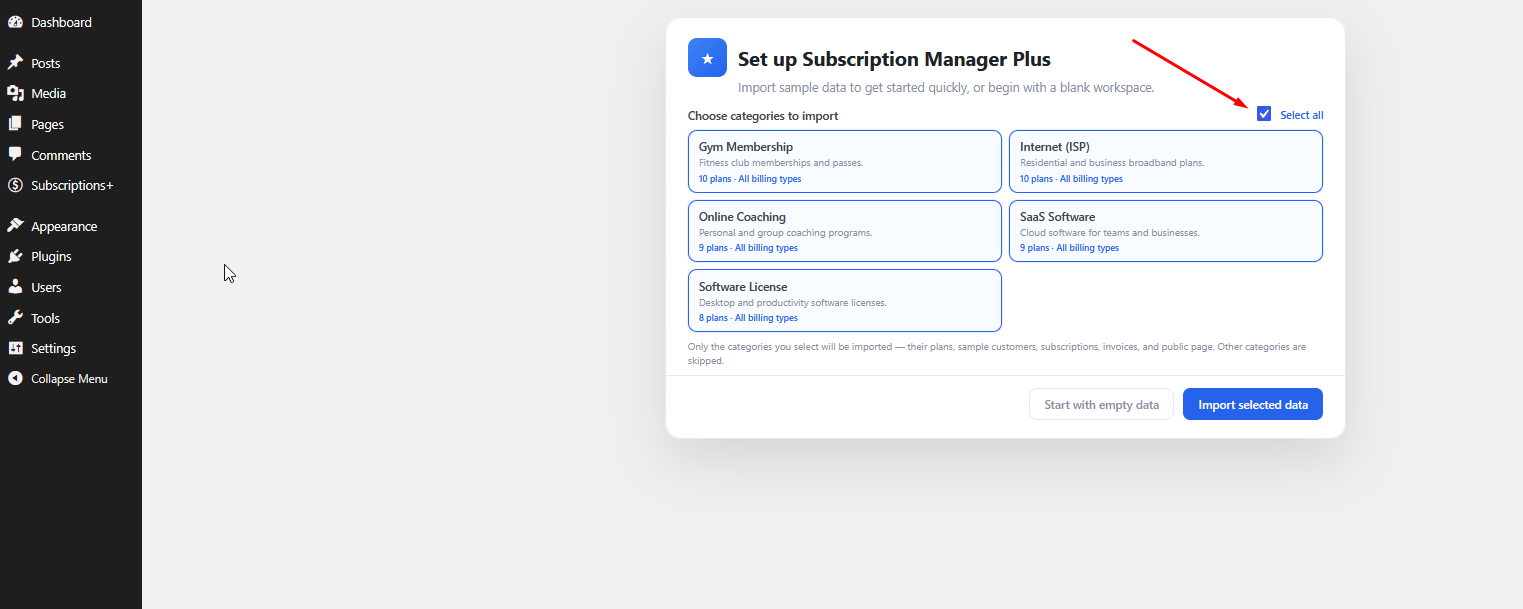
Figure 1 — Setup wizard with all demo categories selected.
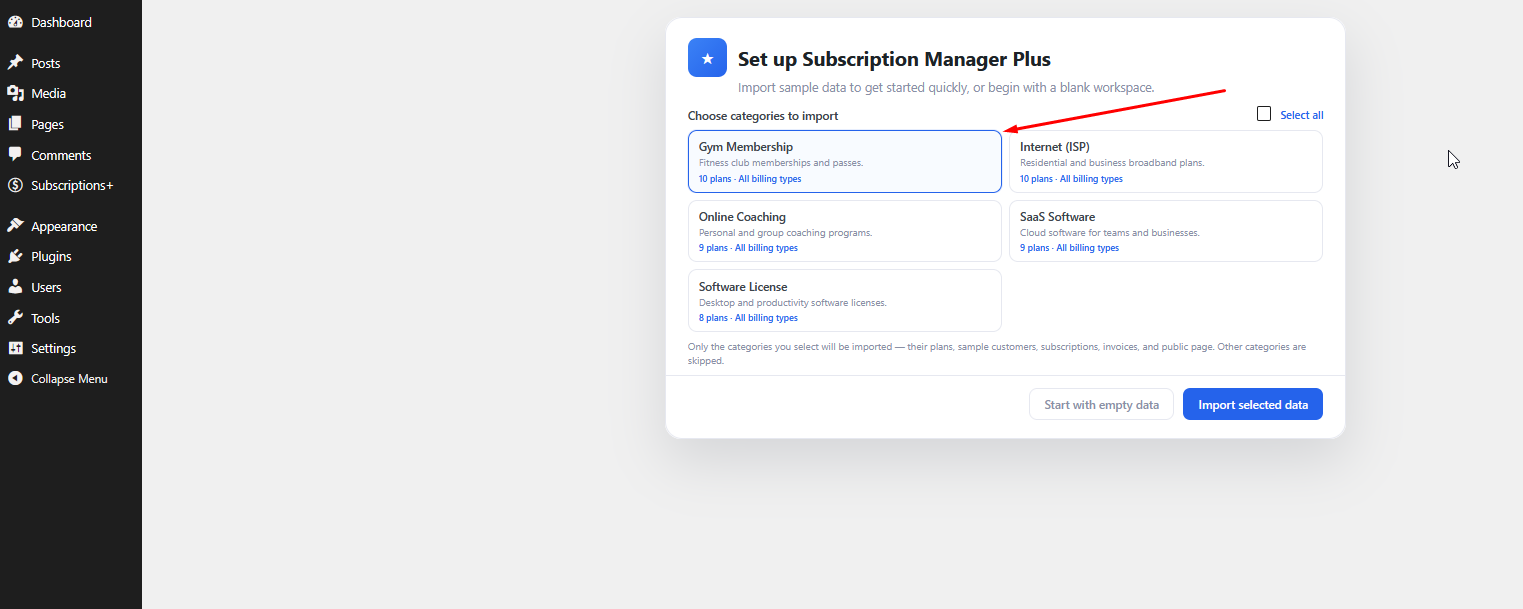
Figure 2 — Importing a single category (Gym Membership).
3.2 After a successful import
When import finishes, you land on the Executive Overview dashboard with a success notice and live sample metrics.
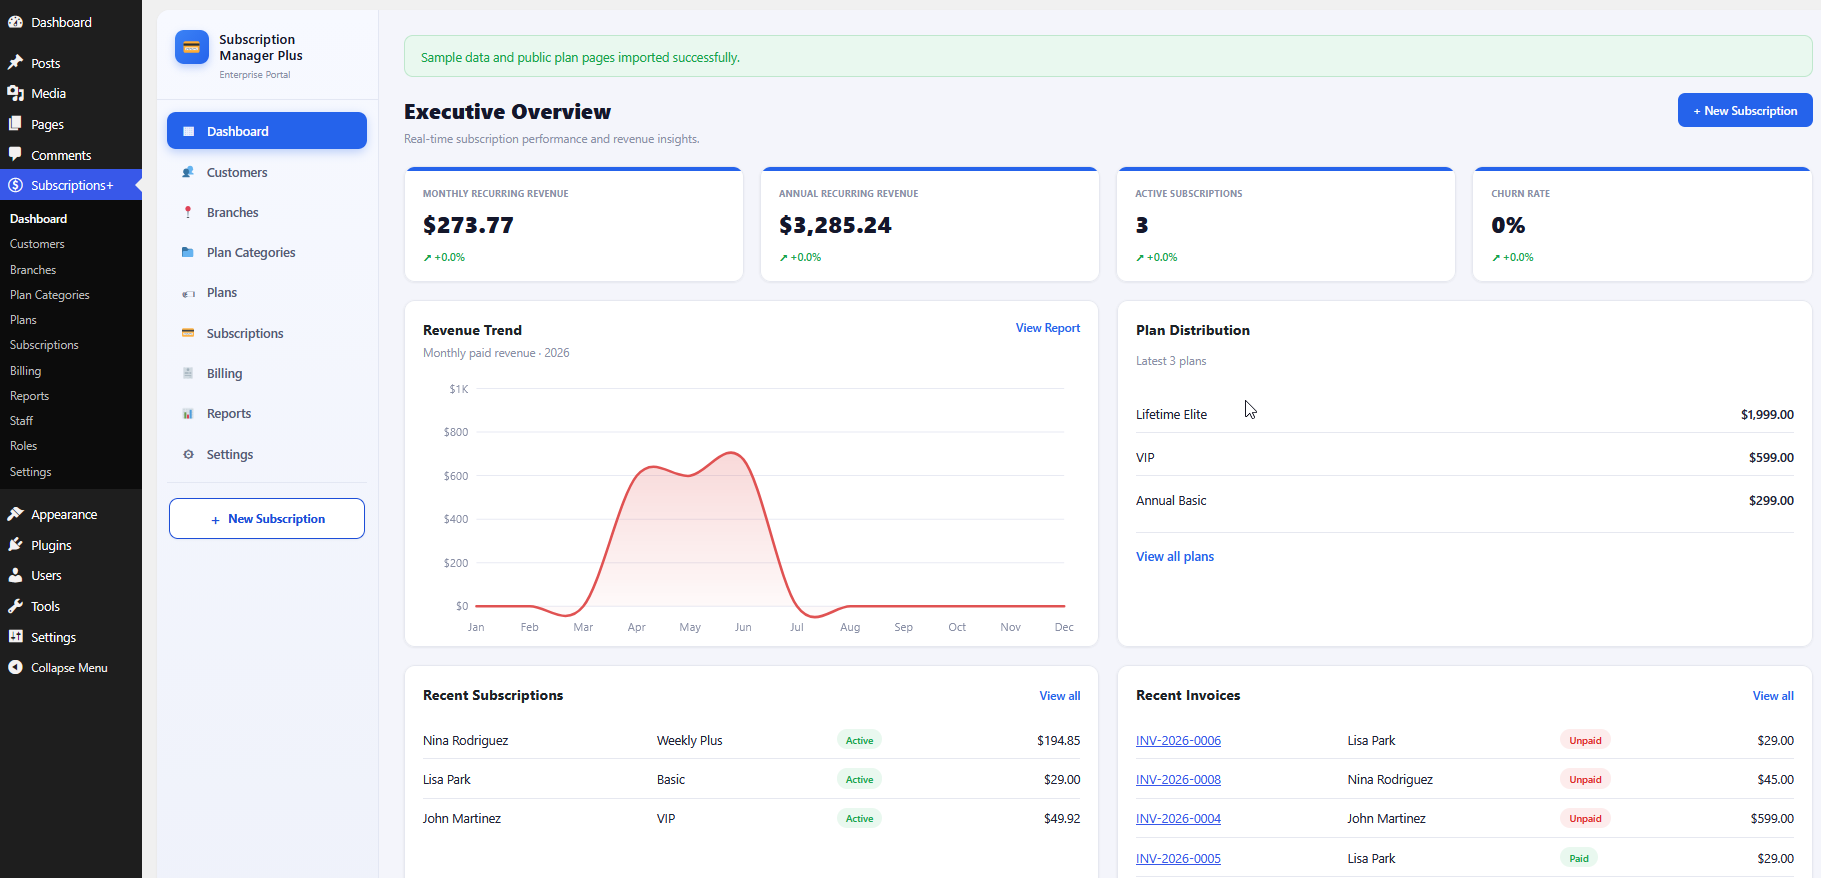
Figure 3 — Dashboard after sample data and public plan pages are imported.
4. Executive Dashboard
The Dashboard summarizes subscription performance at a glance:
- Monthly Recurring Revenue (MRR) and Annual Recurring Revenue (ARR)
- Active Subscriptions and Churn Rate
- Revenue Trend chart for the current year
- Plan Distribution of the latest plans
- Recent Subscriptions and Recent Invoices
5. Plan Categories & Plans
Categories organize plans for different businesses (gyms, ISP, SaaS, coaching, and more). Each category can have a public WordPress page with pricing shortcodes.
5.1 Manage plan categories
- Open Plan Categories from the portal sidebar.
- Click + Add Category to create a new group, or edit an existing card.
- Use Create public pages to generate WordPress pages with the locations + plans shortcode.
- Open View public page on a category card to preview the storefront.
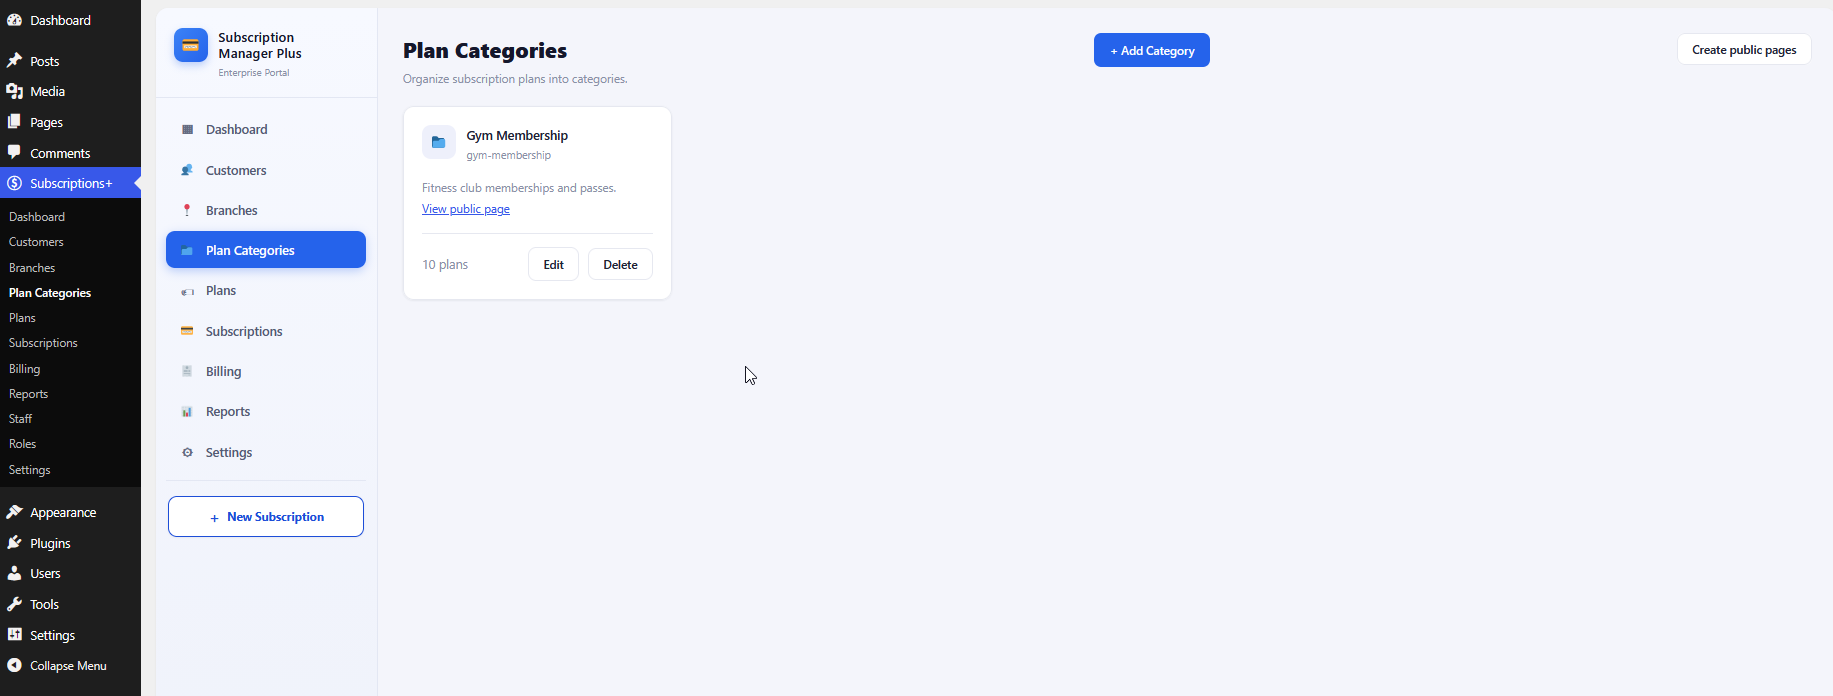
Figure 4 — Plan Categories with public page actions.
5.2 Add a plan (including during subscription setup)
Plans can be created from the Plans module or on-the-fly while creating a subscription. Fill in plan name, price, currency, billing interval, trial days, and description, then click Create Plan.
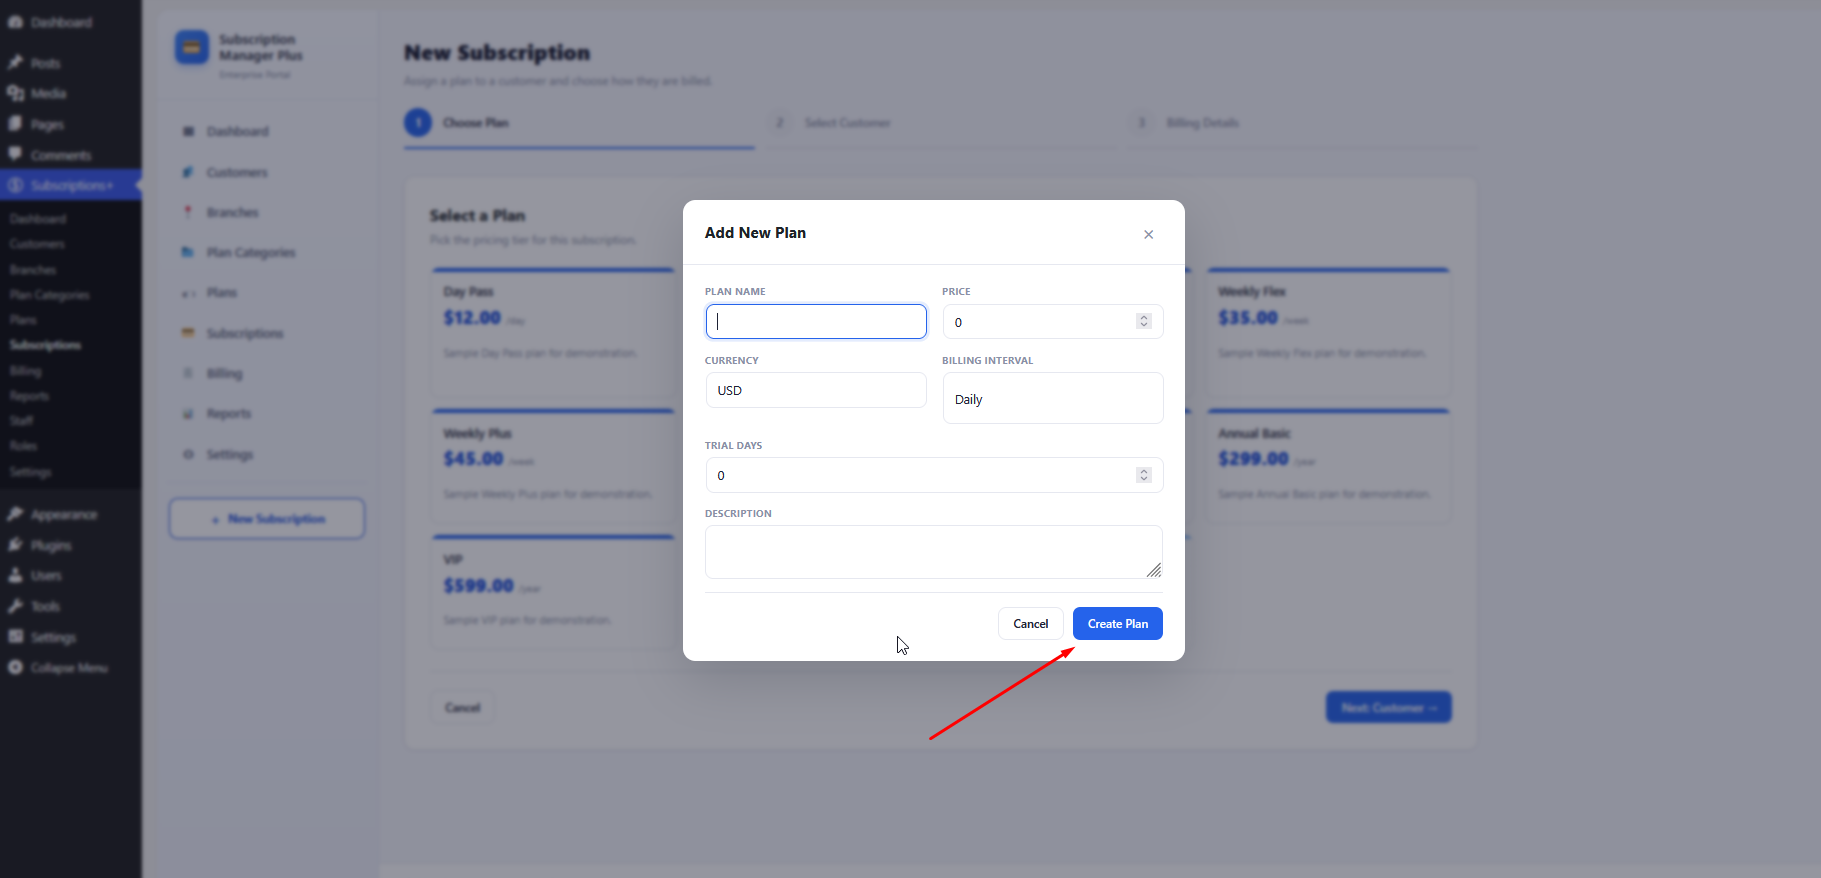
Figure 5 — Add New Plan modal with Create Plan action.
6. Branches
Branches represent regional offices or locations. Assign customers to branches and optionally display them in the frontend locations grid.
6.1 Branch list
Each branch card shows an image, name, region, address, phone, hours, assigned customer count, plus Edit and Details actions. Mark one branch as Main headquarters when needed.
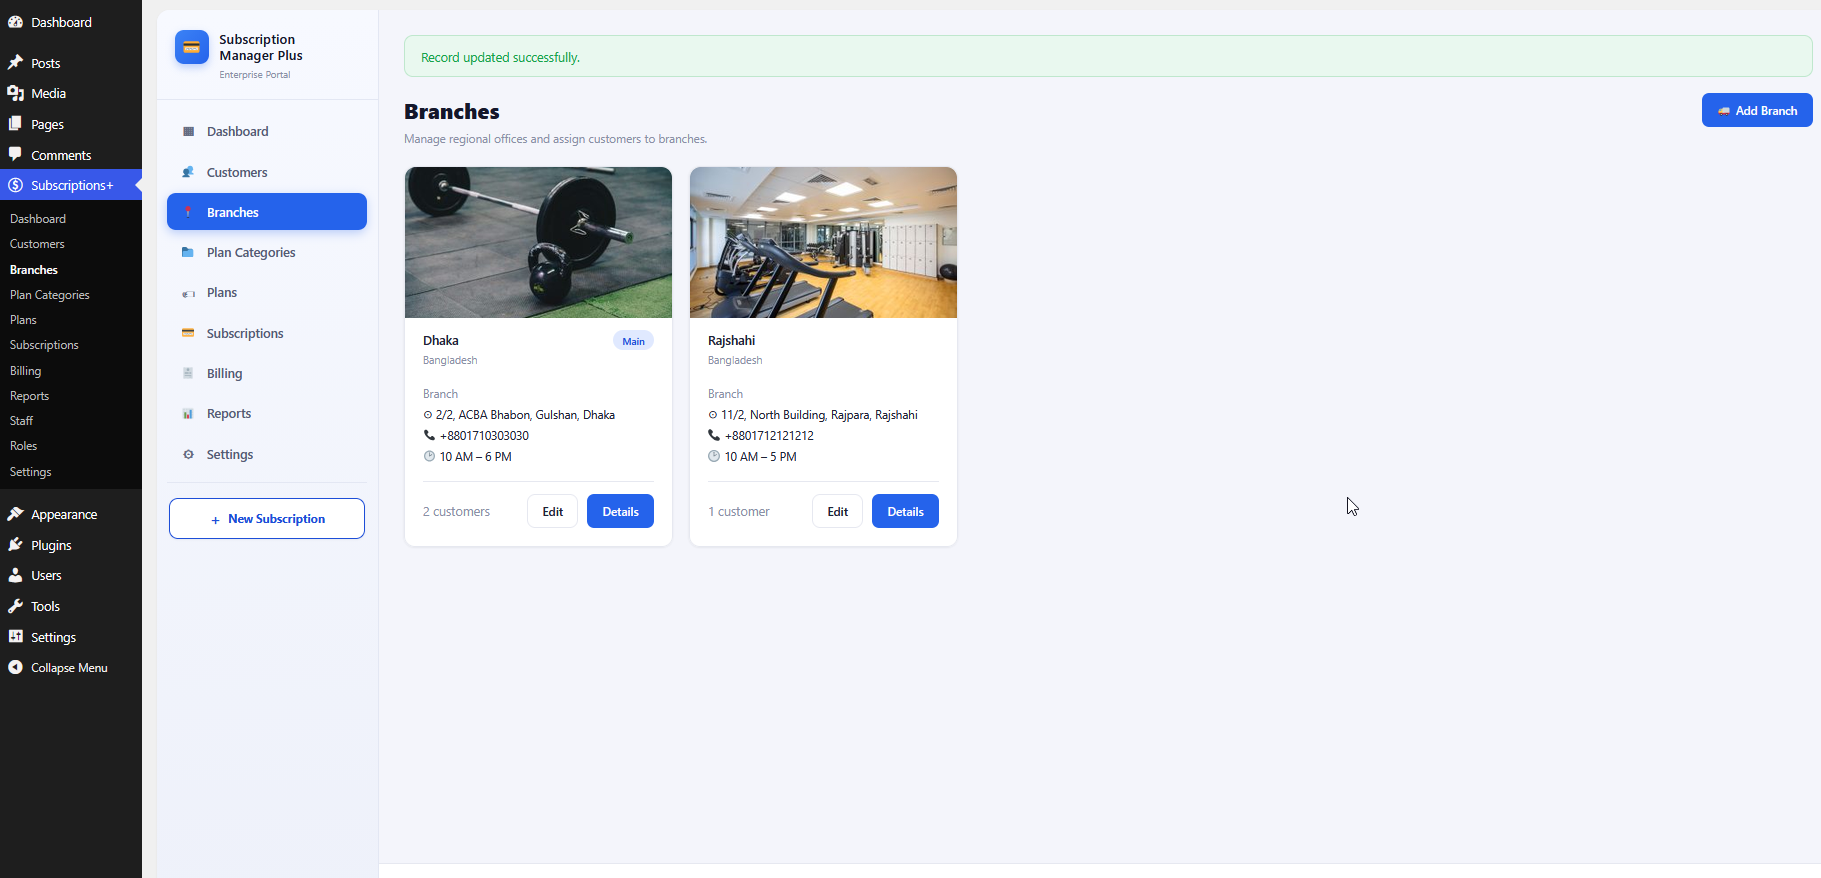
Figure 6 — Branches overview.
6.2 Add a branch
- Click + Add Branch.
- Enter name, code, region, address, phone, and opening/closing times.
- Optionally upload a branch image and list amenities (one per line).
- Set Main headquarters / Active flags, then click Create Branch.
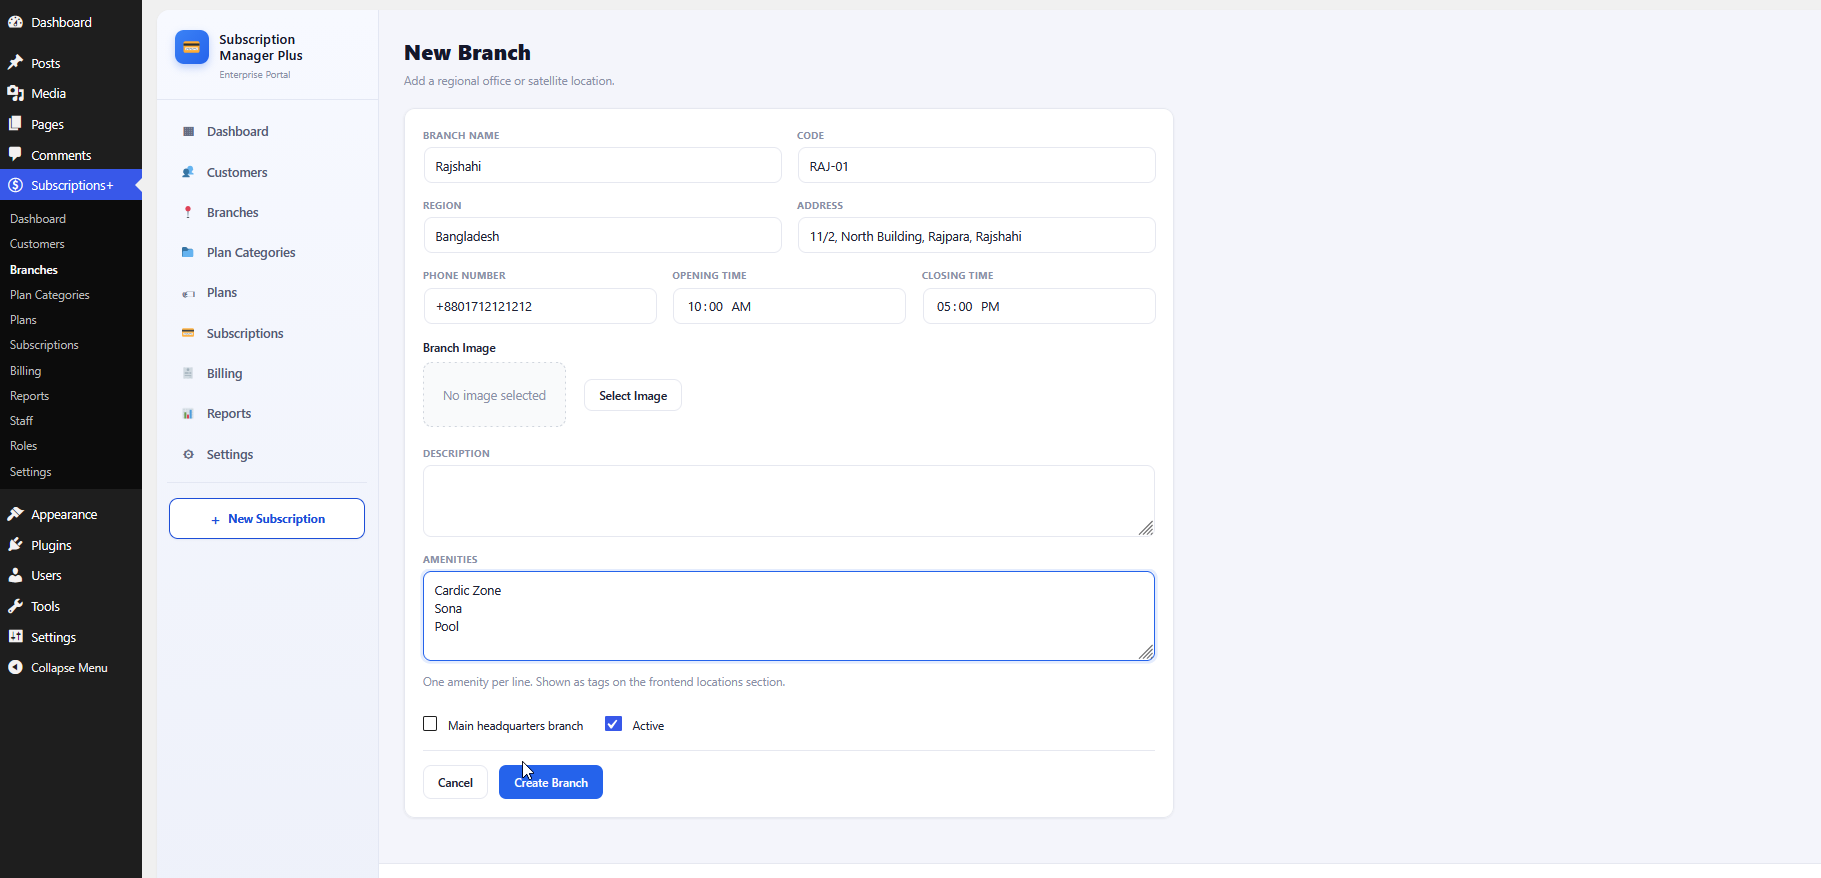
Figure 7 — Creating a new branch.
7. Customers
The Customers module is your subscriber directory. Search by name, email, or ID, and filter by status or branch. Summary cards show total revenue, total customers, and active trials.
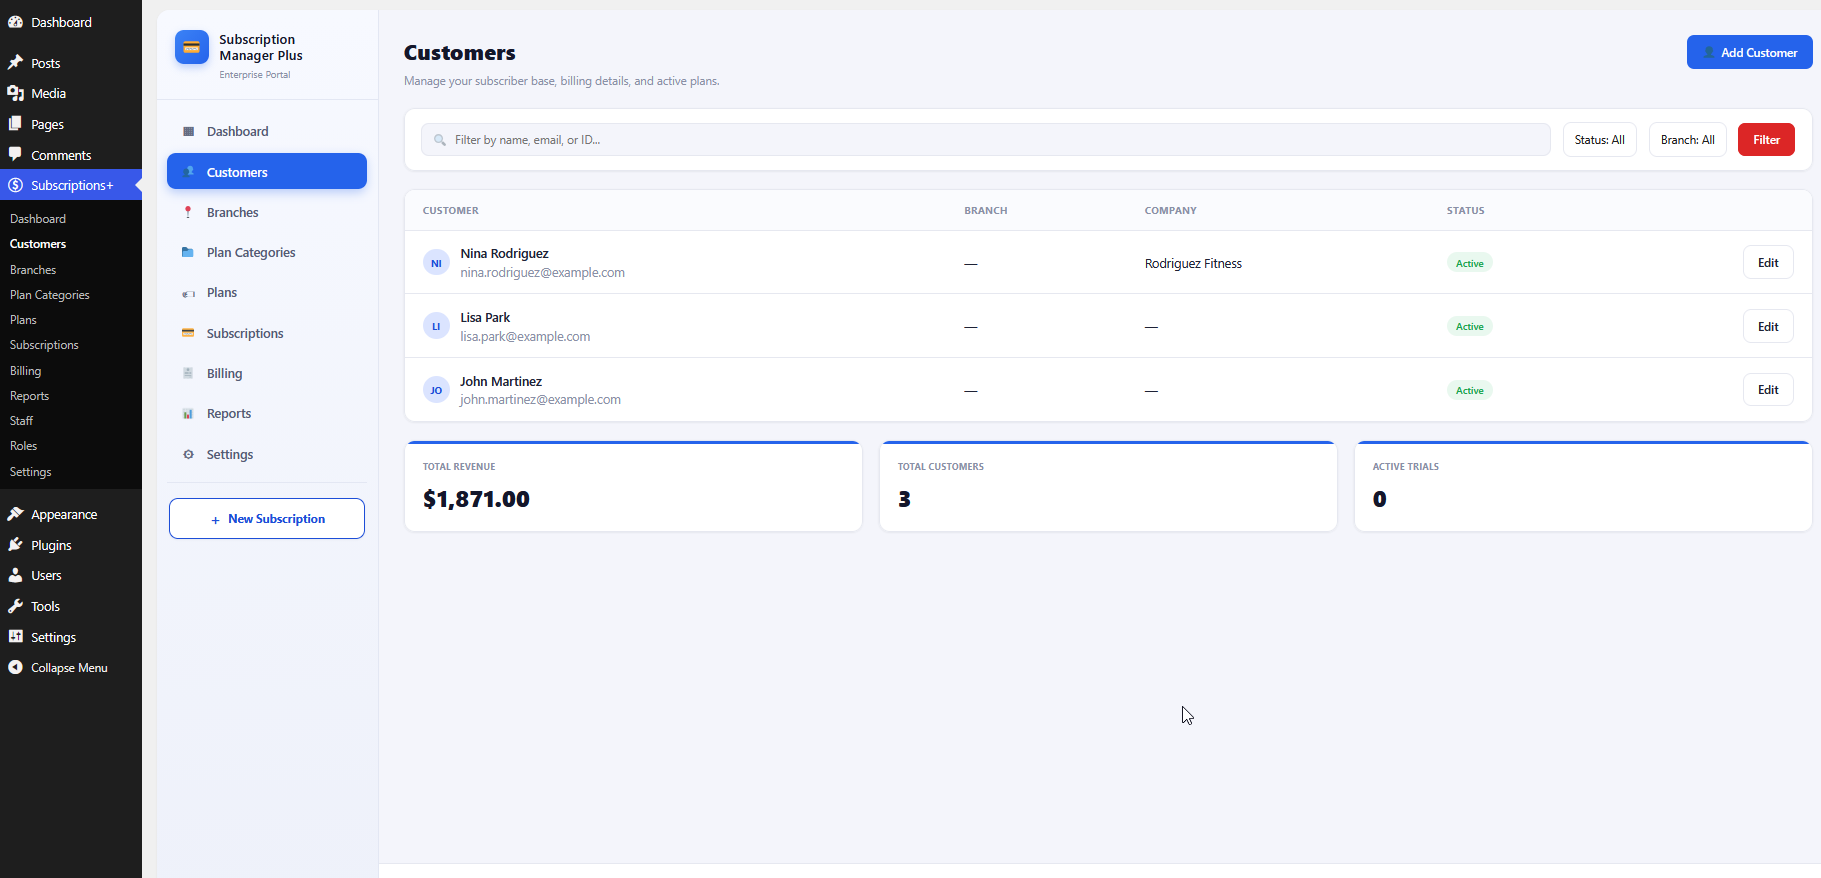
Figure 8 — Customers list and filters.
7.1 Add a customer on the fly
During subscription creation (Step 2), click Add New Customer to open a modal. Provide full name, email, phone, company, and optional branch, then Create Customer.
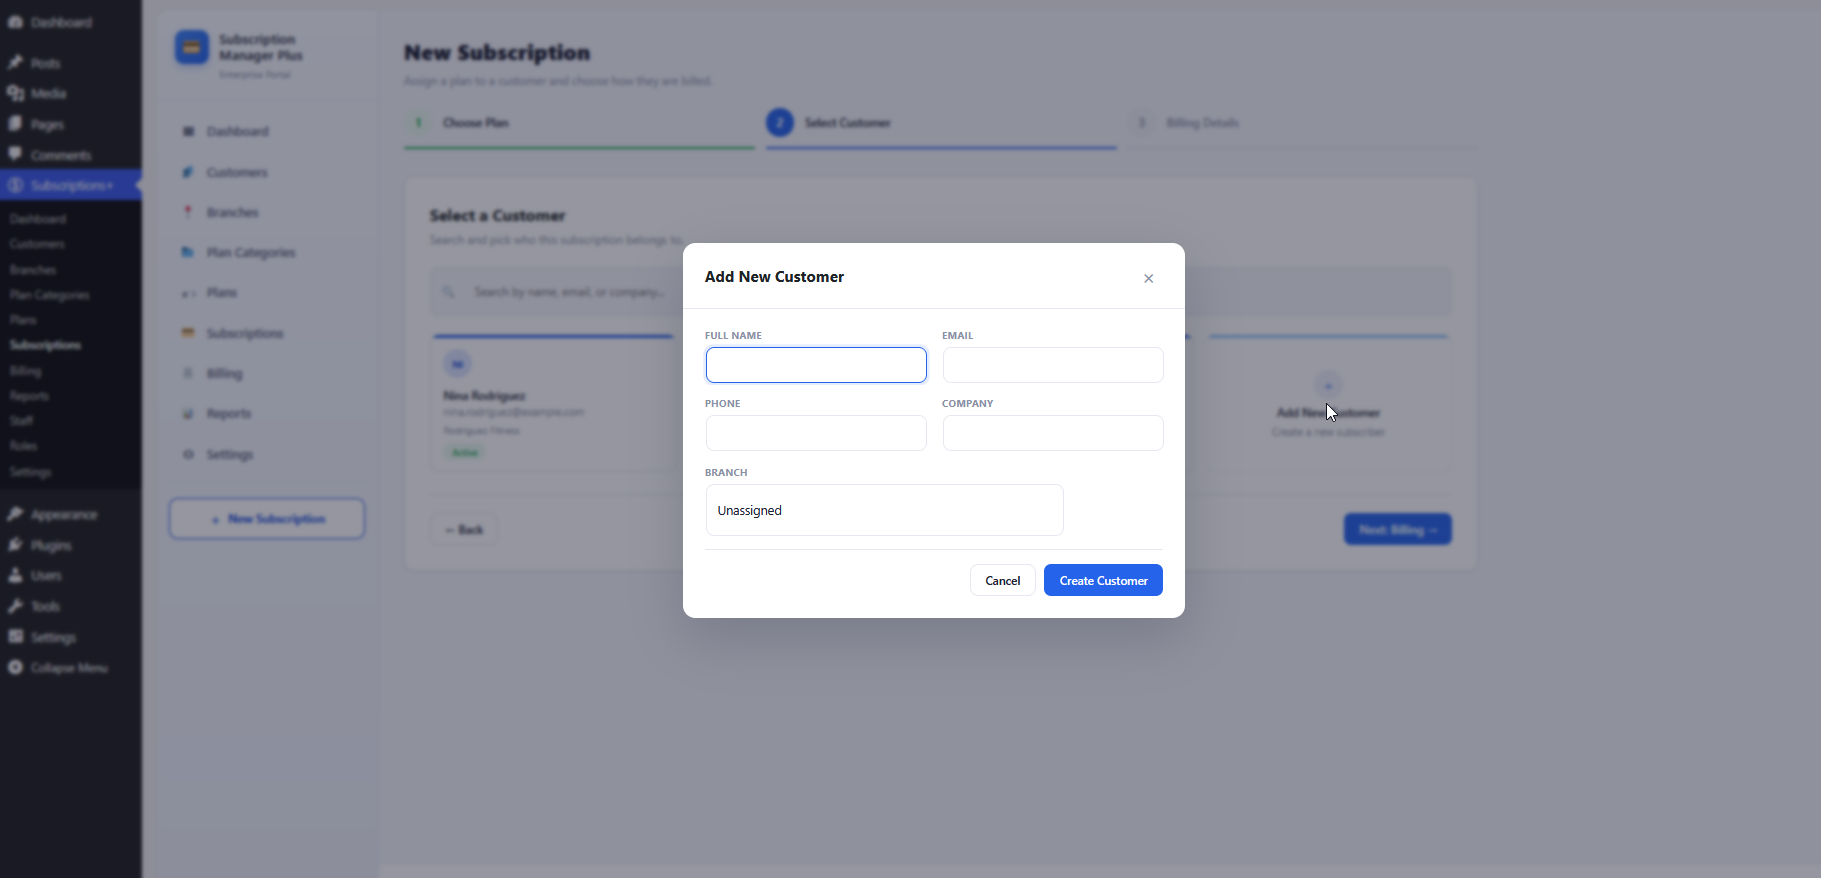
Figure 9 — Add New Customer modal.
8. Create a Subscription (3-Step Wizard)
Creating a subscription is a guided flow: choose a plan, select a customer, then configure billing. Start from + New Subscription in the sidebar or header.
8.1 Start the wizard
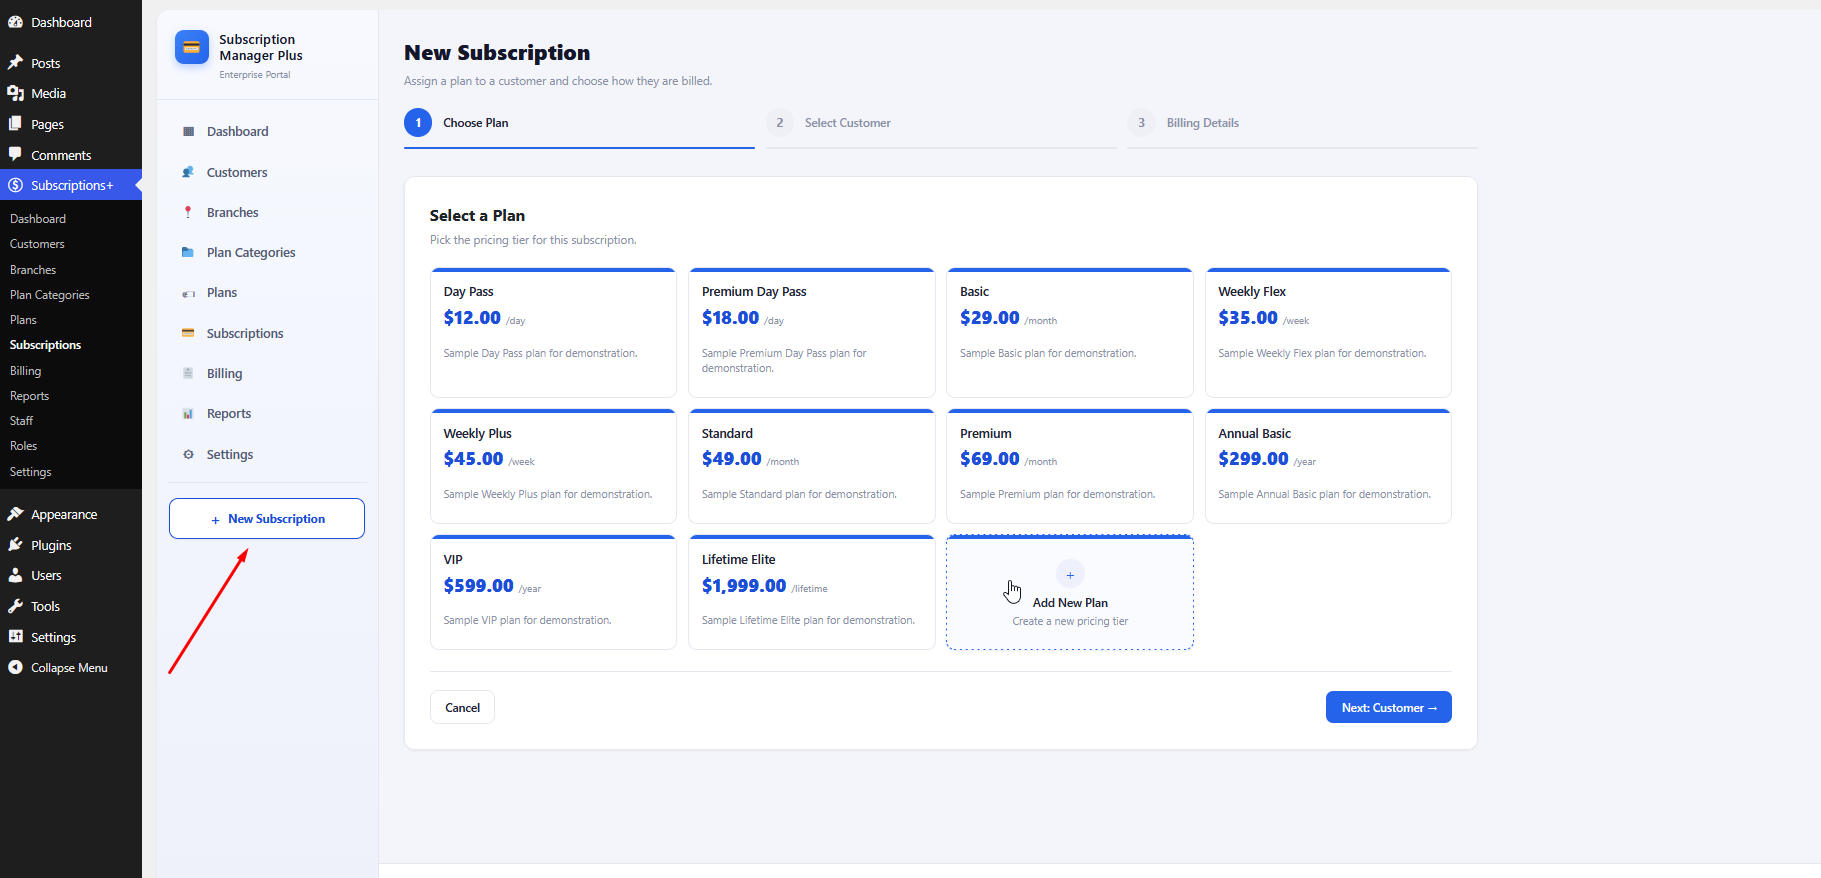
Figure 10 — Entry point: + New Subscription opens the wizard.
8.2 Step 1 — Choose Plan
Select a pricing tier from the plan cards (day, week, month, year, or lifetime). Selected cards show a blue border and checkmark. Click Next: Customer →.
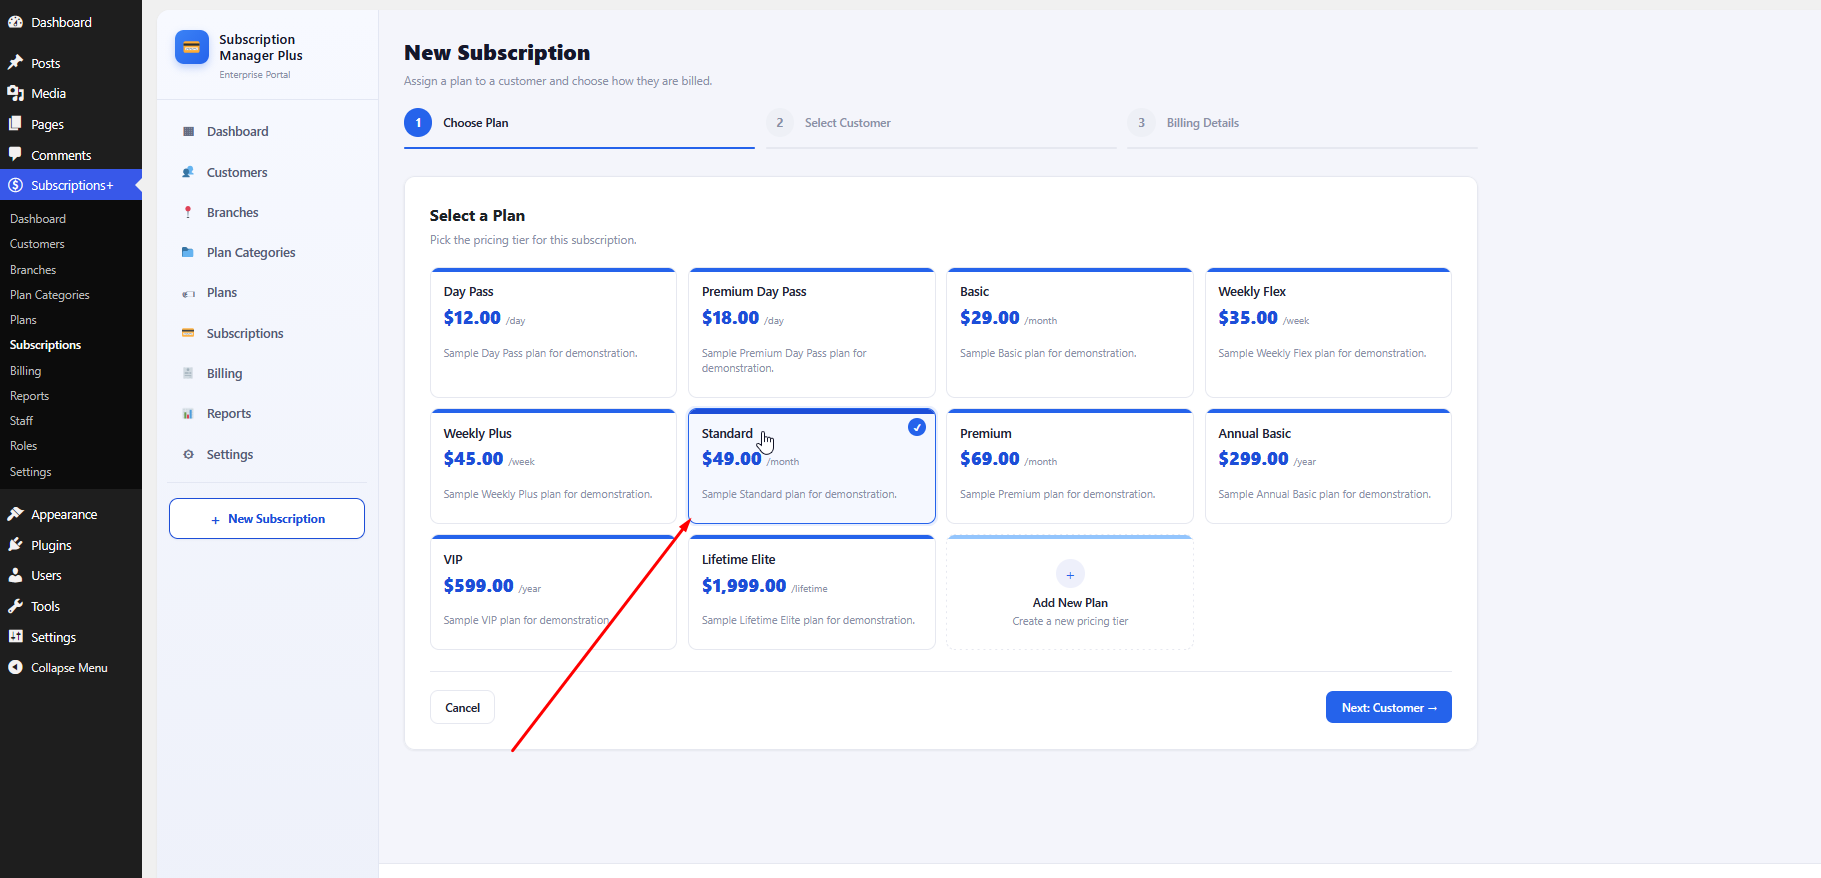
Figure 11 — Step 1: Select a plan.
8.3 Step 2 — Select Customer
Search and pick an existing customer, or create a new one. Selected customers are highlighted. Click Next: Billing →.
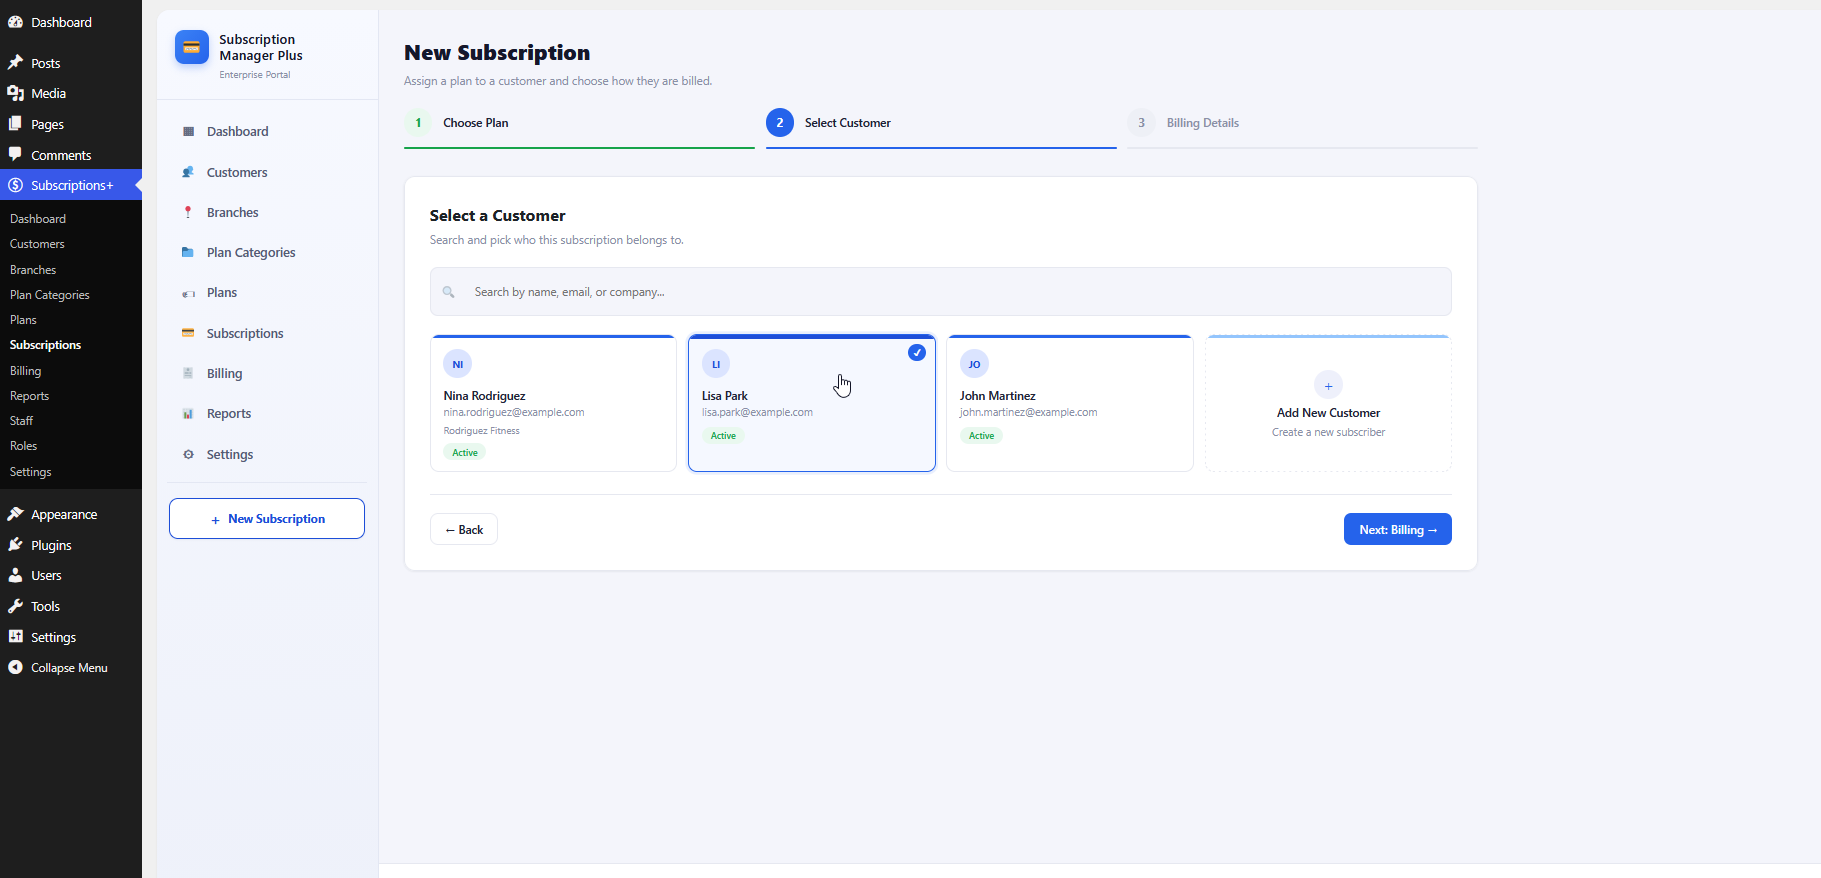
Figure 12 — Step 2: Select a customer.
8.4 Step 3 — Billing Details
Confirm plan and customer, then set status, quantity, start date, optional trial end, payment gateway, and auto-renew.
Manual / Offline gateway — emails an invoice with a payment link each cycle; the customer pays manually.
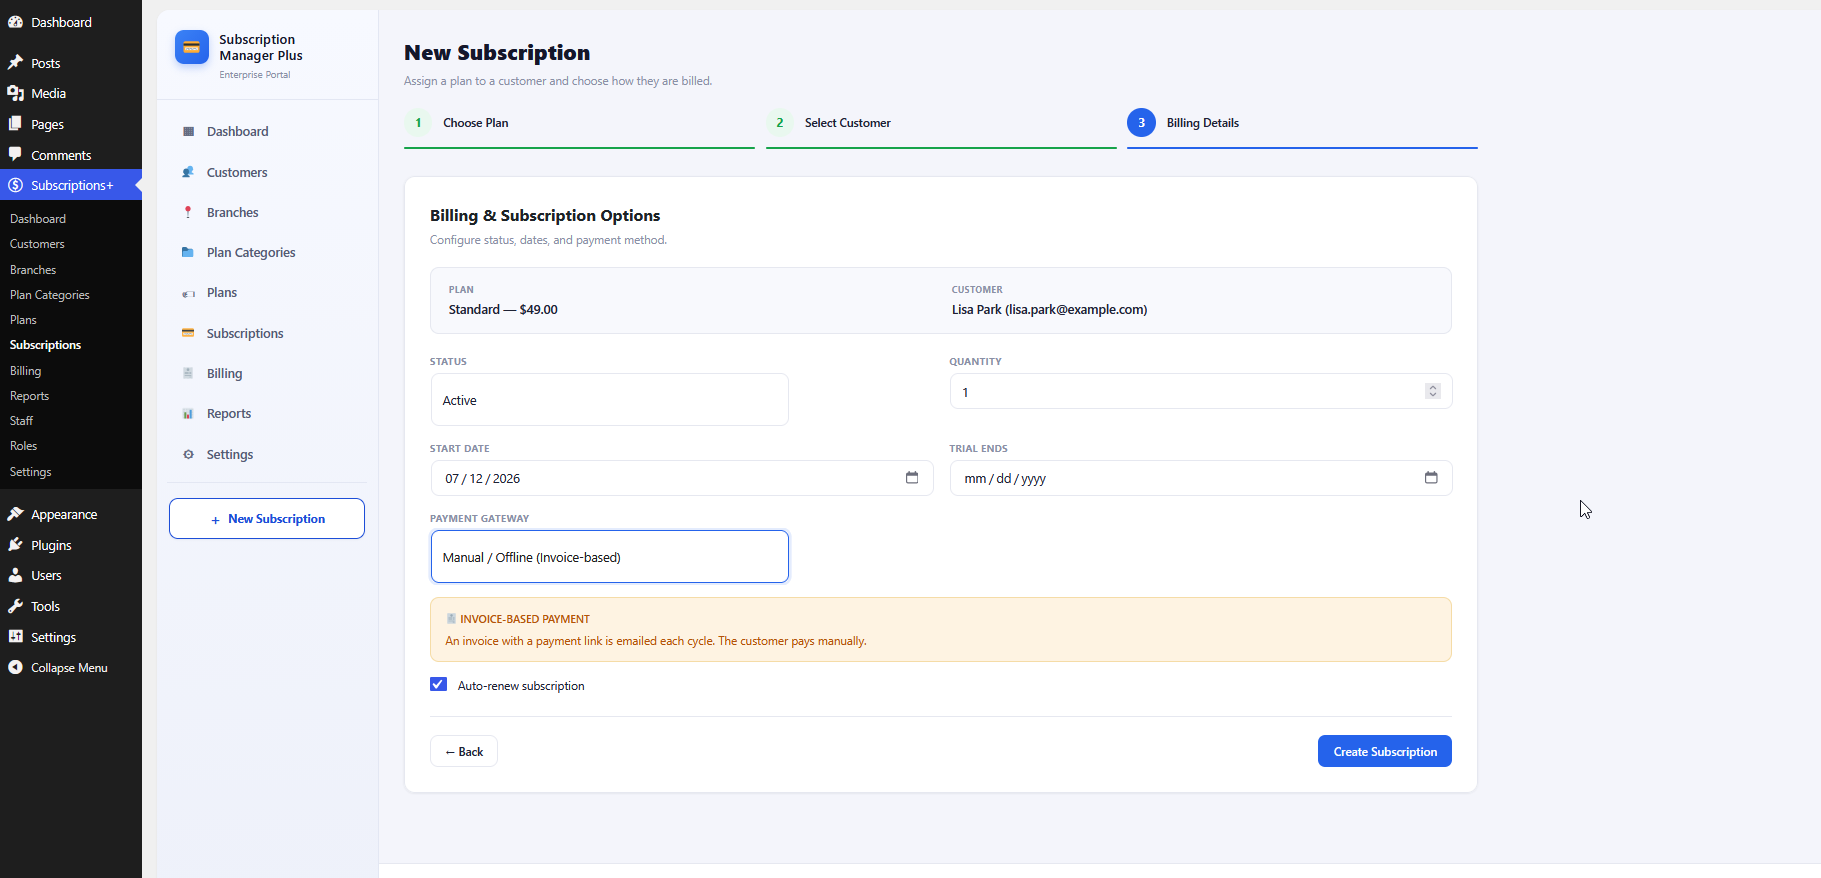
Figure 13 — Manual / Offline (invoice-based) billing.
Stripe (Automatic Recurring) — charges the saved card automatically each billing cycle without sending a pay-by-link invoice.
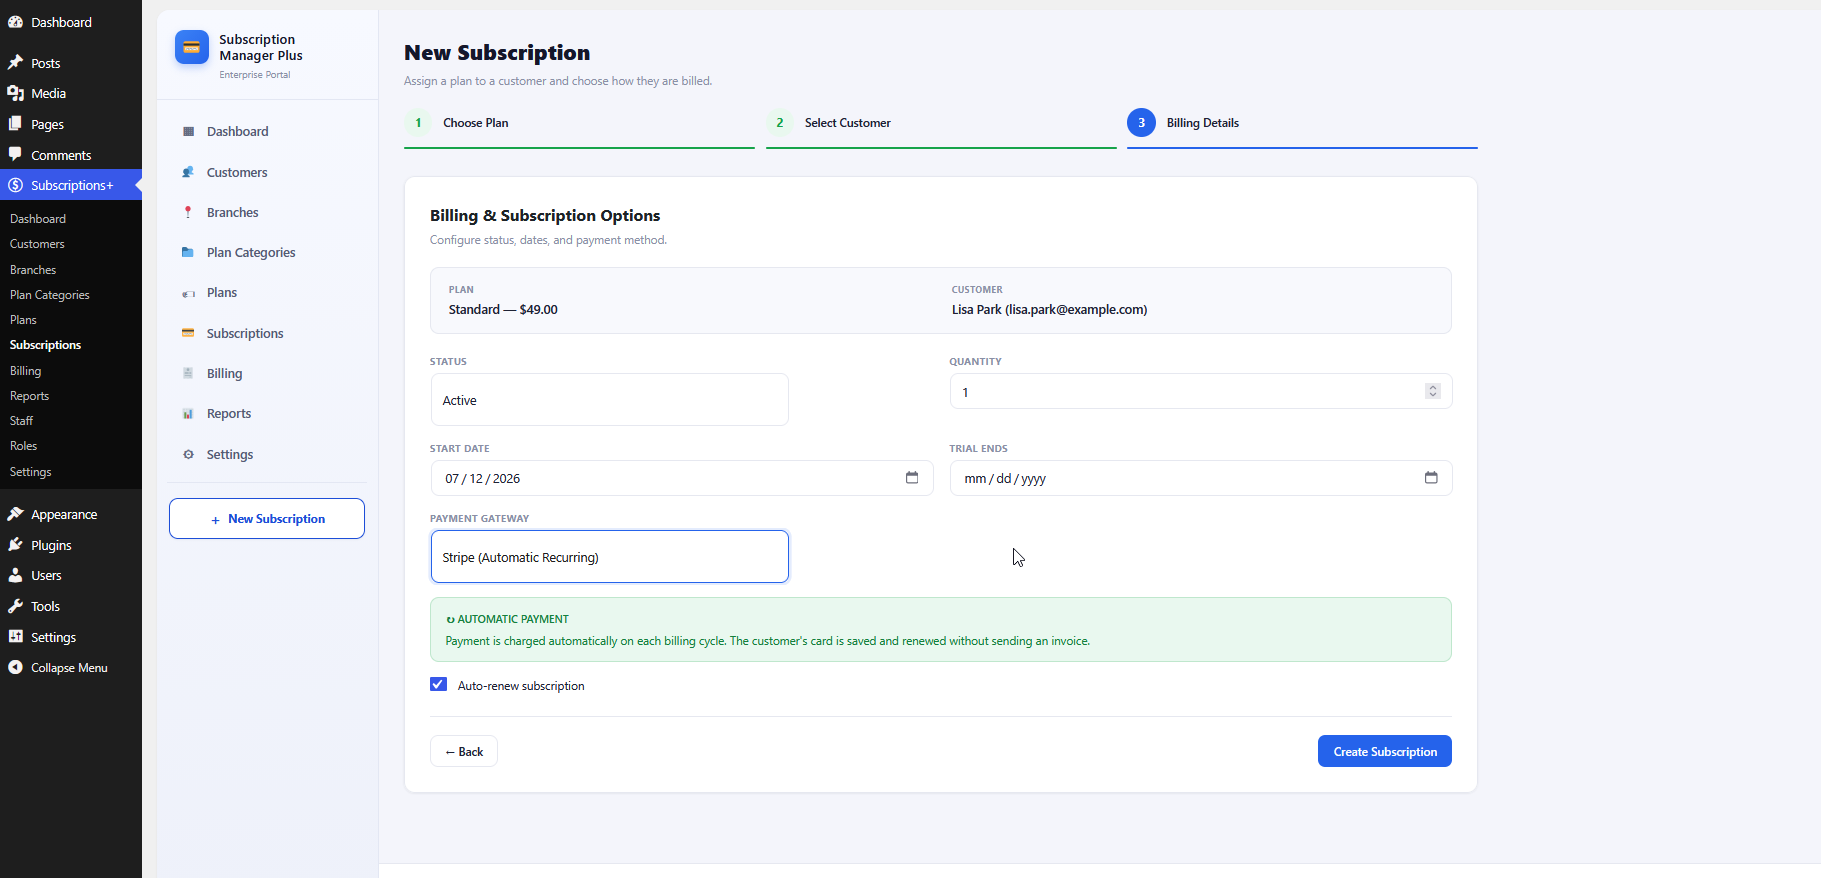
Figure 14 — Stripe automatic recurring billing.
8.5 Subscriptions list
Track lifecycles with search and status filters. Each row shows customer, plan badge, MRR, status, start date, and a Manage action.
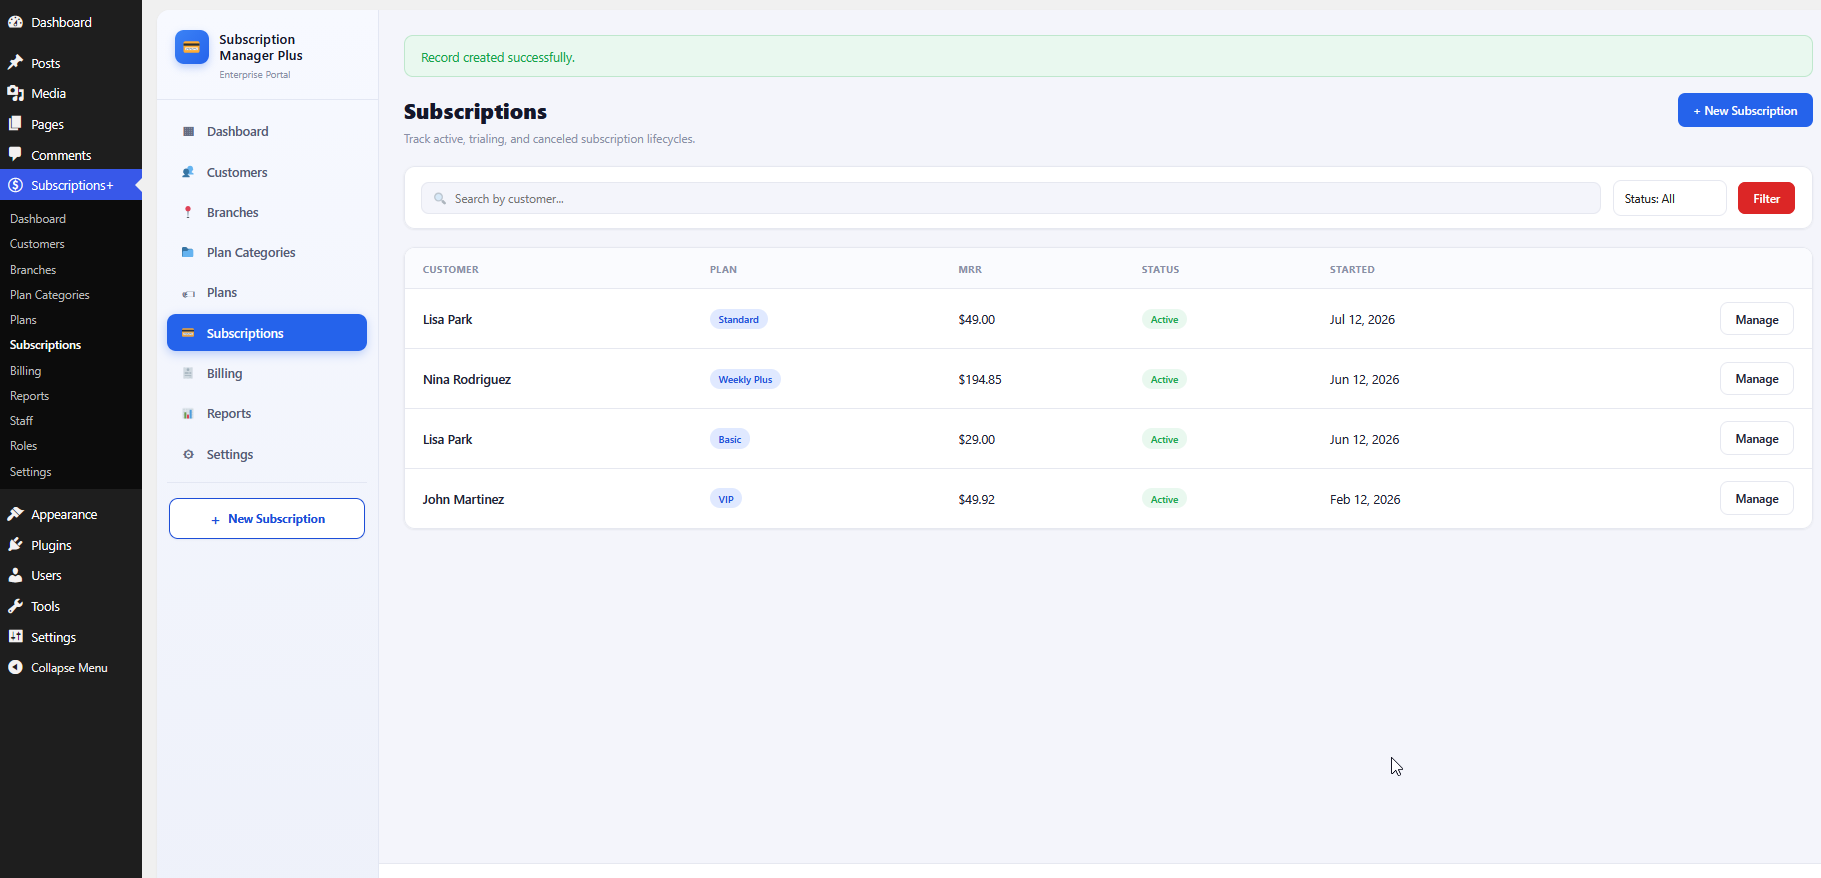
Figure 15 — Subscriptions list with active records.
9. Billing & Invoices
The Billing module lists all invoices with status filters. Unpaid invoices offer View and Mark Paid; paid invoices offer View.
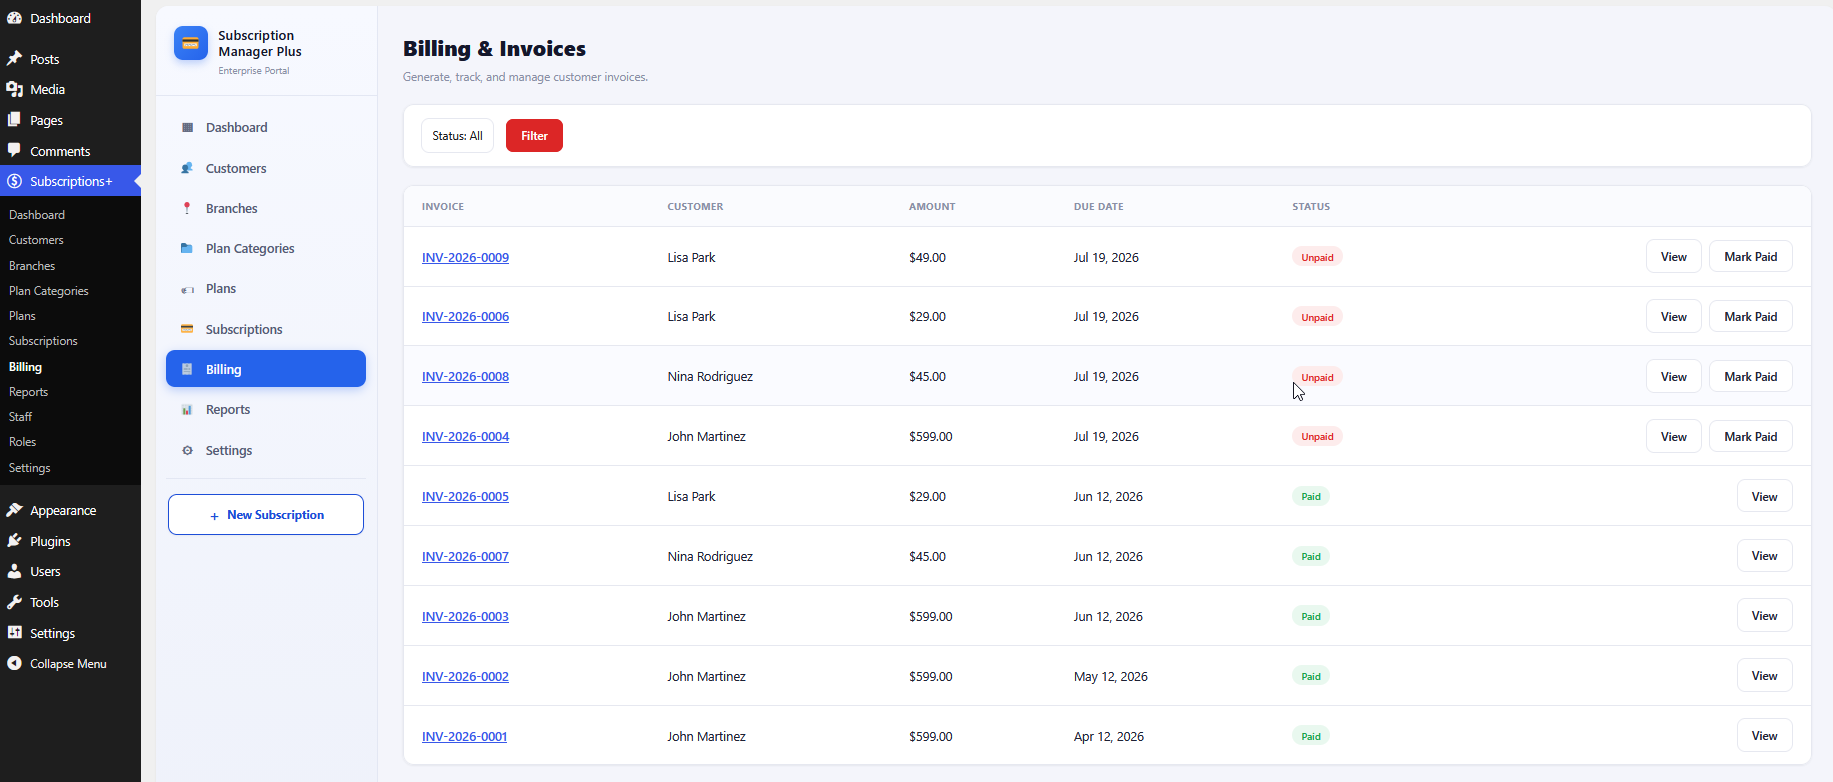
Figure 16 — Billing & Invoices list.
9.1 Invoice detail
Open an invoice to review customer and subscription links, edit payment details (status, method, amount, currency, due date, transaction ID, payment URL), and use actions such as Mark as Paid, Resend Payment Link, or Delete Invoice.
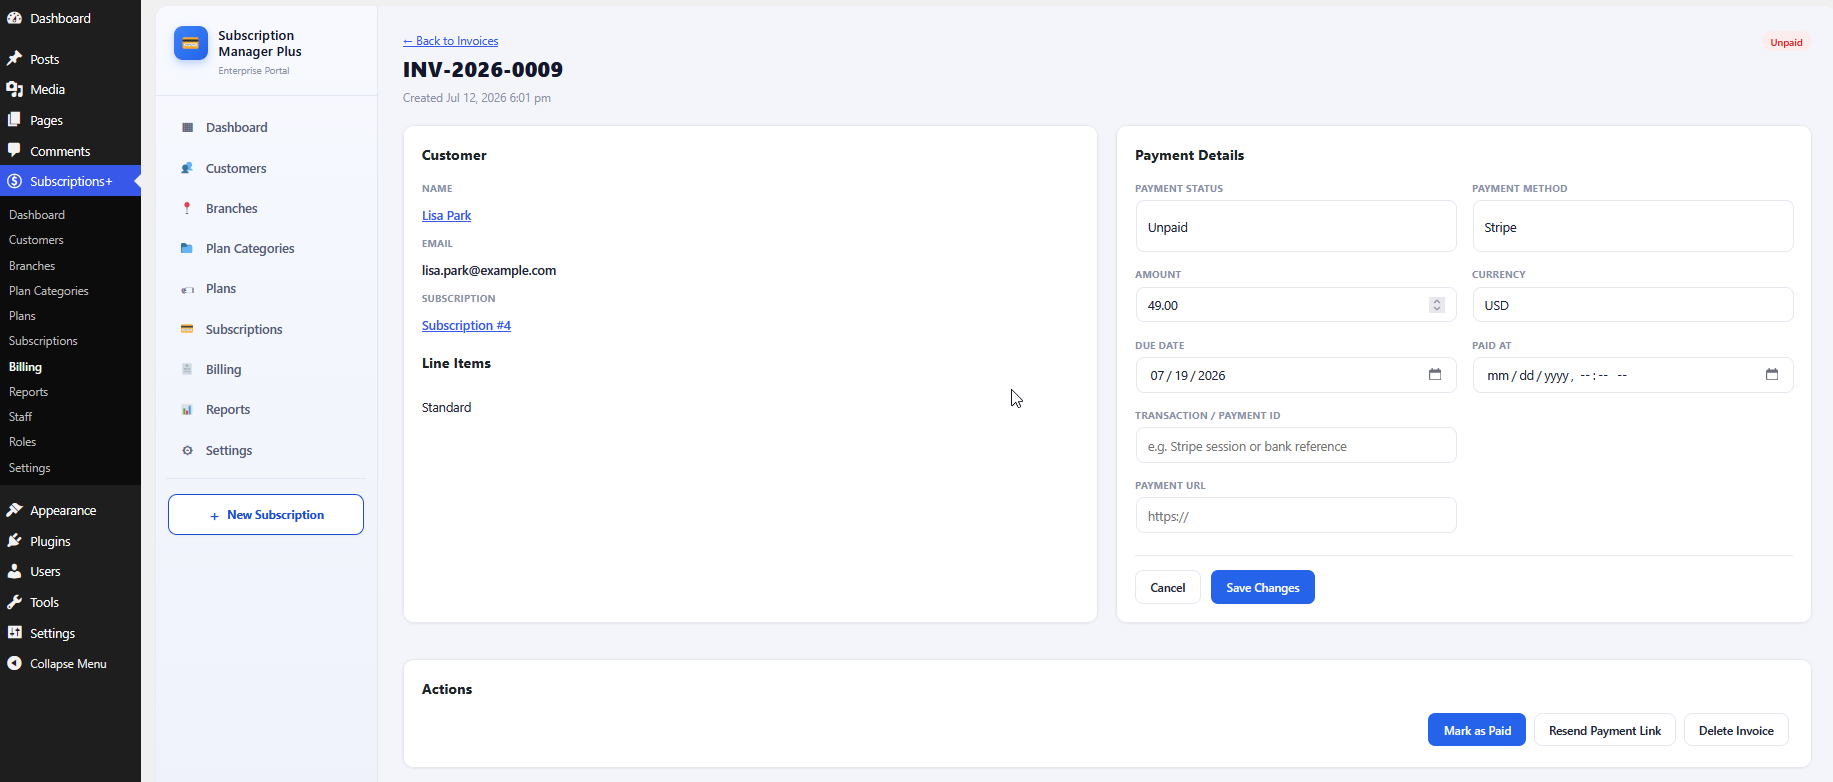
Figure 17 — Invoice detail and payment actions.
10. Reports
Reports provide a last-30-days overview of paid revenue, new subscriptions, cancellations, current MRR, invoice status counts, a revenue-by-day chart, and breakdowns by gateway and plan.
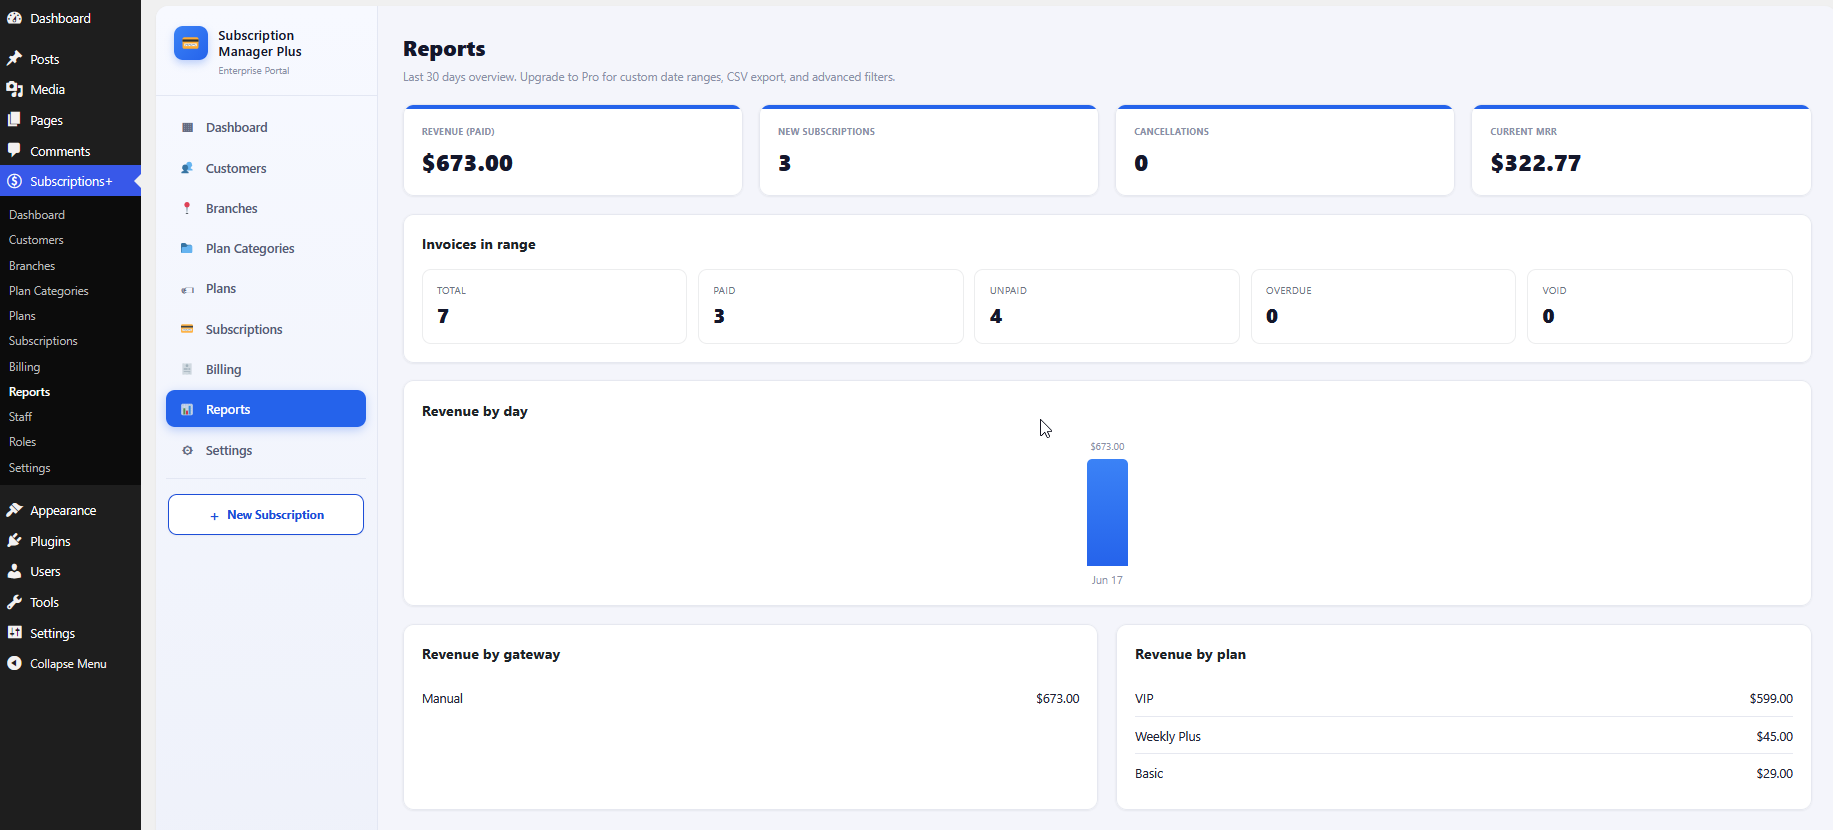
Figure 18 — Reports dashboard (last 30 days).
11. Settings — General
Go to Settings → General to configure company identity and defaults: company name, support email, default currency, timezone, and admin footer text (supports {year}).
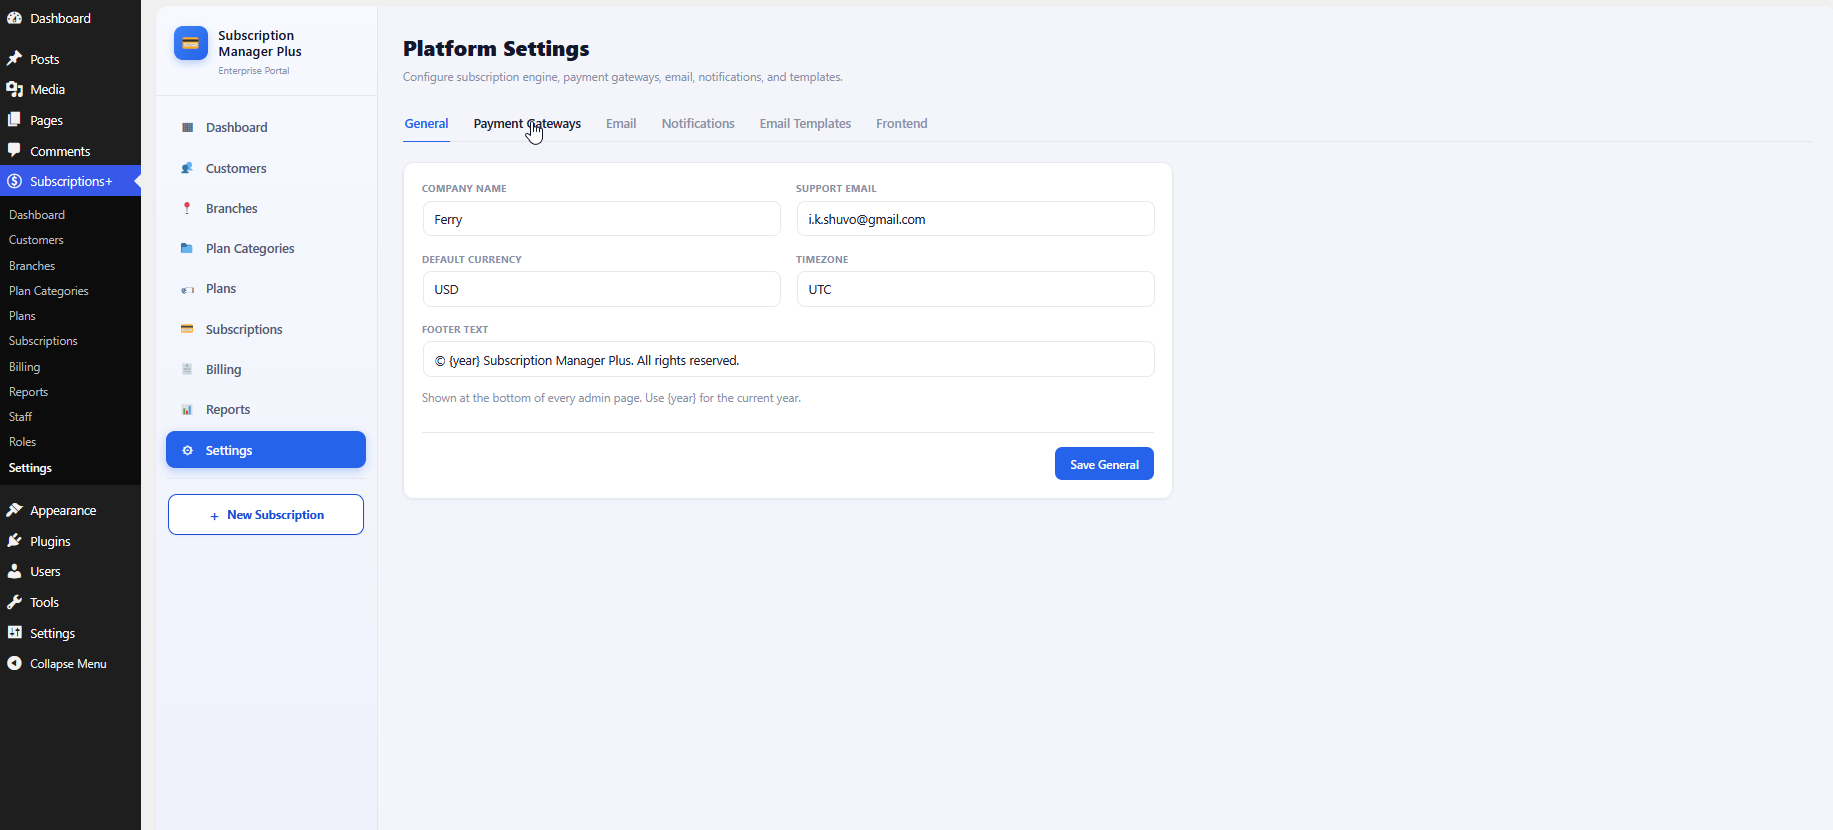
Figure 19 — Platform Settings → General.
12. Settings — Payment Gateways
Configure how customers are billed. The free plugin includes Stripe (automatic card charges), Manual / Offline, SSLCommerz, Razorpay, and PayPal (invoice / payment-link based).
- Set the Default Payment Gateway and Invoice Due Days.
- Enable Stripe and enter Secret Key, Publishable Key, and optional Webhook Secret.
- Copy the Stripe Webhook URL into your Stripe dashboard and listen for the listed events.
- Configure SSLCommerz, Razorpay, or PayPal when you need regional invoice-based checkout.
- Toggle whether Manual payment appears on public checkout.
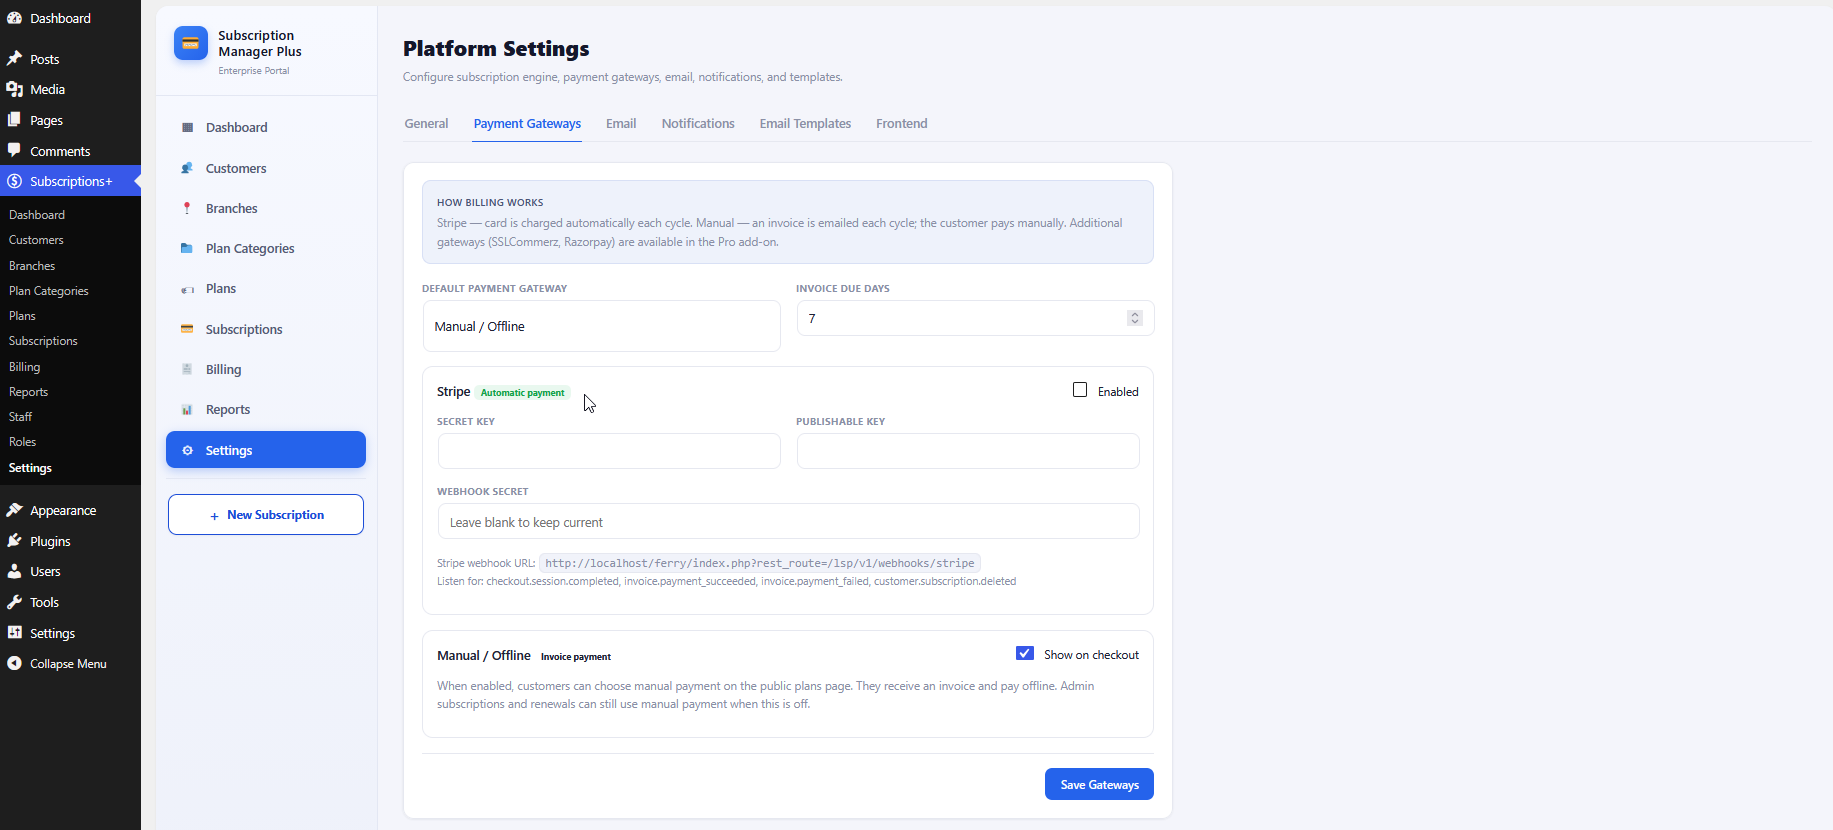
Figure 20 — Payment Gateways configuration.
13. Settings — Email & SMTP
Choose WordPress wp_mail or SMTP. Configure encryption, host, port, credentials, from address, and from name. Use Send Test Email to verify delivery.
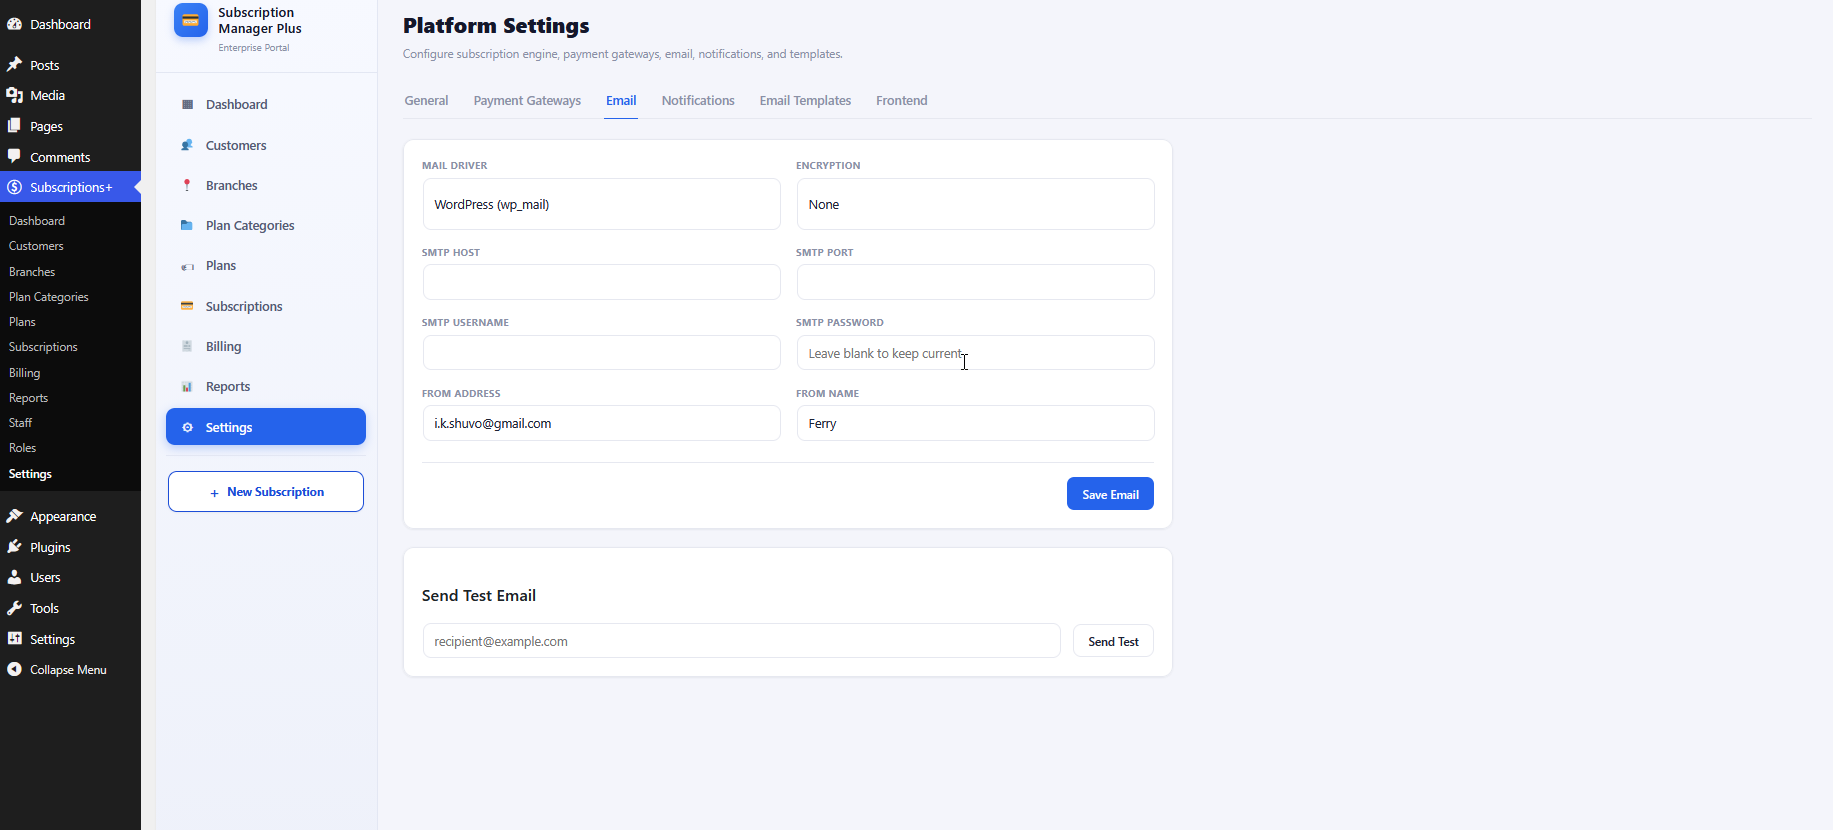
Figure 21 — Email / SMTP settings.
14. Settings — Notifications
Core email notifications are available in both Free and Pro. Choose which emails are sent to customers and admins:
- Invoice sent to customer (Free & Pro)
- Payment received confirmation (Free & Pro)
- Subscription activated for customer (Free & Pro)
- Additional reminder notifications (Pro)
- Attach PDF invoice to emails (Pro)
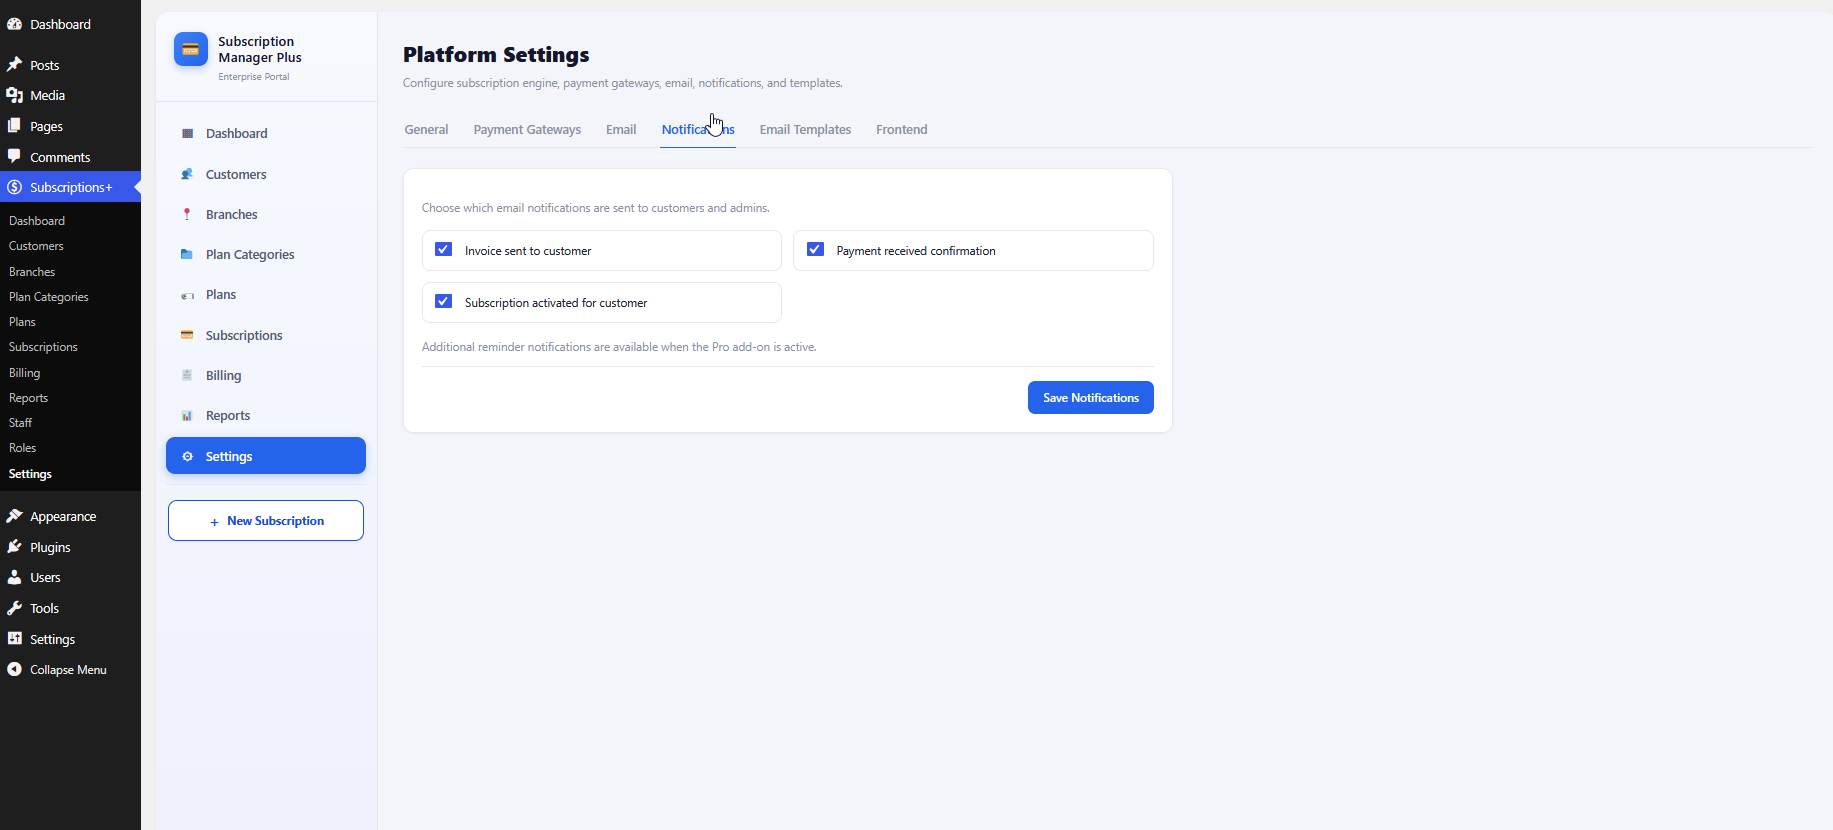
Figure 22 — Notification toggles (core options in Free; reminders & PDF attach in Pro).
15. Settings — Email Templates
Customize subject and body for invoice payment requests, overdue reminders, and other system emails. Start messages with Dear {{customer_name}}. Invoice details and payment buttons are added automatically.
Available placeholders include:
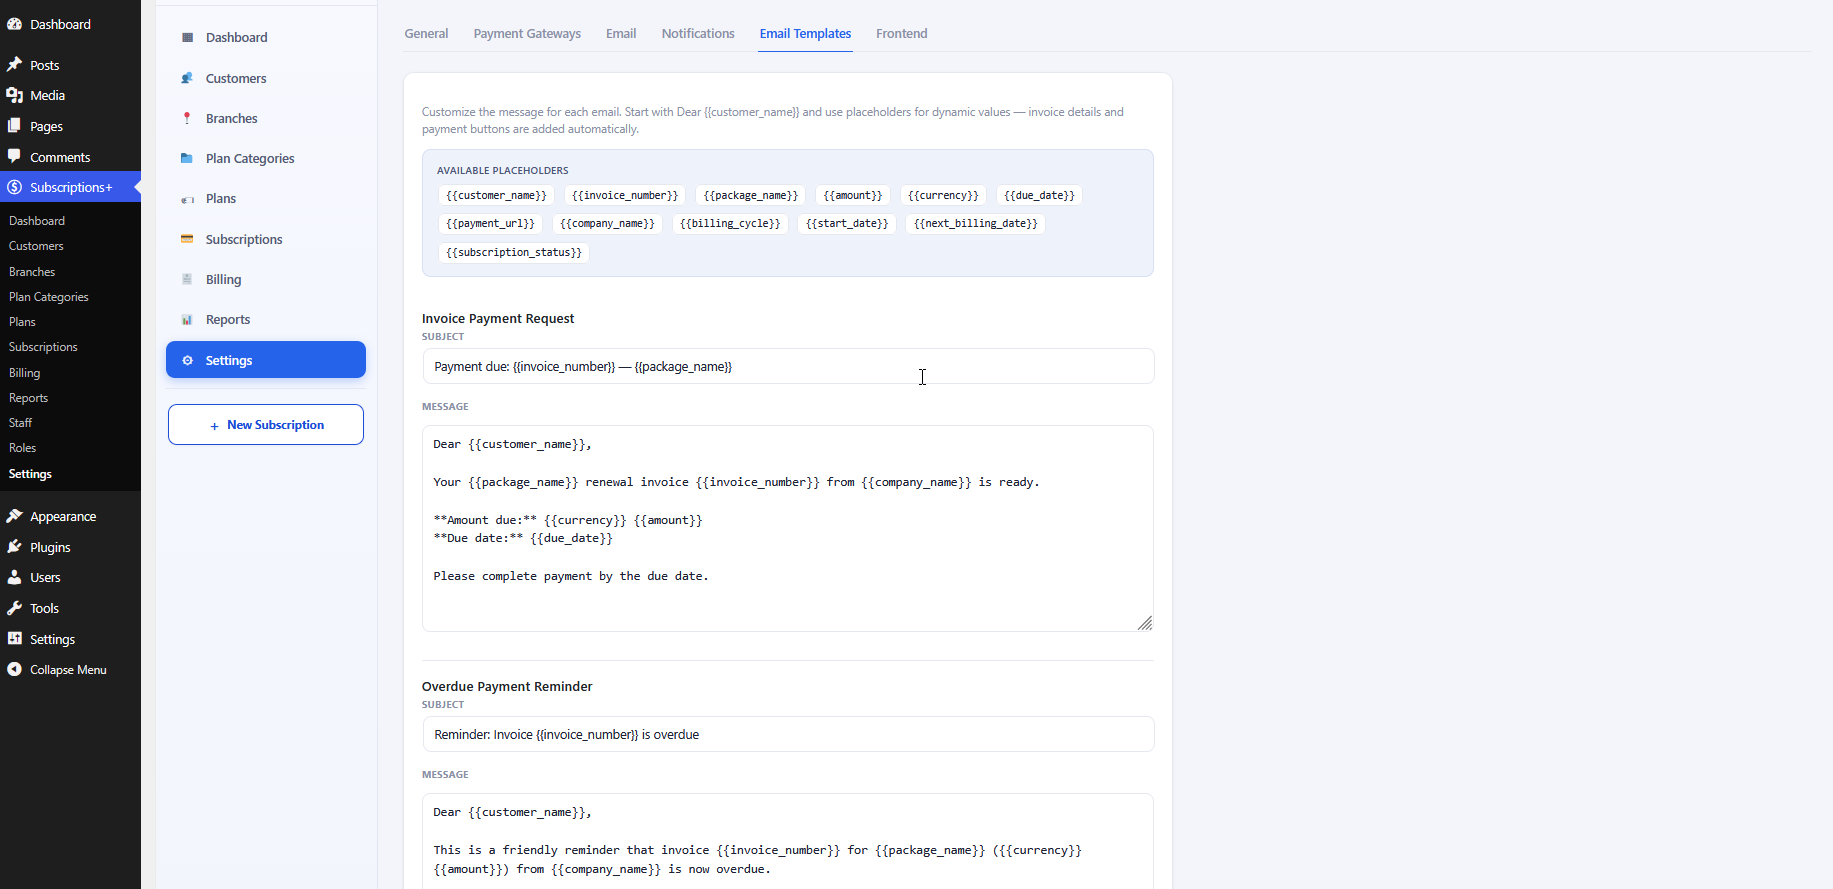
Figure 23 — Email Templates editor.
16. Settings — Frontend & Shortcodes
Control how public pricing pages look: font family, text/muted/border/checkmark colors, button accents, popular badge colors, and hero button styles. Shortcodes are listed at the top of this tab for quick copy/paste.
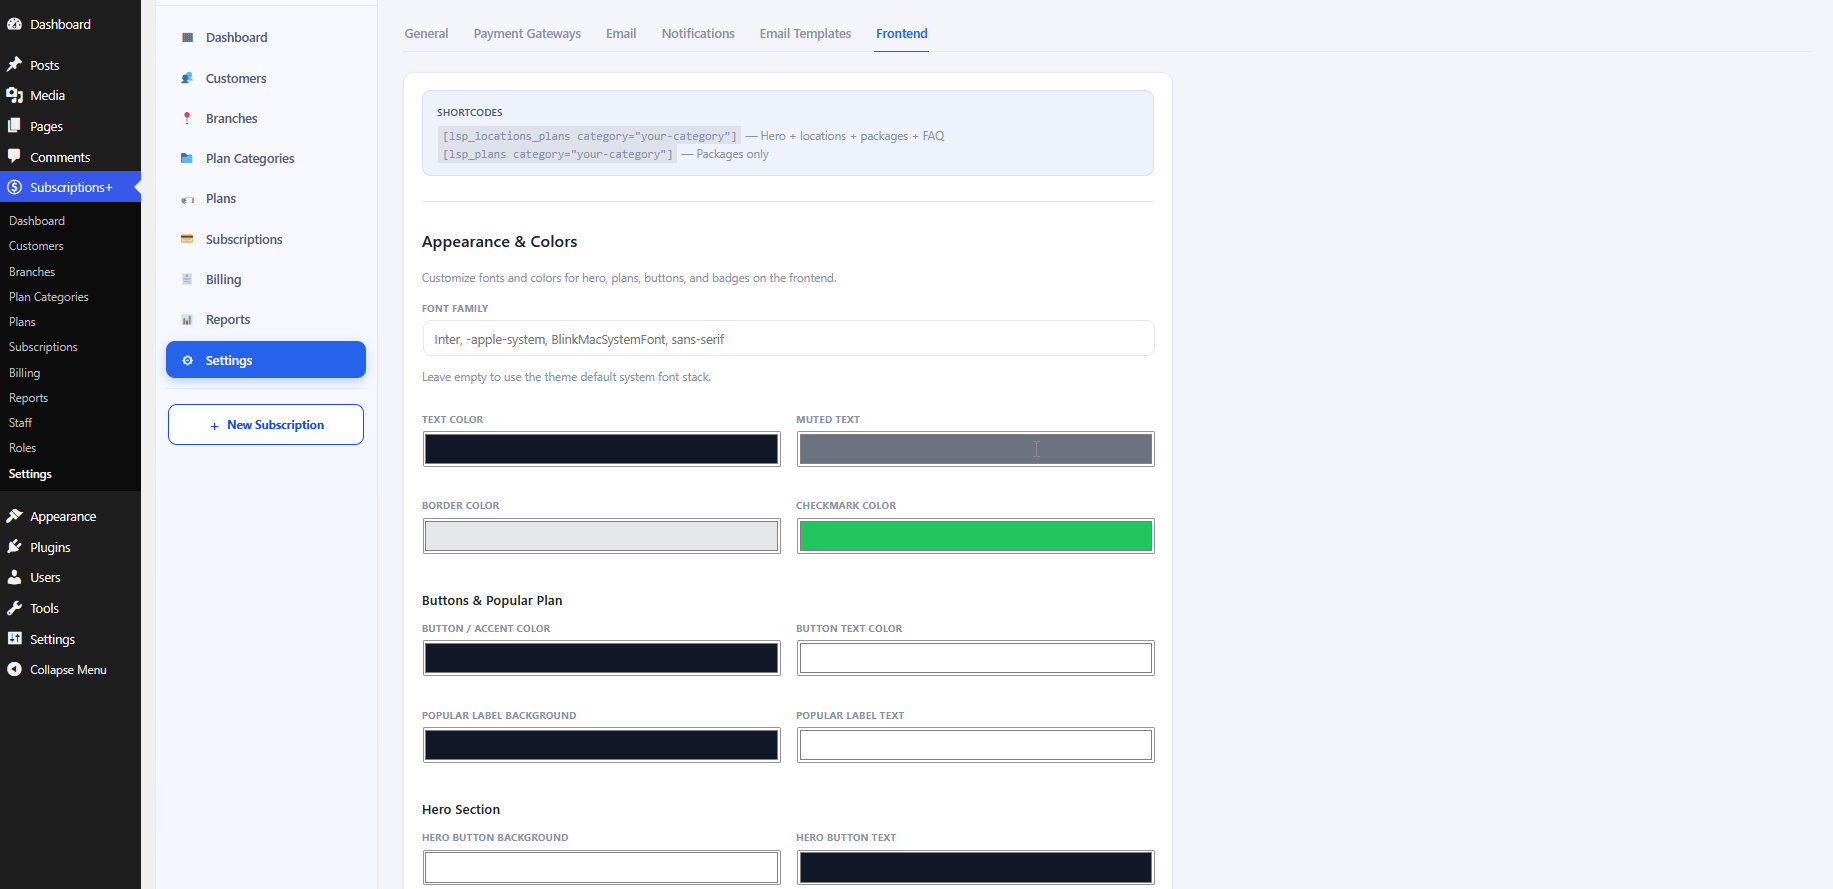
Figure 24 — Frontend appearance and shortcode reference.
Primary shortcodes
17. Public Pricing Page
Visitors see a clean membership plans section with interval tabs (Day, Week, Month, Year, Lifetime), feature lists, a Most Popular badge, and an FAQ accordion — then can choose a plan and complete checkout.
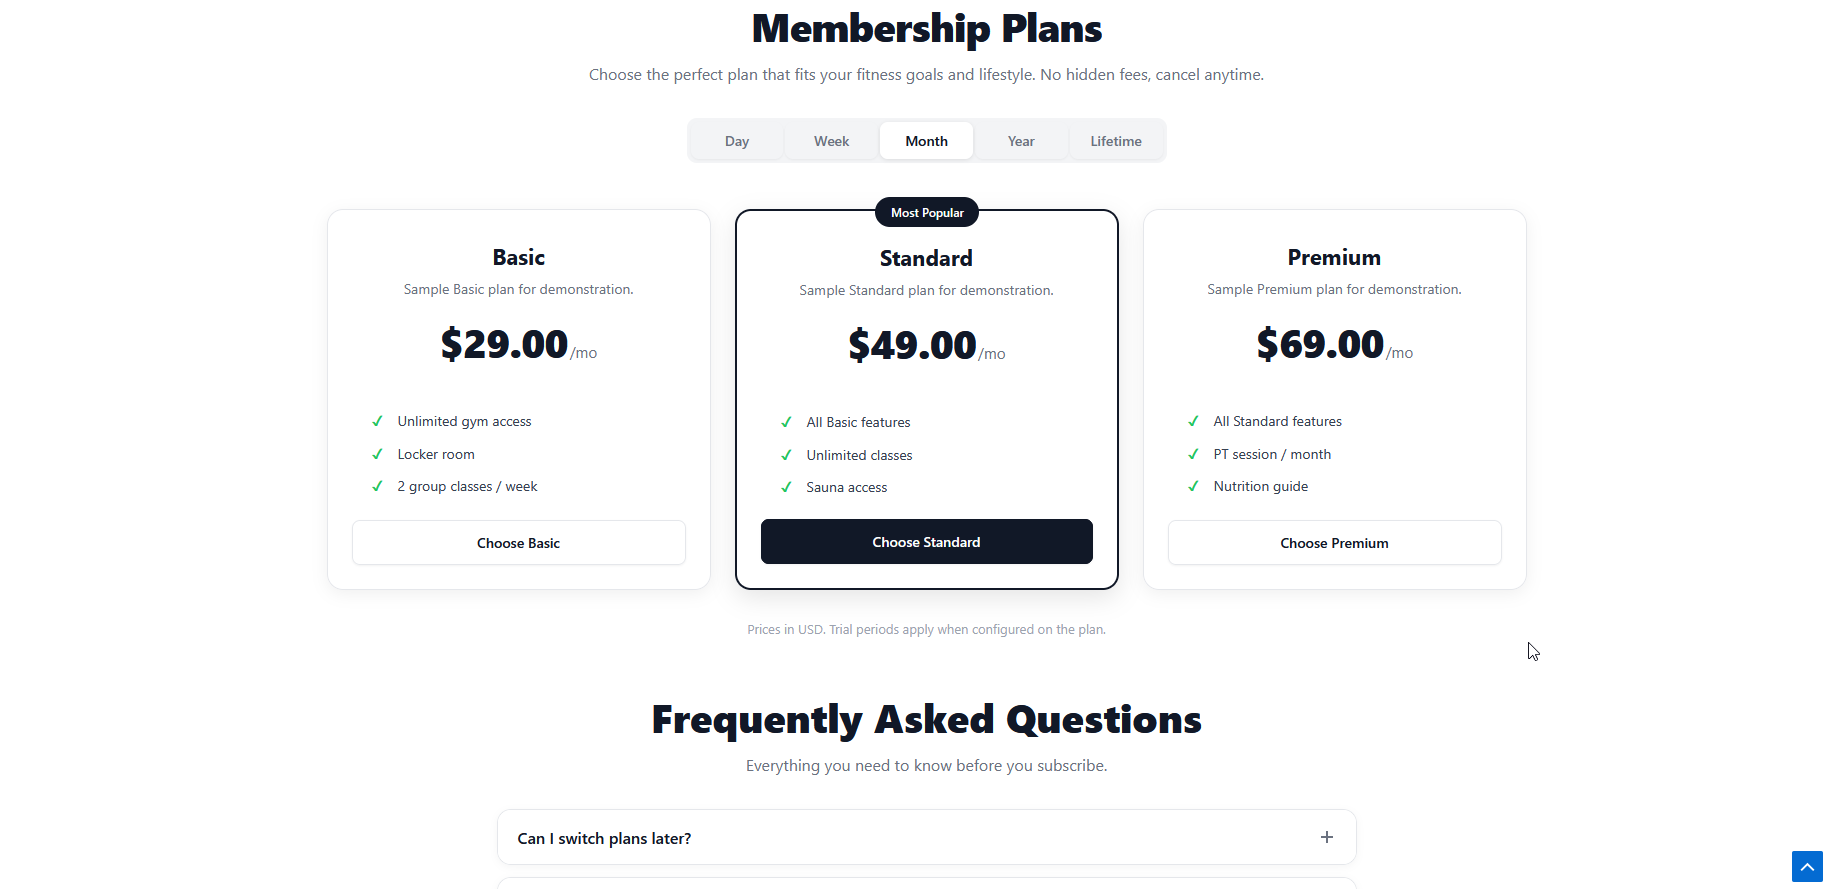
Figure 25 — Frontend membership plans and FAQ.
18. Pro Add-on
Premium features ship in a separate add-on (not included in the free plugin). Install and activate Subscription Manager Plus Pro to unlock the screens below.
Advanced reports
Custom date ranges, branch/plan/customer filters, Search report, and CSV export.
Staff & Roles
Staff management with module-based permissions.
Email branding
Header logo, colors, alignment, and custom footer text on customer emails.
PDF invoices
Branded PDF generation with logo, footer notes, and email attachments.
Automated reminders
Renewal, payment failed, and overdue reminder notification settings.
18.1 Advanced Reports
Filter reports by date range, branch, plan, and customer, then run Search report or download a Export CSV of the filtered results.
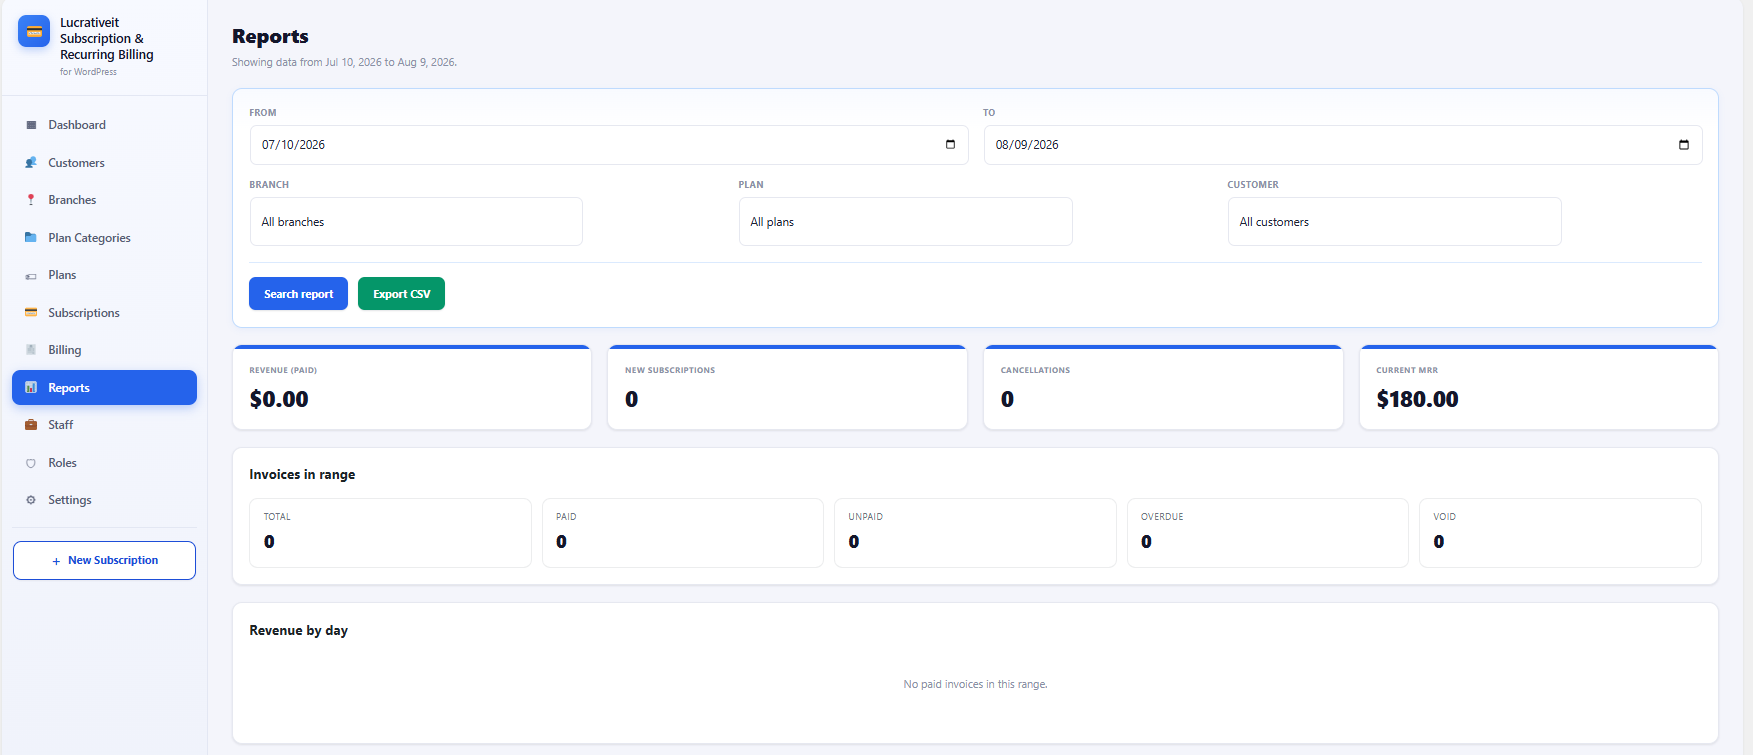
Figure 26 — Pro Advanced Reports (custom range, filters, Search report, CSV export).
18.2 Roles & Permissions
Create roles with module-level view/manage access for Staff, Billing, Plans, Settings, and more. Assign roles to staff so each team member only sees what they need.
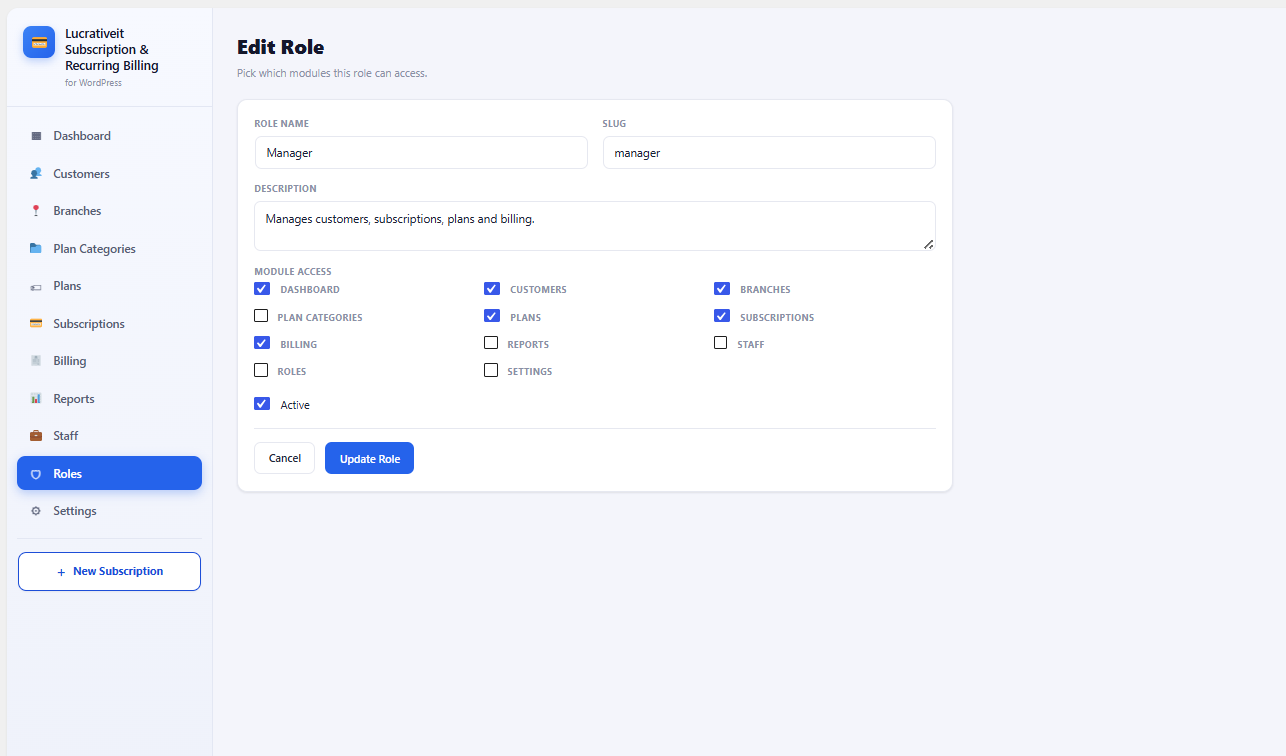
Figure 27 — Pro Roles & permissions.
18.3 Email Branding
Upload a header logo, set width and alignment, choose header colors, and customize footer text so every invoice and notification matches your brand.
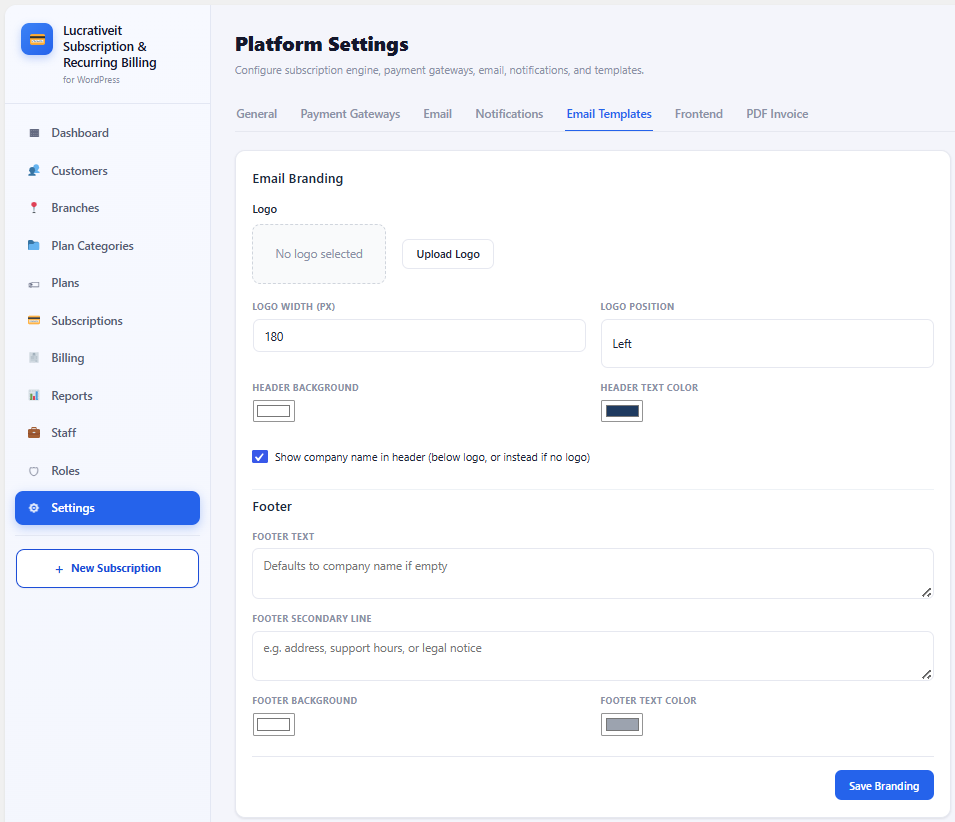
Figure 28 — Pro Email branding.
18.4 PDF Invoices
Generate branded PDF invoices with logo, footer, notes, and business details. Optionally attach PDFs to payment and receipt emails.
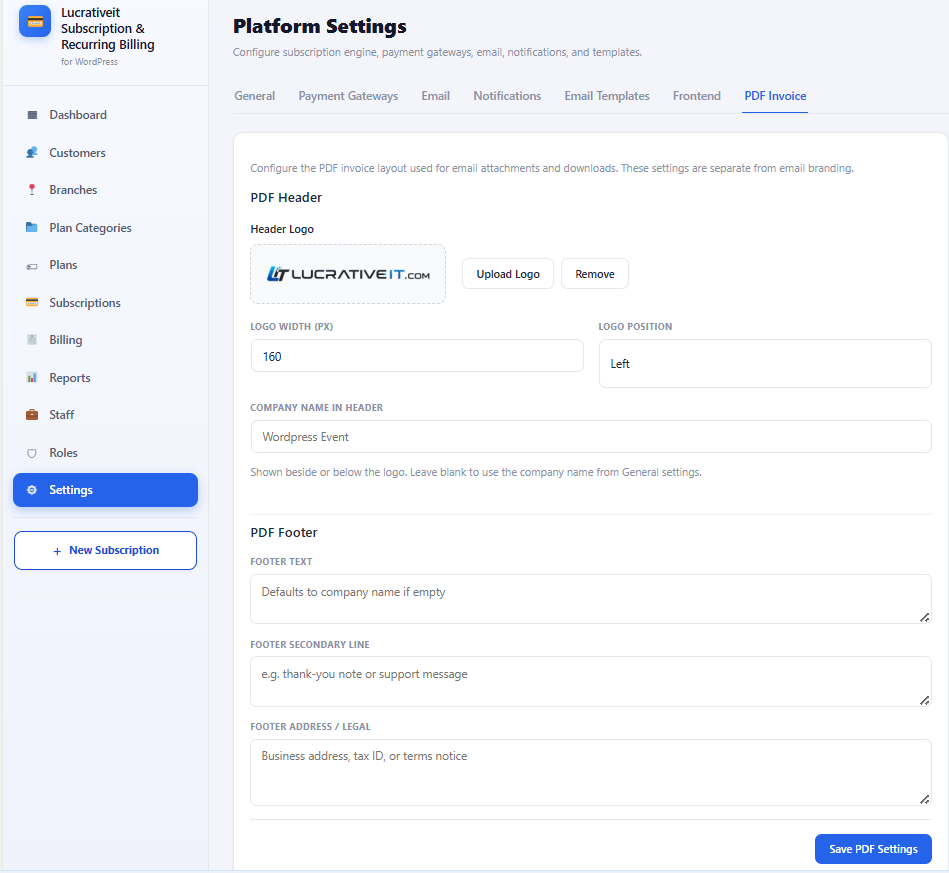
Figure 29 — Pro PDF invoices.
18.5 Automated Reminders
Configure renewal, payment-failed, and overdue reminder emails beyond the core invoice / payment / activation notifications included in Free.
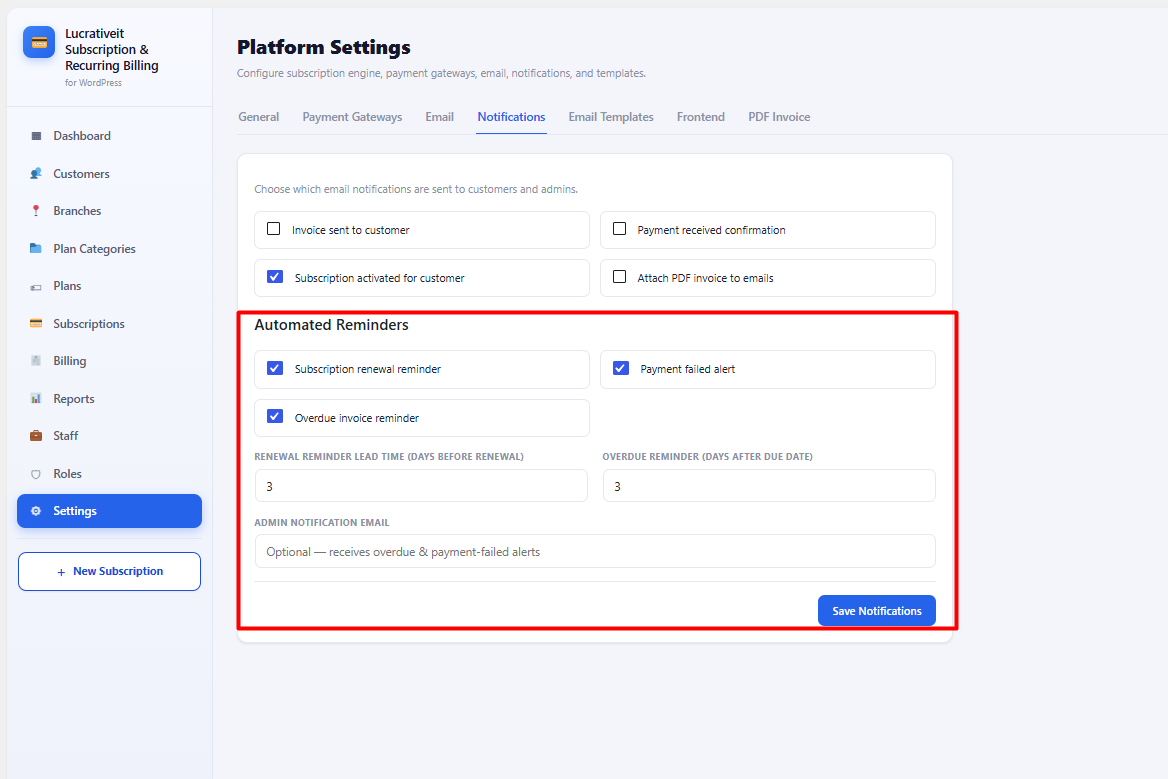
Figure 30 — Pro Automated reminders.
Live demo: wpbillify.lucrativeit.com · Product page: Get Premium Update · Author: Lucrativeit