Support Ticket Plus — Product Documentation
Support Ticket Plus is a WordPress help desk plugin for managing customer support from ticket creation through resolution. Customers use a public support portal (with optional guest ticketing and magic-link access); staff manage tickets from WordPress admin or the same portal.
1. Installation
Requirements
| Requirement | Minimum |
|---|---|
| WordPress | 6.2+ |
| PHP | 8.2+ |
Step-by-step install
-
Upload the plugin folder to:
Or install the ZIP from Plugins → Add New → Upload Plugin.wp-content/plugins/lucrativeit-support-ticket-plus/ - Go to Plugins in WordPress admin and click Activate on LucrativeIt Support Ticket Plus.
-
On activation, the plugin creates a Support Portal page with the shortcode:
[lucrativeit_support_portal] - Open Pages → All Pages, find Support Portal, and click View. Add that page to your menu under Appearance → Menus so customers can find it.
- Configure the basics under Support Ticket Plus → Settings:
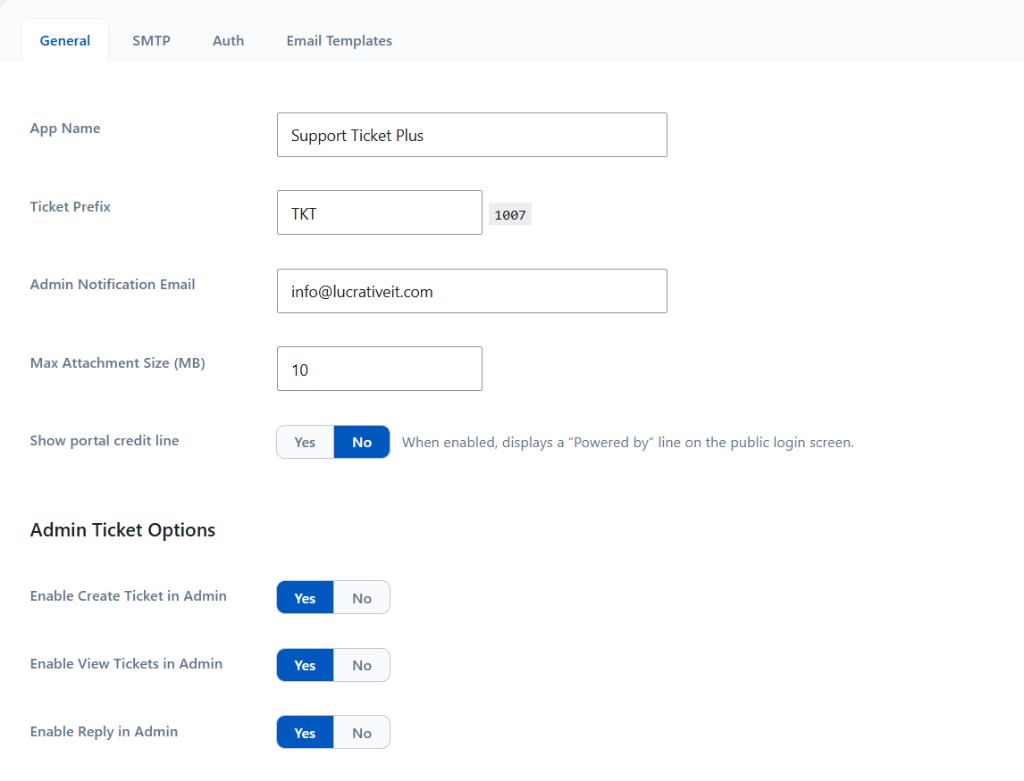
Settings → General
| Setting | Purpose |
|---|---|
| App Name | Display name on the portal (e.g. Support Ticket Plus) |
| Ticket Prefix | Prefix for ticket IDs (e.g. TKT → #TKT-1007) |
| Admin Notification Email | Where staff alerts are sent |
| Max Attachment Size (MB) | Upload limit for ticket files |
| Allow Guest Tickets | Let visitors submit tickets with name and email without logging in |
| Enable Turnstile for Guest Tickets | Show Cloudflare Turnstile CAPTCHA on the guest form |
| Site Key / Secret Key | Cloudflare Turnstile keys (secret stored encrypted) |
| Admin Ticket Options | Toggle create / view / reply in WordPress admin |
- Create departments under Support Ticket Plus → Departments so tickets can be routed correctly:
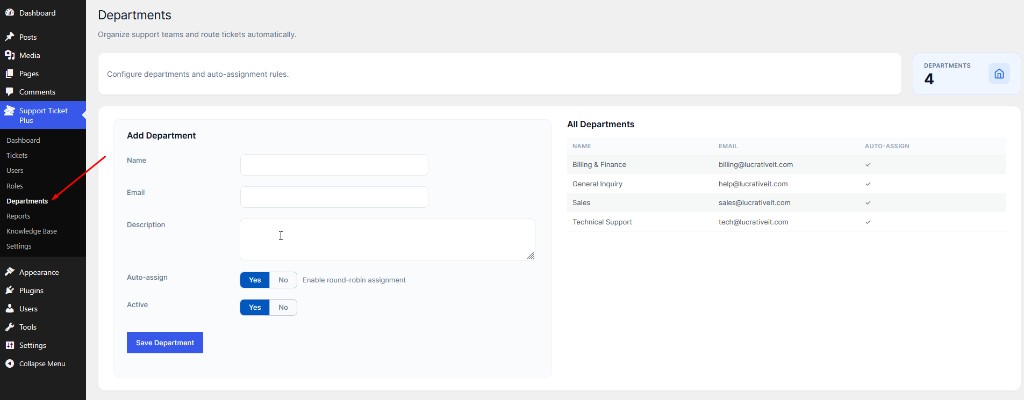
Departments with auto-assign (round-robin)
Enable Auto-assign for round-robin distribution among agents in that department.
- (Optional) Grant staff permissions under Support Ticket Plus → Roles. Every logged-in user is a customer by default. Grant the Tickets permission to a WordPress role (for example Editor) to make those users support agents.
Manual portal page (if needed)
If the Support Portal page was deleted:
- Pages → Add New
- Add the shortcode
[lucrativeit_support_portal] - Publish and link it from your menu
Knowledge base only (optional):
[lucrativeit_knowledge_base]2. Enable registration
Customers can open tickets with a registered account, or as a guest without logging in (see section 2.1). For registered users, sign-up is controlled in two places — both must allow registrations.
A. WordPress membership (required)
- Go to Settings → General (WordPress core settings, not the plugin).
- Enable Membership → Anyone can register.
- Save changes.
Without this, WordPress rejects new accounts even if the plugin Register button is visible.
B. Plugin Auth setting
- Go to Support Ticket Plus → Settings → Auth.
- Set Allow Registration to Yes.
- Click Save Changes.
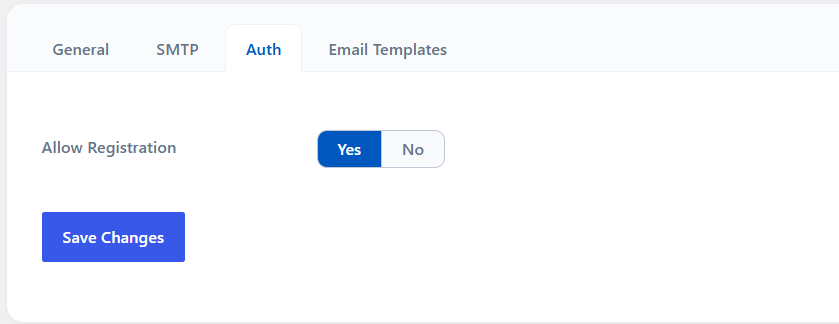
Settings → Auth → Allow Registration
What customers see
Visitors who open the support portal while logged out see a login prompt. With registration enabled, they also get a Register option (modal on the portal).
- New accounts receive the Subscriber role.
- They can create and view their own tickets only.
- Login details are emailed after registration (SMTP must be configured for reliable delivery).
To promote a user to support staff, grant their WordPress role the Tickets permission under Support Ticket Plus → Roles.
2.1 Guest tickets (no login required)
When Allow Guest Tickets is enabled under Settings → General → Portal Access (on by default), visitors can submit a support request without creating an account or logging in.
What the visitor sees
On the portal login screen, a Submit a Ticket as Guest link appears below the Register option:
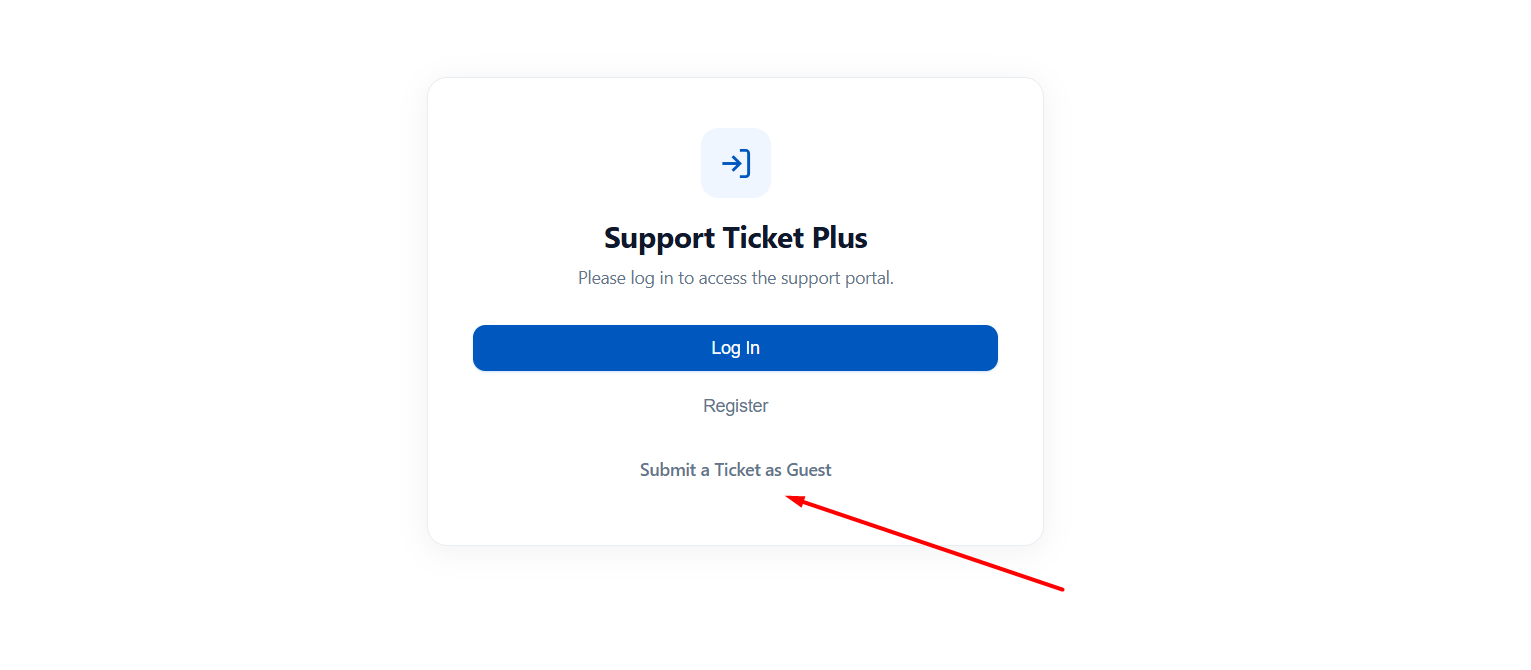
Portal login — guest ticket entry point
Guest create-ticket flow
- Click Submit a Ticket as Guest.
- Enter Your Name and Email (required).
- Complete the standard ticket fields: subject, order number (optional), department, priority, description, and attachments.
- Complete the Turnstile CAPTCHA if enabled (see section 2.2).
- Click Submit Ticket.
The footer note reads: We will email you a confirmation and a secure link to track this ticket.
What happens after submit
- A customer account is created automatically when needed.
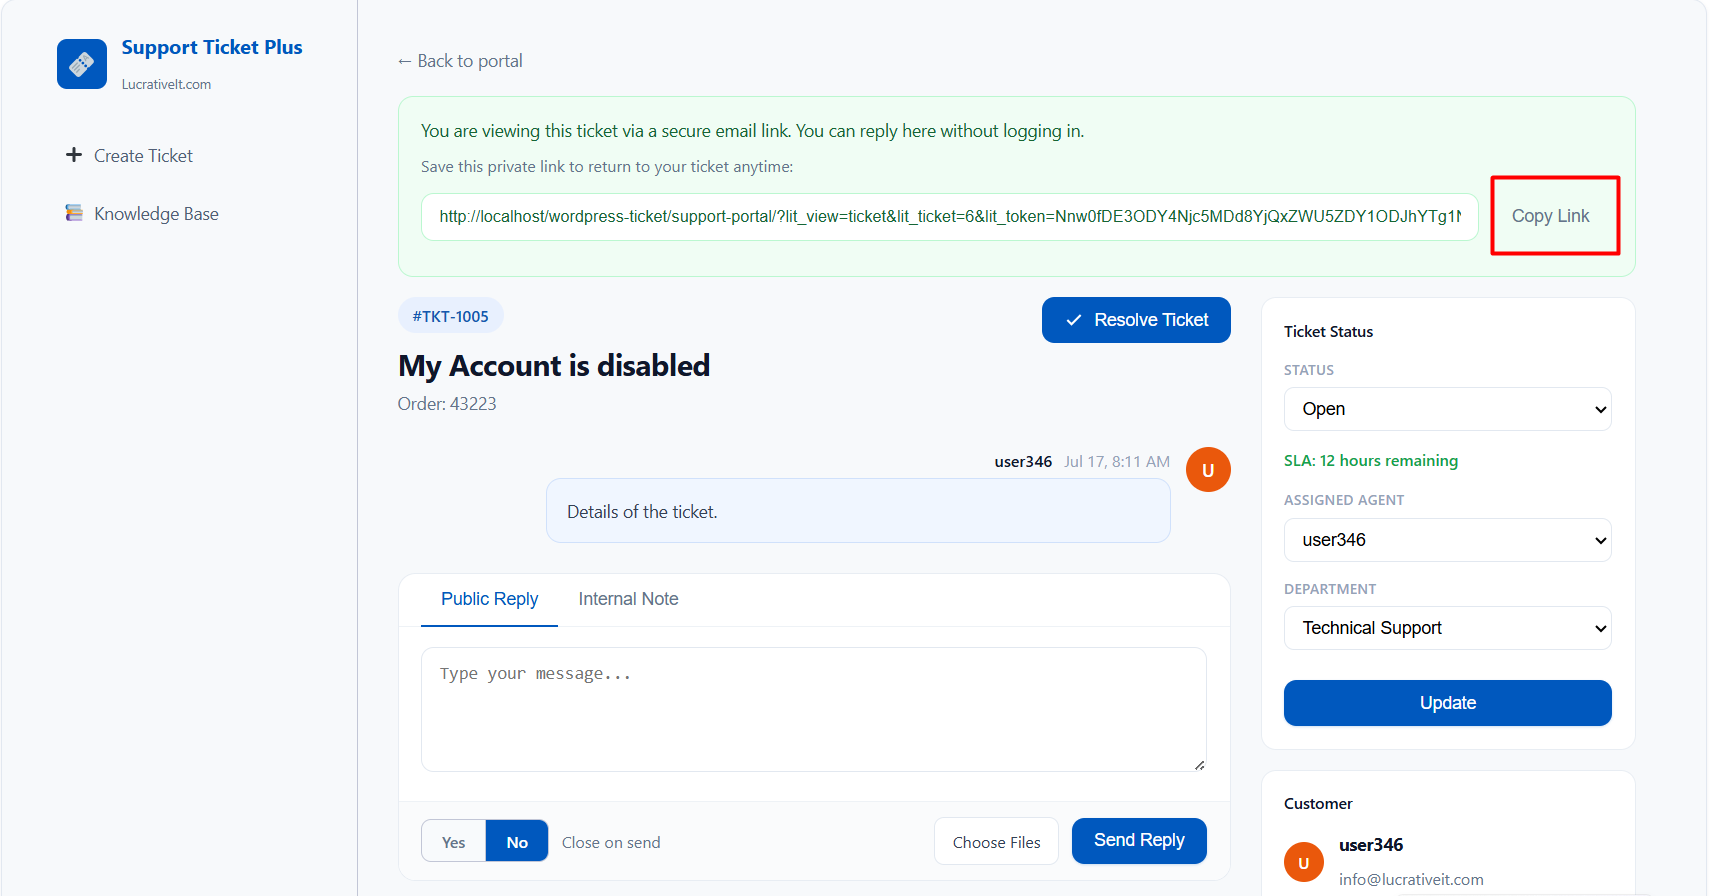
- The guest is redirected to the ticket page via a signed magic link (see section 5.1).
- A confirmation email with the same link is sent (requires SMTP).
Disable guest tickets
Set Allow Guest Tickets to No under Settings → General. Visitors must then log in or register to submit tickets.
2.2 Cloudflare Turnstile CAPTCHA
Protect the guest create-ticket form from spam with Cloudflare Turnstile — a free CAPTCHA alternative. Turnstile applies to guest submissions only; logged-in users do not see it.
Configure Turnstile
- Create a Turnstile widget in the Cloudflare dashboard and copy the Site Key and Secret Key.
- Go to Support Ticket Plus → Settings → General.
- Under Cloudflare Turnstile, set Enable Turnstile for Guest Tickets to Yes.
- Paste the Site Key and Secret Key.
- Click Save Changes.
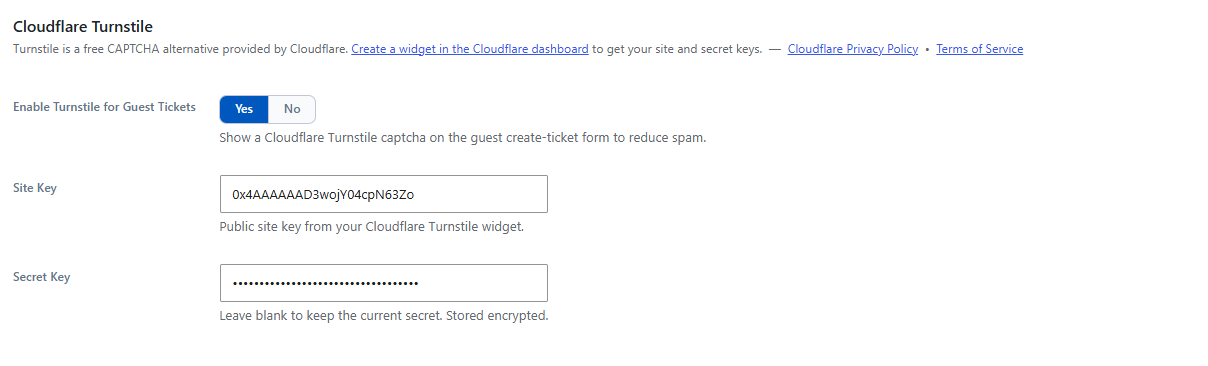
Settings → General — Cloudflare Turnstile
| Setting | Purpose |
|---|---|
| Enable Turnstile for Guest Tickets | Show the CAPTCHA widget on the guest create-ticket form |
| Site Key | Public key from your Cloudflare Turnstile widget |
| Secret Key | Private key; stored encrypted. Leave blank to keep the current secret. |
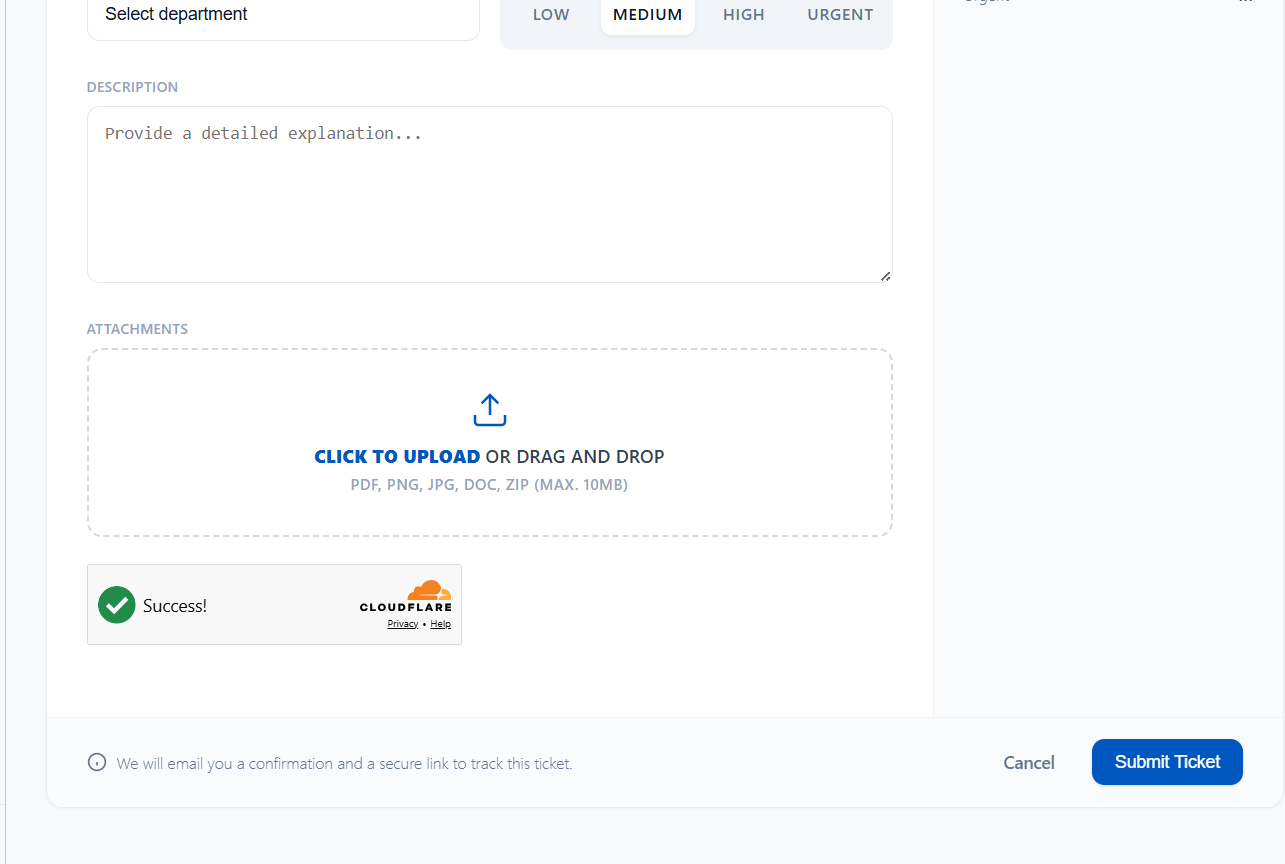
Guest create-ticket form with Turnstile verification
If verification fails, the form redisplays with: Please complete the captcha verification and try again.
3. Why SMTP and how to configure it
Why SMTP matters
WordPress’s default mail() function often fails on shared hosting or lands in spam. Support Ticket Plus sends email for:
- Registration confirmation and login details
- New ticket alerts to admins and agents
- Reply notifications to customers and staff
- Status and assignment updates
SMTP uses your mail provider’s authenticated server so messages are delivered reliably and appear from your brand address.
How to configure SMTP
- Go to Support Ticket Plus → Settings → SMTP.
- Fill in the fields from your mail provider (Gmail, Microsoft 365, cPanel, SendGrid, etc.).
- Click Save Changes.
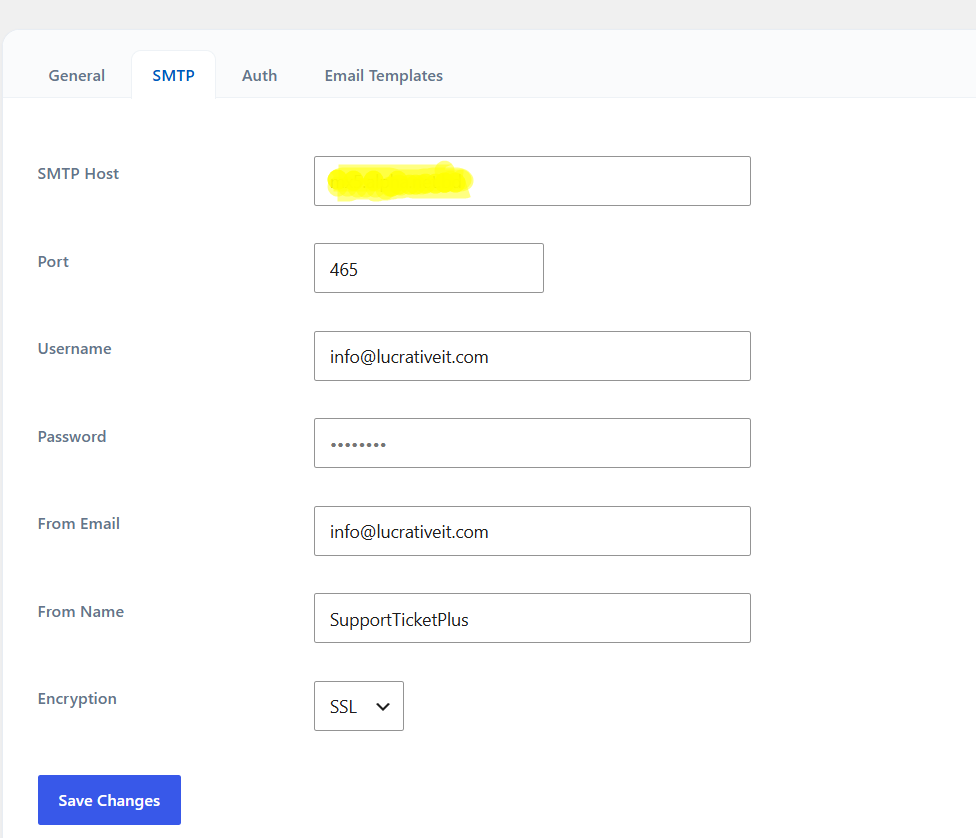
Settings → SMTP
| Field | Example | Notes |
|---|---|---|
| SMTP Host | smtp.yourdomain.com or smtp.gmail.com | From your provider |
| Port | 465 (SSL) or 587 (TLS) | Match encryption |
| Username | info@yourdomain.com | Usually the full email |
| Password | App password or mailbox password | Prefer app passwords for Gmail |
| From Email | info@yourdomain.com | Sender address customers see |
| From Name | Support Ticket Plus | Display name in the inbox |
| Encryption | SSL or TLS | SSL → port 465; TLS → port 587 |
Recommended checklist
- Use a real mailbox or transactional email service on your domain.
- For Gmail, create a Google App Password (not your normal password).
- Set Admin Notification Email under Settings → General so staff receive alerts.
- Customize message content under Settings → Email Templates.
4. Create a ticket
Customer portal (logged in)
- Open the Support Portal page and log in.
- Click Create Ticket in the sidebar, or New Ticket on the dashboard.
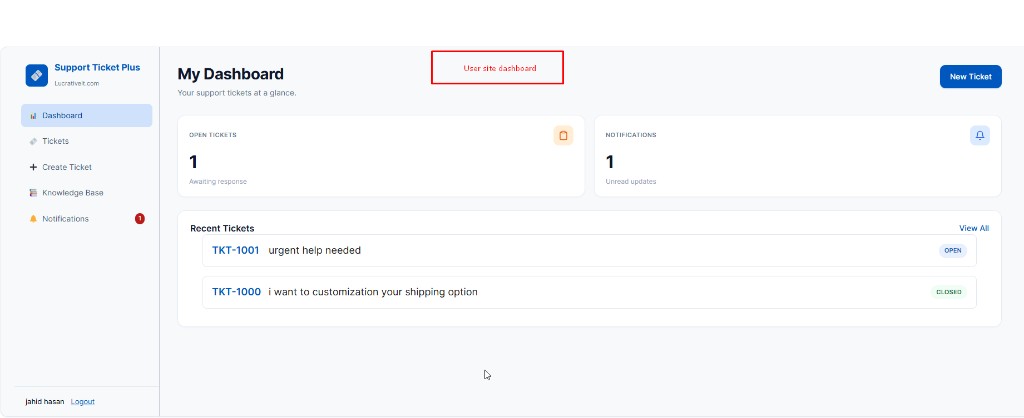
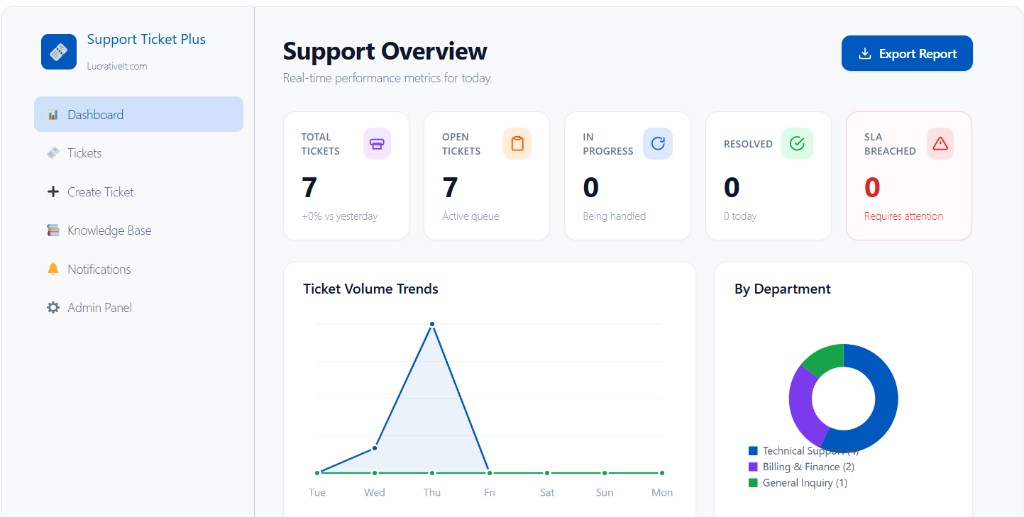
Customer portal dashboard
Complete the form:
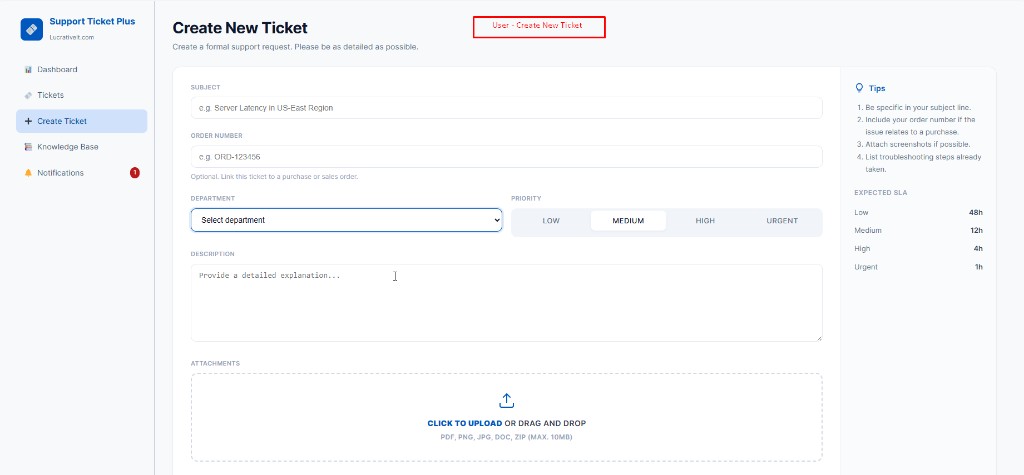
Create New Ticket form
| Field | Description |
|---|---|
| Subject | Short summary of the issue |
| Order Number | Optional link to a purchase (e.g. ORD-123456) |
| Department | Routes the ticket to the right team |
| Priority | Low, Medium, High, or Urgent (SLA targets shown on the form) |
| Description | Full details of the problem |
| Attachments | PDF, PNG, JPG, DOC, ZIP (size limited by settings, default 10 MB) |
Submit the ticket. It receives an ID such as #TKT-1001 and appears under My Tickets.
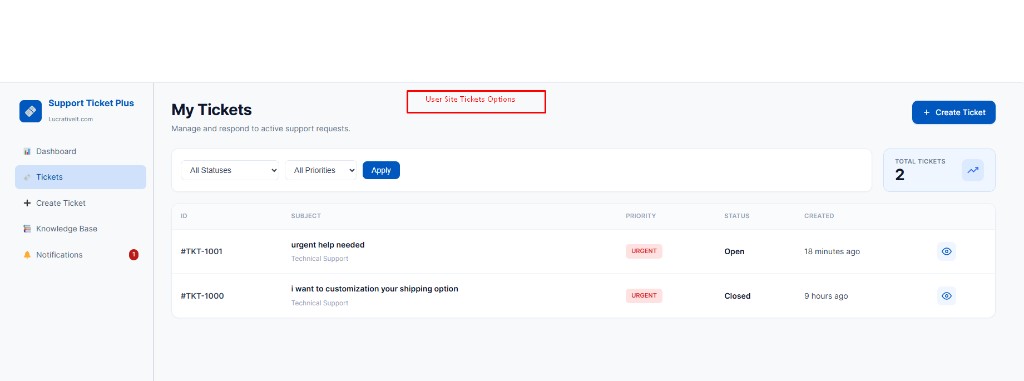
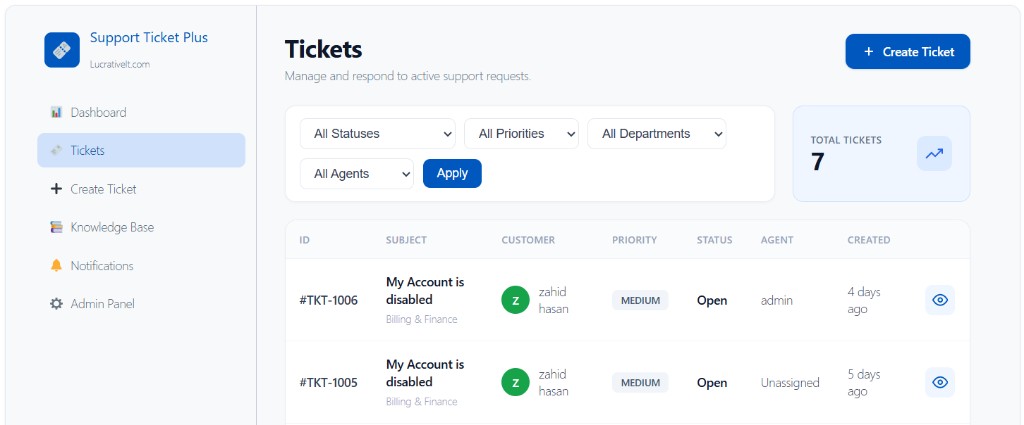
My Tickets list
Guest (no login)
Guests use the same create-ticket form with additional Your Name and Email fields. See section 2.1 for the full guest workflow, Turnstile CAPTCHA, and magic link access after submit.
Staff / admin
Agents can create tickets from:
- The portal Create Ticket page (same form), or
- Support Ticket Plus → Tickets → + Create Ticket in WordPress admin (if Enable Create Ticket in Admin is on under General settings)
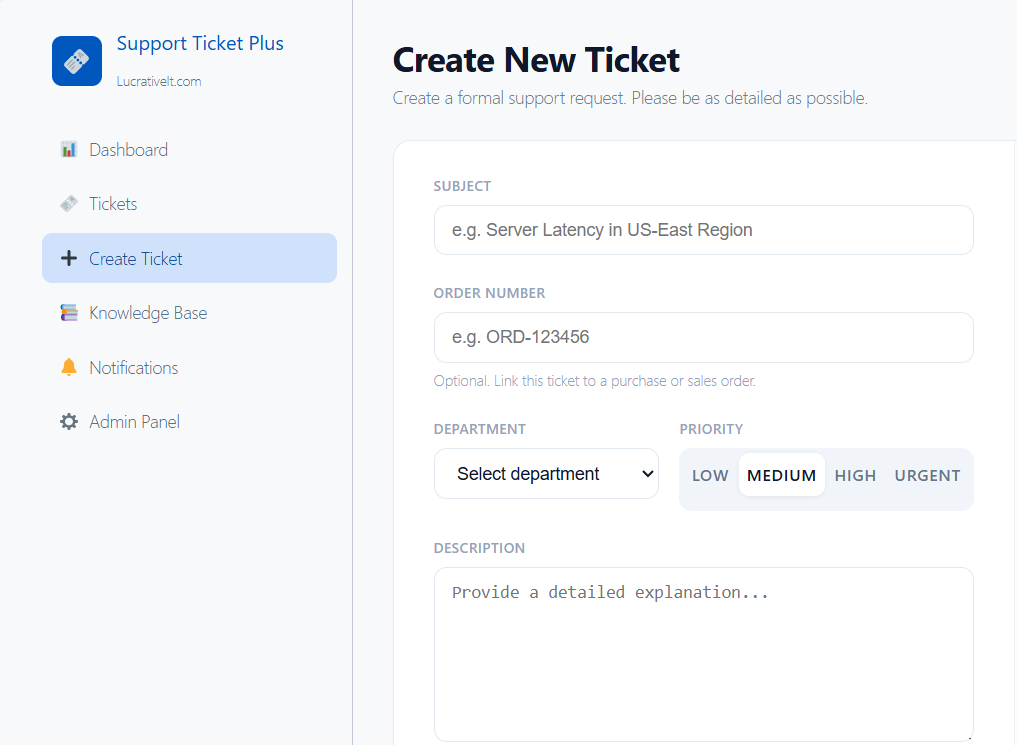
Staff create-ticket view
6. Notifications
Support Ticket Plus uses in-app notifications and email (via SMTP).
In-app notifications (portal)
- Open Notifications in the portal sidebar.
- Unread items show a red badge on the menu and an UNREAD count on the page.
- Example: Agent replied on ticket TKT-1000.
- Click the eye icon to open the related ticket, or Mark All Read to clear the list.
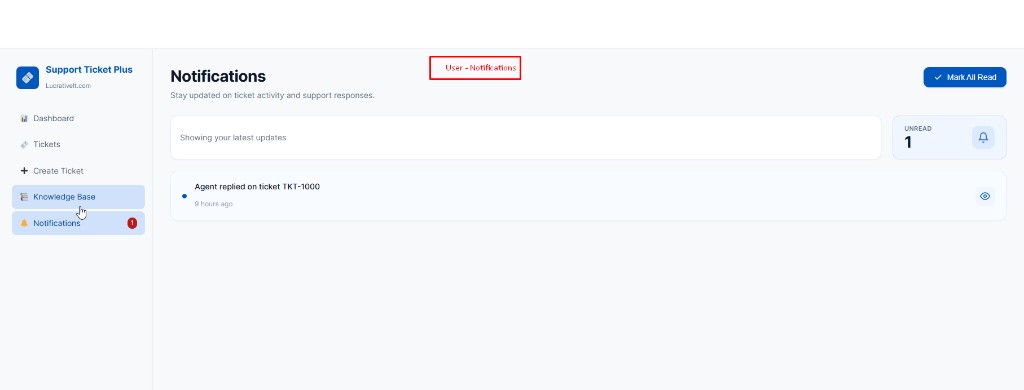
Portal notifications center
Email notifications
When SMTP is configured, the plugin can email customers and staff for events such as:
- Ticket created
- New public reply
- Assignment and status changes
Configure:
| Location | What to set |
|---|---|
| Settings → General | Admin Notification Email |
| Settings → SMTP | Delivery server |
| Settings → Email Templates | Subject and body for each event |
6.1 Email templates & branding PRO
With Lucrative Support Ticket Pro active, Support Ticket Plus → Settings → Email Templates opens the full email template manager. Without Pro, the same tab shows a notice and only basic subject/body fields per template.
The manager has two layers:
- Email header & branding — a shared HTML wrapper applied to every notification email.
- Per-event templates — subject lines and body copy for each notification type.
Configure SMTP first (section 3) so preview and test emails can be delivered.
Email header & branding
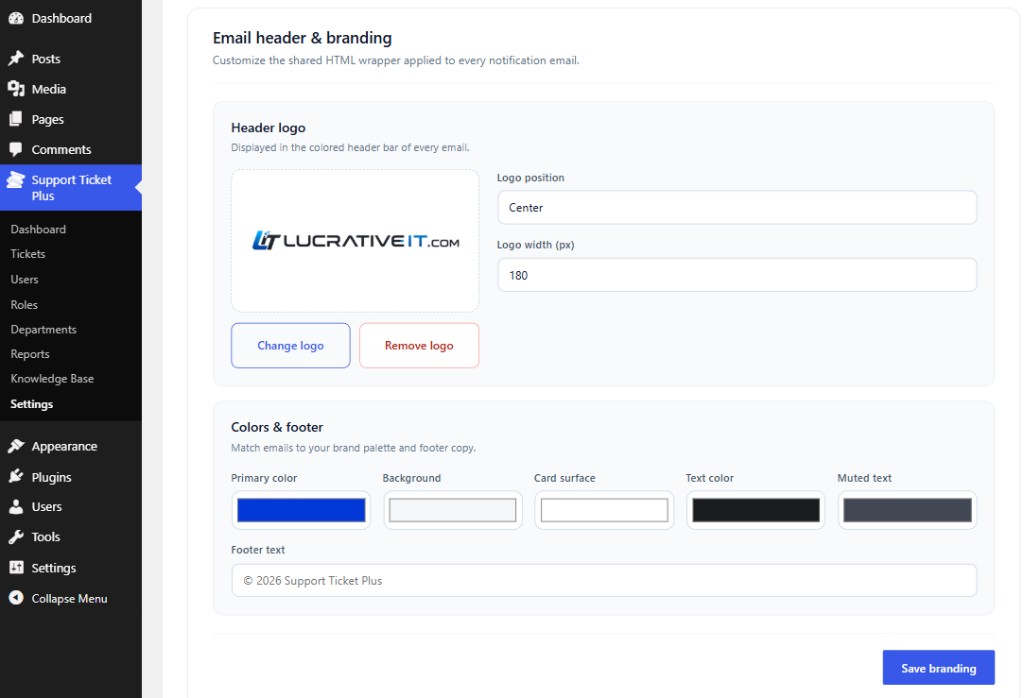
Settings → Email Templates — header logo, colors, and footer
This section controls the look of the outer email shell (header bar, colors, and footer). Changes apply to all notification emails, not just one template.
| Setting | Purpose |
|---|---|
| Header logo | Upload or change the image shown in the colored header bar. Use Remove logo to fall back to the App Name text from General settings. |
| Logo position | Align the logo Left, Center, or Right in the header. |
| Logo width (px) | Set logo width from 40–600 px (default 180). |
| Primary color | Background of the header bar (default #0058be). |
| Background | Outer email background behind the card (default #f4f6f8). |
| Card surface | Main content card background (default #ffffff). |
| Text color | Body text inside the card (default #191c1e). |
| Muted text | Footer and secondary text (default #424754). |
| Footer text | Custom footer copy. Leave blank to use © {year} {company}. |
Click Save branding to store these settings. They are independent of individual template saves.
Notification templates
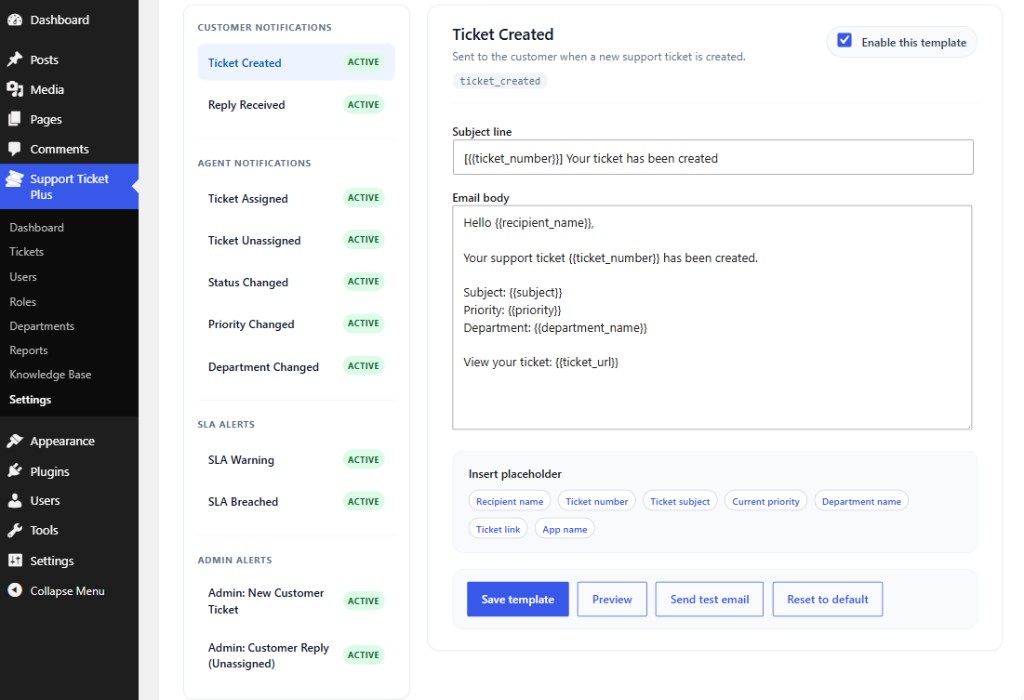
Per-event templates with sidebar navigation and merge tags
Use the left sidebar to pick a template. Templates are grouped by audience:
| Group | Templates | When sent |
|---|---|---|
| Customer notifications | Ticket Created, Reply Received | Customer creates a ticket or receives a public reply |
| Agent notifications | Ticket Assigned, Ticket Unassigned, Status Changed, Priority Changed, Department Changed | Assignment or ticket field updates affecting agents |
| SLA alerts | SLA Warning, SLA Breached | Approaching or missed SLA deadline |
| Admin alerts | Admin: New Customer Ticket, Admin: Customer Reply (Unassigned) | New ticket or customer reply on an unassigned ticket |
Each template editor includes:
| Control | Description |
|---|---|
| Enable this template | Turn the notification on or off without deleting custom copy. Disabled templates are not sent. |
| Subject line | Email subject. Supports placeholders (see below). |
| Email body | Plain-text message inserted into the branded HTML wrapper. Line breaks are preserved. |
| Insert placeholder | Click a tag to insert {{placeholder}} into the focused subject or body field. Available tags vary by template. |
| Save template | Save subject, body, and enabled state for the selected template only. |
| Preview | Render a live HTML preview with sample data and current branding. |
| Send test email | Send a sample to your logged-in WordPress user email using the current subject and body. |
| Reset to default | Restore the built-in subject and body for this template. |
Placeholders (merge tags)
Use double curly braces in the subject or body. They are replaced when the email is sent.
| Placeholder | Replaced with |
|---|---|
{{recipient_name}} | Name of the person receiving the email |
{{ticket_number}} | Ticket ID (e.g. TKT-1001) |
{{subject}} | Ticket subject line |
{{status}} / {{old_status}} | Current or previous status |
{{priority}} / {{old_priority}} | Current or previous priority |
{{department_name}} / {{old_department_name}} | Current or previous department |
{{customer_name}} | Ticket owner |
{{agent_name}} | Assigned agent |
{{assigner_name}} | User who assigned the ticket |
{{actor_name}} | User who changed status, priority, or department |
{{replier_name}} | User who posted the reply |
{{message}} | Reply body text |
{{ticket_url}} | Link to open the ticket in the portal |
{{sla_deadline}} | Formatted SLA due date/time |
{{app_name}} | App Name from General settings |
Example — Ticket Created subject:
[{{ticket_number}}] Your ticket has been createdExample — Ticket Created body:
Hello {{recipient_name}},

Your support ticket {{ticket_number}} has been created.

Subject: {{subject}}
Priority: {{priority}}
Department: {{department_name}}

View your ticket: {{ticket_url}}
Recommended workflow
- Set Email header & branding to match your site (logo, colors, footer).
- Click Preview on a template to confirm the wrapper looks correct.
- Customize subject and body per notification type.
- Use Send test email to verify delivery and formatting in a real inbox.
- Disable any template you do not want sent using Enable this template.
7. Pro features PRO
Install the optional add-on Lucrative Support Ticket Pro (lucrativeit-support-ticket-pro)
after Support Ticket Plus is active. Pro adds email-to-ticket, Gmail inbound, AI reply suggestions, and Google login.
Purchase Pro.
7.1 Custom SMTP (included in Plus)
Built-in SMTP (see section 3) is part of Support Ticket Plus so outbound mail works without a third-party SMTP plugin.
7.2 Email Ticketing PRO
Turn inbound email into tickets and thread replies into existing conversations.
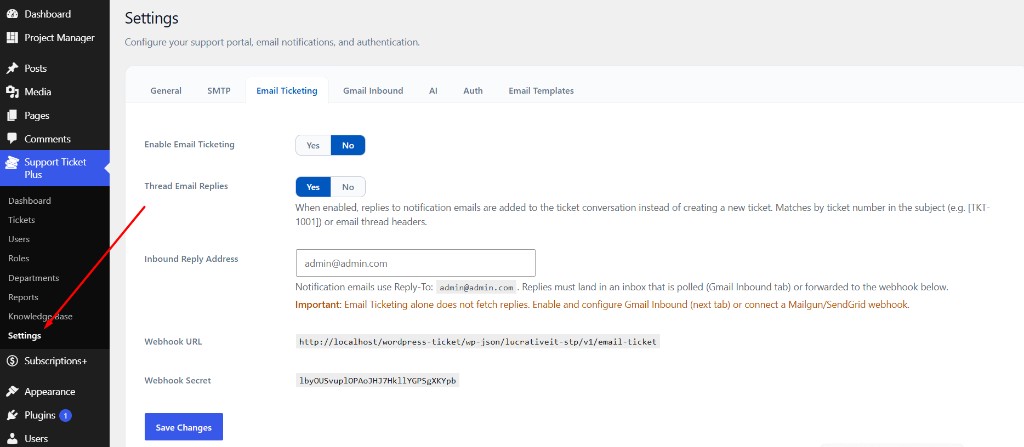
Settings → Email Ticketing
- Go to Support Ticket Plus → Settings → Email Ticketing.
- Set Enable Email Ticketing to Yes.
- Keep Thread Email Replies on Yes so replies with
[TKT-1001](or matching thread headers) attach to the same ticket instead of creating a new one. - Set Inbound Reply Address (used as
Reply-Toon notification emails). - Copy the Webhook URL and Webhook Secret into Mailgun, SendGrid, or another inbound provider.
7.3 Gmail Inbound PRO
Poll a Gmail inbox and pull replies into tickets.
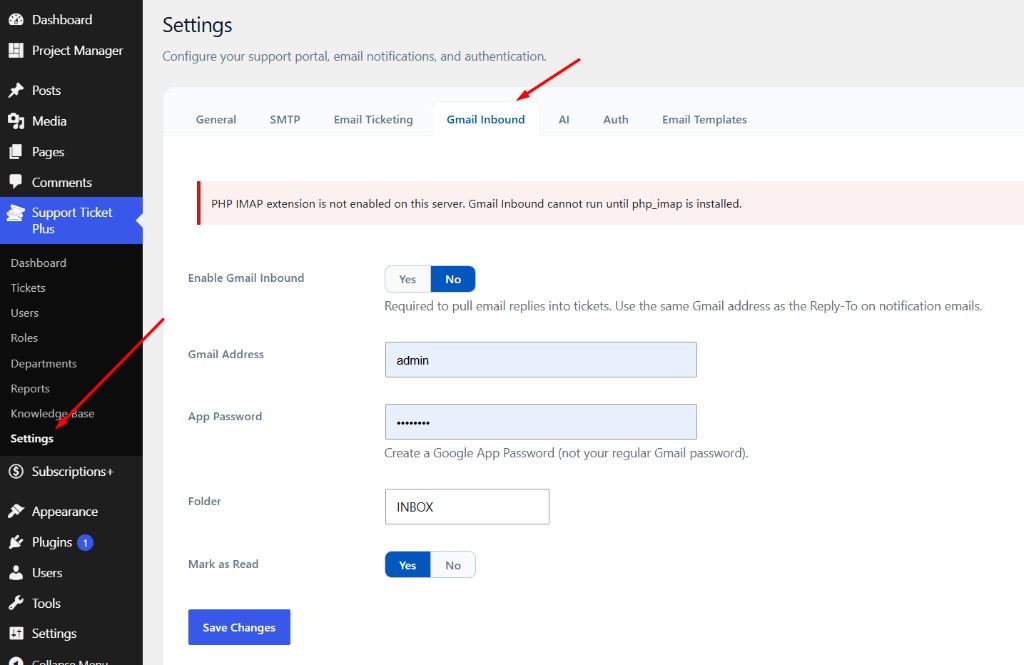
Settings → Gmail Inbound
- Enable the PHP IMAP extension on the server (
php_imap). Without it, Gmail Inbound cannot run. - Go to Settings → Gmail Inbound.
- Set Enable Gmail Inbound to Yes.
- Enter the Gmail Address (same address used as Reply-To when possible).
- Enter a Google App Password (not the normal Gmail password).
- Set Folder (usually
INBOX) and optionally Mark as Read. - Save changes.
WP-Cron polls Gmail about once per minute by default. On production sites, use a real server cron hitting wp-cron.php.
7.4 AI reply suggestions PRO
Help agents draft replies faster with an AI provider.
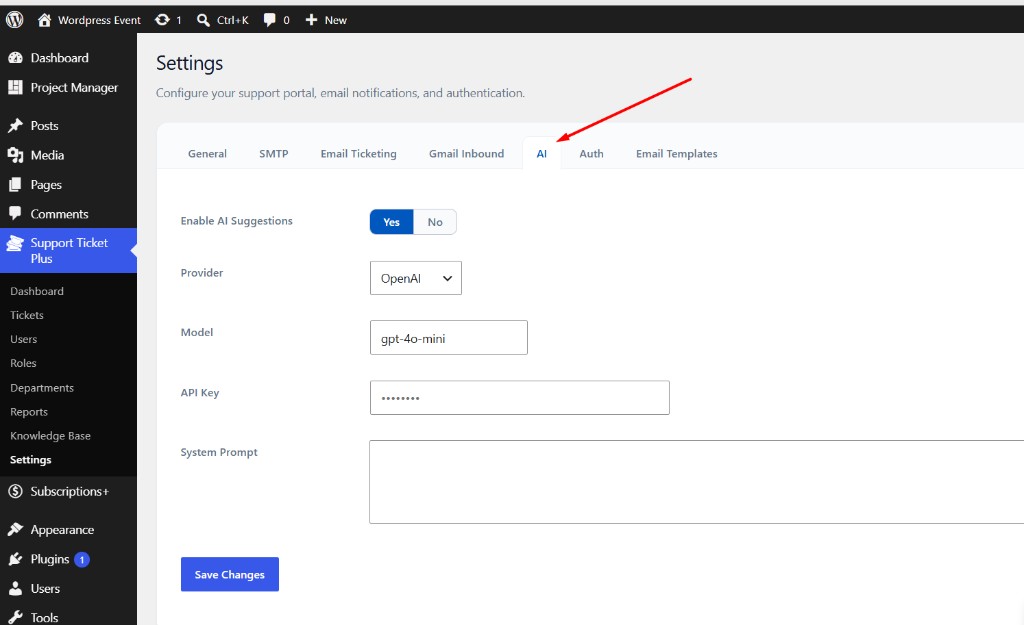
Settings → AI
- Go to Settings → AI.
- Set Enable AI Suggestions to Yes.
- Choose Provider (e.g. OpenAI).
- Set Model (e.g.
gpt-4o-mini). - Enter your API Key.
- Optionally add a System Prompt to match your support tone.
- Save. Agents see AI tools in the ticket reply composer.
7.5 Other Pro capabilities
| Feature | Description |
|---|---|
| Google login | Optional sign-in via Google on the Auth settings tab |
| Email template manager | Branding, preview, merge tags, test emails — see section 6.1 |
| Webhook email-to-ticket | REST endpoint for Mailgun / SendGrid inbound |
| Threaded email replies | Customer replies by email stay on the same ticket |
Plus features worth highlighting
These ship with Support Ticket Plus (no Pro required):
| Feature | Where |
|---|---|
| SLA tracking & breach alerts | Dashboard, Reports, create-ticket SLA table |
| Departments & round-robin auto-assign | Departments |
| Knowledge Base | Portal Knowledge Base / admin KB |
| Guest tickets & magic links | Settings → General → Allow Guest Tickets |
| Turnstile CAPTCHA | Settings → General → Cloudflare Turnstile |
| Reports (volume, SLA, agent performance) | Reports |
| Roles & permissions on existing WP roles | Roles |
| File attachments | Create / reply forms |
| Email templates | Settings → Email Templates |
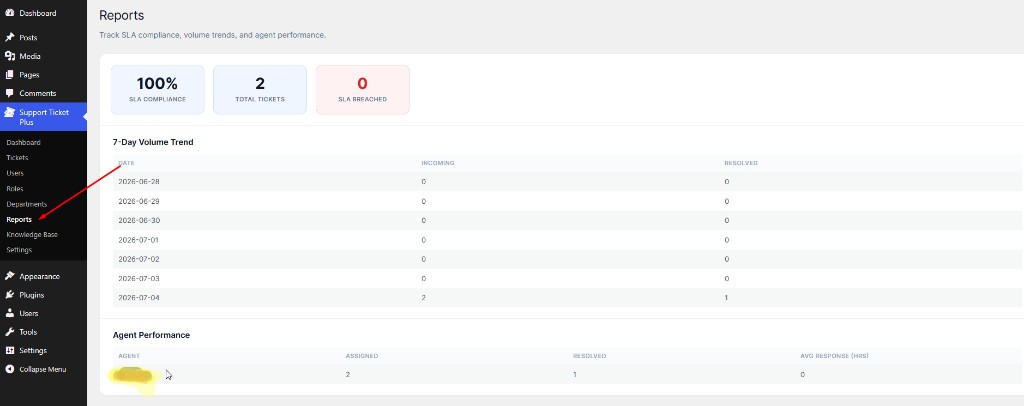
Reports — SLA and agent performance
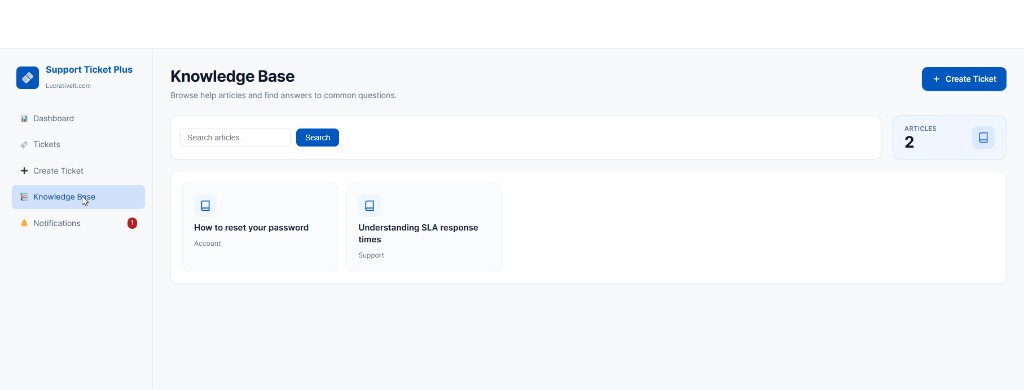
Customer Knowledge Base
8. Quick reference
Admin menu (WordPress)
| Menu item | Purpose |
|---|---|
| Dashboard | Metrics: total, open, in progress, resolved, SLA breached |
| Tickets | List, filter, view, reply |
| Users | Link to WordPress user management |
| Roles | Staff permissions per WordPress role |
| Departments | Teams, emails, auto-assign |
| Reports | SLA compliance, volume trends, agent performance |
| Knowledge Base | Self-service articles |
| Settings | General, SMTP, Auth, Email Templates (+ Pro tabs) |
Portal URLs (examples)
Replace the path with your portal page slug:
| View | URL pattern |
|---|---|
| Dashboard | /lucrativeit-support-ticket-plus/ |
| My tickets | ?lit_view=tickets |
| Create ticket | ?lit_view=create |
| Guest create ticket | ?lit_view=create (when not logged in and guest tickets enabled) |
| Guest ticket (magic link) | ?lit_view=ticket&lit_ticket=12&lit_token=… |
| Notifications | ?lit_view=notifications |
| Knowledge base | ?lit_view=knowledge-base |
| Single ticket | ?lit_view=ticket&lit_ticket=12 |
First-time setup checklist
- Activate Support Ticket Plus
- Confirm Support Portal page and menu link
- Configure Settings → General
- Enable Anyone can register (WordPress) and Allow Registration (Auth tab) — or use guest tickets instead
- Confirm Allow Guest Tickets is set as desired under Settings → General
- (Recommended) Enable Cloudflare Turnstile for guest spam protection
- Configure SMTP and send a test registration or ticket
- Create departments and assign agent roles
- (Optional) Install Pro for email ticketing, Gmail inbound, and AI